X-Cart:Special Offers
Contents
Overview
Key features
X-SpecialOffers allows you to create special offers. By special offers meant a variety of discounts and bonuses which customers can get under certain conditions. X-SpecialOffers does not impose any ready-made schemes, but provides you with extreme flexibility in defining bonuses/discounts and setting up conditions under which they will be made available to your customers.
- allows to create an unlimited number of special offers based on 5 combinable types of bonuses;
- allows to set up complex conditions defining when this or that special offer can be applied;
- informs customers about available special offers using promo blocks, ‘Special offers’ page and clickable ‘Special offer’ labels added to thumbnail images of products;
- detects situations in which a customer is eligible for getting discounts/bonuses;
- automatically applies bonuses to qualified orders (performs deduction of discounts and shipping charges; adds bonus points to customer accounts);
- provides optional bonuses (free products and memberships) to eligible customers;
- keeps the list of available offers up-to-date (automatically disables expired offers);
- provides customers with a means for managing earned bonuses (including a tool for converting bonus points to Gift Certificates).
Special offers
Special offers which can be created by means of X-SpecialOffers add-on module are extremely diverse. Each offer is supposed to give a customer some kind of bonus: a discount, some bonus points, a privileged membership, free products or free shipping. Bonuses may be combined within one special offer (for example, a customer may be offered both a discount and a membership for buying a specific amount of some product).
Customers become eligible for getting bonuses as a result of certain conditions being met. For example, you can create offers that will be applicable if a customer:
- buys a certain product/combination of products/product(s) from a certain category;
- belongs to a specific membership group;
- has a certain amount of bonus points;
- comes from a specific geographic location;
- orders products for a sum of money that is larger than a certain amount.
Conditions can be combined with one another to form complex conditions. It is possible to define a validity period for each of your special offers. Expired offers get disabled automatically.
Detailed information on how to create special offers is available in the chapter #Creating and Configuring Special Offers.
To see how special offers would appear to your customers please refer to X-Cart:Special Offers in Customer zone page.
Functional roles
The administrative part of X-SpecialOffers module is handled by the store administrators and providers.
In X-Cart GOLD and GOLD PLUS, the store admin/provider fully controls the work of the module:
- enables the module and adjusts the module settings,
- configures special offers (defines bonuses and conditions, creates promo-blocks, adjusts availability and duration for each offer),
- manages existing special offers,
- has access to information about the number of bonus points earned by specific customers and edits the number of bonus points if necessary.
In X-Cart PLATINUM and PRO, the store admin and provider(s) have different access privileges, so the functions performed by them in connection with X-SpecialOffers are not the same. The administrator installs and configures the module, while all the tasks related to configuring and managing special offers are performed by providers. The administrator also carries out the function of supervision, which enables him to edit the number of bonus points earned by the store users.
System requirements and installation
Starting with X-Cart v4.4.0, X-SpecialOffers is available as a built-in module in all X-Cart editions. It does not require installation and can be enabled in the Modules section of X-Cart Admin area.
For X-Cart versions 4.0.0-4.3.2, X-SpecialOffers is available as an add-on module which can be purchased separately. The instructions below will guide you through the process of installing the X-SpecialOffers add-on module in your store.
System requirements
To be able to successfully install and use the X-SpecialOffers module, you need a working copy of X-Cart GOLD or PRO v4.0.0-4.3.2 installed on your server. Make sure that the version of the module is the same as the version of the installed copy of X-Cart.
Installation
To install the module, take the following steps:
1. Download the module distributive from the File area/Software distributives. The file you need is named x-offers-x.y.z.tgz, where x, y and z are the numbers of the module version (must be the same as the version of your X-Cart).
2. Uncompress the archive file x-offers-x.y.z.tgz and copy the resulting files to the directory where your X-Cart is installed. The file INSTALL.X-OFFERS provides instructions for installing the module.
3. Run in the browser the installation script: http://www.yourhost.com/xcart_dir/install-xoffers.php
X-SpecialOffers installation wizard will be launched.
4. Enter your Auth code, read the License Agreement and, if you accept the terms and conditions of the License Agreement, click the Next button.
5. The installation script will copy the files and make all the necessary changes in the database.
Click on Next to proceed.
6. After the installation is completed, you will get a message informing you of the completion of the installation process.
Now you need to enable the module and configure it for work with your X-Cart based store.
Removal
To uninstall X-SpecialOffers, do the following:
- Launch the Installation Wizard (Point your browser at the location of your store with the addition of /install-xoffers.php)
- At the first step of the Installation Wizard (Step 1: License agreement), select the 'Un-install the module' radio button.
- Click the Next button.
- The Installation Wizard will remove the module files and deactivate the module (Step 2: Uninstalling the module). Click Next to proceed.
- Step 3: Uninstallation complete is the final step of the uninstallation process. It notifies you that the module has been successfully uninstalled.
Configuring the X-SpecialOffers module
1. Log in to the Admin area. Go to the ‘Modules’ section.
2. Enable the module Special Offers by selecting the checkbox next to it.
Click on Update at the bottom of the page.
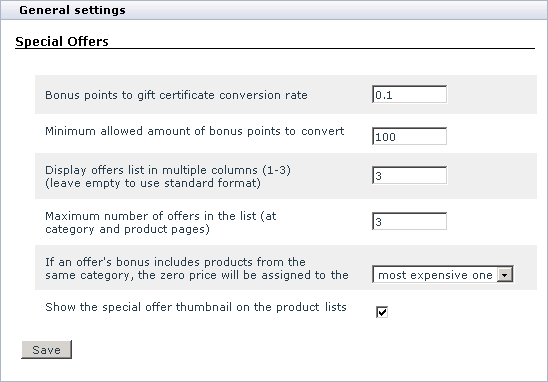
3. Go to the General settings/Special Offers options section and adjust the module settings:
- Bonus points to gift certificate conversion rate: Specify the conversion rate which should be used when converting bonus points to a gift certificate (The amount of the resulting GC will be calculated as the number of bonus points multiplied by the number entered into this field). For example, if the store currency is US dollars, the conversion rate is 0.1, and the customer has 100 bonus points, the GC amount will be $10 (100 bonus points x 0.1 = $10). Please note that bonus points will only be converted to a GC if their amount is larger or equal to the amount specified in the 'Minimum allowed amount of bonus points to convert'.
- Minimum allowed amount of bonus points to convert: Enter the minimum amount of bonus points which a customer can convert to a Gift Certificate.
- Display offers list in multiple columns (1-3): Specify how many columns you would like the short promo blocks of your special offers to be displayed in on the store pages.
- Maximum number of offers in the list (at category and product pages): Specify the maximum number of short promo blocks with information about special offers that will be simultaneously displayed to your customers on category and product pages.
- If an offer's bonus includes products from the same category, the zero price will be assigned to the most: Select from the most expensive one and cheapest one.
- Show the special offer thumbnail on the product lists: Select this check box to display the special offer thumbnail on the product list page.
4. Click Save to apply the changes.
Creating and configuring special offers
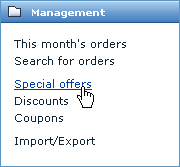
Special offers are configured via the section ‘Special offers’ located in the administrator (X-Cart GOLD and GOLD PLUS) or provider (X-Cart PLATINUM or PRO) area of your store. Depending on the version of X-Cart, this section can be accessed via the Special offers item in the Management or Catalog menu.
The page you will find yourself at is supposed to provide a list of all the special offers in your store. As no special offers have been configured yet, on your first visit to this page the list of special offers will be empty.
As you start creating special offers, they will be added to the list.
To add a special offer, click on Add new at the bottom of the ‘Offers’ dialog. You will be given access to the offer configuration dialog. Use it to configure the new offer.
Configuring any special offer involves the following steps:
- Setting up offer conditions;
- Selecting bonuses;
- Creating promo texts for short and detailed offer descriptions;
- Defining the validity period of the offer; activating the offer.
Each of the named steps corresponds to a specific section of the offer configuration dialog. The sections can be accessed by clicking the links Conditions, Bonuses, Promo texts and Offer at the top.
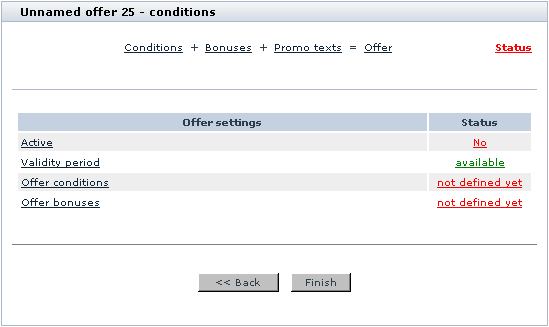
The link Status in the top right corner of the offer configuration dialog allows you to make sure you have adjusted all the required offer settings. Red color of the link means offer configuration has not been finished. To find out which configuration steps still need to be completed, click the link. You will see a list of required configuration settings and their statuses.
The status links allow you to access the corresponding settings and (re)adjust them if necessary. Green links mark the settings which are already defined. Red links mark the settings that still need to be taken care of.
Conditions
The first thing you need to do while configuring a special offer is to set the conditions under which your special offer will be applied. To set offer conditions, do the following:
1. Open the ‘Conditions’ section of the offer configuration dialog.
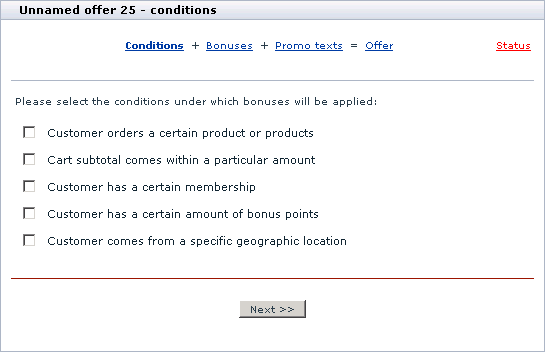
In the central part of the dialog window you will see five types of conditions:
- Customer orders a certain product or products - for offers similar to “All DVDs – Buy 3, Get 4th FREE” (customer orders 3 DVDs), “30% Off Hardcover Bestsellers Every Day” (customer orders a hardcover book), “Free 256MB expansion card with any Palm computer” (customer orders a Palm computer), “Buy a cell phone and a hands-free kit, get 200 bonus points” (customer orders a cell phone and a hands-free kit).
- Cart subtotal comes within a particular amount - for offers similar to “Free Shipping on any purchase over $40” (the subtotal order amount exceeds $40), “200 bonus points with orders of $200 or more” (the subtotal order amount is $200 or more).
- Customer has a certain membership - for offers similar to “Premium Members Save 20% June 7-23” (customer is a Premium member).
- Customer has a certain amount of bonus points - for offers similar to “10% off any purchase for 200 bonus points” (customer has 200 bonus points).
- Customer comes from a specific geographic location - for offers similar to “Free shipping on all orders within the Continental USA” (customer resides in the Continental USA), “Free shipping to all addresses within Bayfield county” (customer is from Bayfield county).
2. Decide on the type of condition that you want to set. Click on the selected condition. The dialog window will be expanded allowing you to configure the condition parameters.
3. Configure the condition parameters.
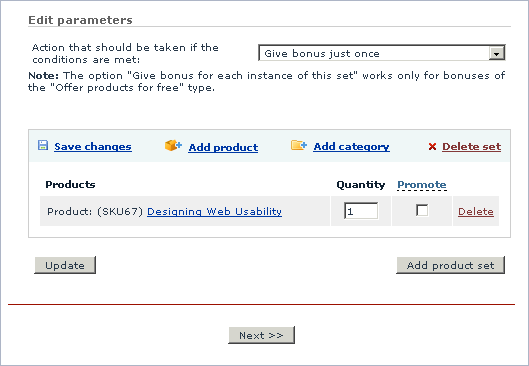
- If you have selected Customer orders a certain product or products, select what product(s) a customer will need to buy to become eligible for bonuses. You can select one specific product, several products (which will have to be ordered as a set) or a category. For each of the selected products/categories specify the product quantity that needs to be ordered. If you want to show a promo block for the product, if a product is not in the cart, select 'Promote'. Select the action that the system should take if a customer orders more than one product or product set specified here (Give bonus just once or Give bonus for each instance of this set).
To add a set of products click the Add product set button. Then select products or categories to be included in the product set. To include products from subcategories, select the corresponding check box.
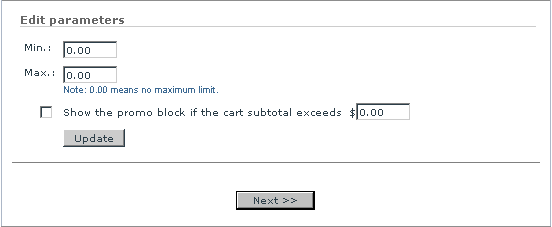
- If you have selected Cart subtotal comes within a particular amount, specify the range in which a customer’s order subtotal must fall for the customer to be able to get bonuses. The minimum limit is supposed to equal the lowest (the maximum limit – the highest) order subtotal amount with which a customer will be eligible for bonuses. If no maximum limit is needed, simply set the maximum limit to 0.00.
- Please note that this functionality enables you to define more than one subtotal amount ranges and use them for different special offers. For example, you can define two offers - A and B - whose application will depend on the subtotal amount. If you configure them so that the subtotal amount range for A is 100.00 - 199.99, and the subtotal amount range for B is 200.00 – 0.00 (assuming the currency is USD), offer A will be applied to orders with a subtotal of $100 or more (under $200); offer B will be applied to orders with a subtotal of $200 or more.
- To display a promo block if the cart subtotal exceeds the specified amount, select the corresponding check box and enter the required sum.
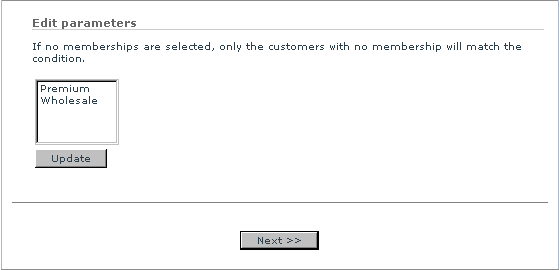
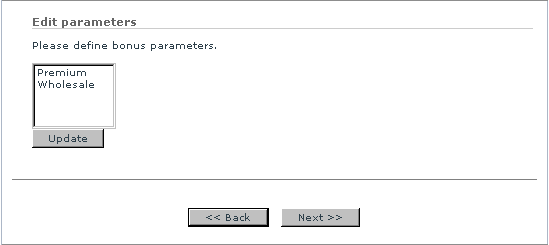
- If you have selected Customer has a certain membership, specify a membership that a customer will need to have to be eligible for bonuses. If necessary, specify more than one membership (To do so, simply hold down Ctrl key while selecting the necessary memberships with your mouse). Please note that, in case of multiple memberships selected, ANY of the selected memberships entitles a customer to use the special offer.
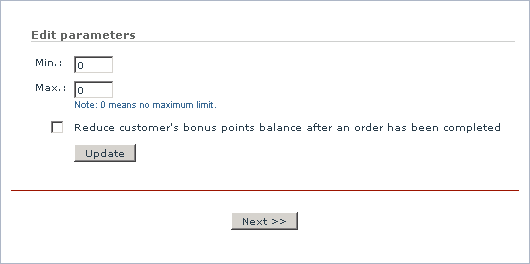
- If you have selected Customer has a certain amount of bonus points, specify the amount of bonus points that a customer is supposed to have to be eligible for bonuses. In a way similar to setting a subtotal amount range, you can specify the minimum and maximum limit for the amount of bonus points. If no maximum limit is needed, simply set the maximum limit to 0.00.
- To reduce the customer's bonus points balance after an order has been completed, select the corresponding option.
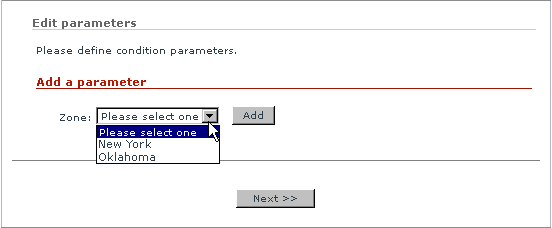
- If you have selected Customer comes from a specific geographic location, specify, what destination zone a customer must come from to be eligible for offer bonuses. If necessary, several destination zones can be specified in one offer. For each of the zones, you can specify, which of the customer’s addresses (billing or shipping) must belong to that zone.
Figure 10. ‘Conditions’ section: the condition ‘Customer comes from a specific geographic location’ is expanded.
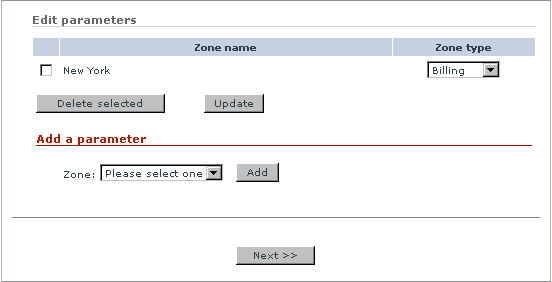
Click Next. The zone will be added to the list of zones applicable to this special offer.
Select zone type - Billing or Shipping from the corresponding drop-down box.
To remove a zone from the list select the check box next to the zone name and click Delete selected. When all the necessary zones have been included into the list, click Update. The condition parameters will be saved.
4. Select the check box next to the condition whose parameters you have just configured. Click Update. The condition will be assigned to the special offer being configured.
After all the necessary conditions have been set, you can move on to configuring offer bonuses.
Bonuses
To configure offer bonuses, do the following:
Go to the ‘Bonuses’ section of the offer configuration dialog.
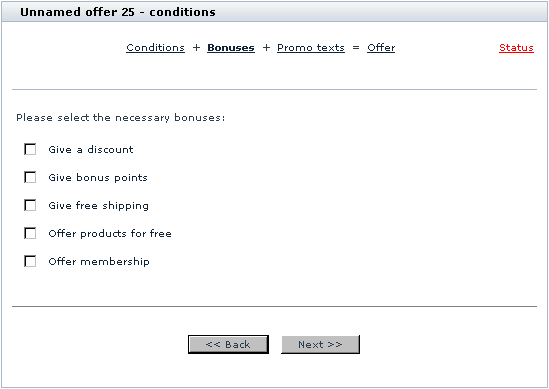
In the central part of the dialog window you see five types of bonuses:
- Give a discount - allows you to provide a discount on a specific product/several products/category/the whole customer’s shopping cart when offer conditions are satisfied. According to your needs, discounts may be expressed in percent or in absolute terms. It is possible to set a maximum limit for any discount (For example, “10% off the purchase, but not more than $100 off”).
- Give bonus points - allows you to give a customer bonus points with his purchase. Bonus points are conventional units which can be awarded to a customer if his order satisfies offer conditions. You define the amount of bonus points that a customer can receive on a special offer. Bonus points are added to a customer’s account automatically as soon as the customer’s order receives the status Complete. Upon collecting a certain amount of bonus points, a customer can convert them to a Gift Certificate. If you wish, you may also create special offers, according to which certain amounts of bonus points will entitle a customer to other bonuses (getting free products, discounts, memberships or free shipping).
- Give free shipping - allows you to provide free shipping on qualified orders. Please note that free shipping can be applied to specific products, specific categories or the whole customer’s shopping cart.
- Offer products for free - allows you to enable your customers to receive free products. Please note that free products are not added to a qualified order automatically. The customer who is placing that order has to click the "Check for special offers" link before checking out, and then add products from the list of available free products to cart.
- Offer membership - allows you to enable your customers to sign up for a membership that grants privileges in using the store. If a special offer that gives ability to sign up for some membership is applied to a purchase, the customer is informed about it by a message displayed in the shopping cart before checkout. As soon as the order gets the status Complete, the customer can visit the section ‘My bonuses’ available via Your cart menu and select a membership that he would like to have. The chosen membership will be granted to him automatically upon request. Please note that memberships are only given to customers who declare their wish to get them by signing up.
Decide on the type of bonus that you want to use.
Click on the name of the bonus you want to use.
Configure the bonus parameters:
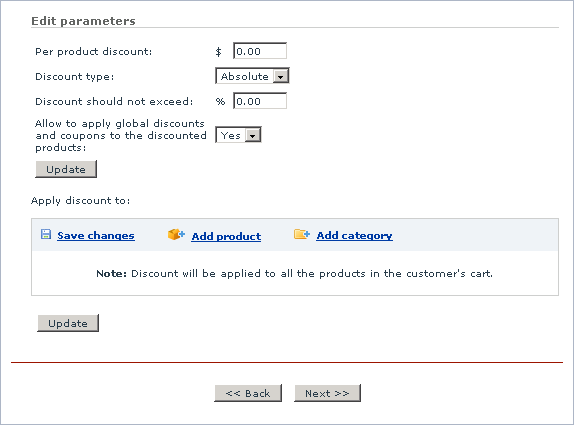
- If you have selected Give a discount, specify
a) Per product discount - an amount by which the price of each product item that satisfies the parameters of the bonus discount will need to be reduced.
b) Discount type - absolute or percent.
c) Discount should not exceed - the upper limit for the discount defined in the ‘Per product discount’ field.
d) Apply global discounts and coupons to the discounted products - select to allow the corresponding action.
e) Apply discount to - Select products or categories, which the discount should be applied to. You can select a specific product or products, any products from a specific category or categories. If you do not specify, the discount will be applied to the entire shopping cart.
The bonus discount defined in this section will be applied to a customer’s order on a per product item basis.
Examples demonstrating usage of discount amount limitation:
1.
- Product price: $40
- Discount amount: 5% (Discount type = percent)
- Limitation: $10
- Calculating the discount amount: $40 * 5% = $2
- Does the discount amount exceed the discount amount limitation? No ($2 < $10)
- Calculating the discounted product price: $40 - $2 = $38
2.
- Product price: $40
- Discount amount: 50% (Discount type = percent)
- Limitation: $10
- Calculating the discount amount: $40 * 50% = $20
- Does the discount amount exceed the discount amount limitation? Yes ($20 > $10)
- Calculating the discounted product price: $40 - $10 = $30
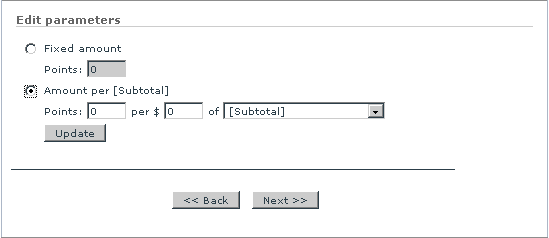
- If you have selected Give bonus points, specify the amount of bonus points that a customer will be given on the offer. A customer can get either a fixed amount of points for on order as a whole, or a certain amount of points per $ spent (the undiscounted subtotal is being used in the calculation). Select, whether the offer should apply to the subtotal or the subtotal minus the gift certificate discount.
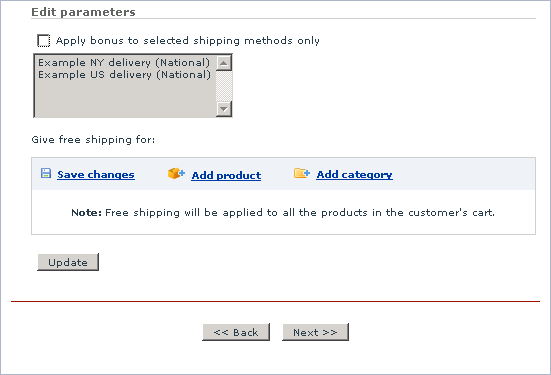
- If you have selected Give free shipping, specify whether you want free shipping to be applied to selected shipping methods only. Then select specific products and categories to give free shipping for.
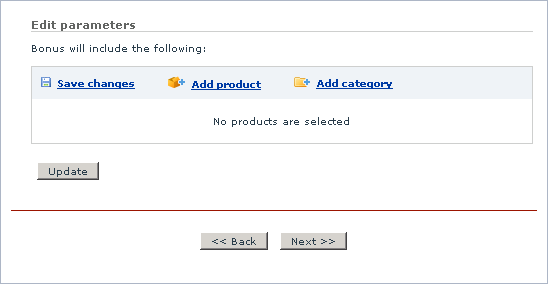
- If you have selected Offer products for free, specify, which products should be offered to a customer if the offer conditions are satisfied. You can specify particular products or a category/categories from which the customer will be able to choose a certain number of products for free.
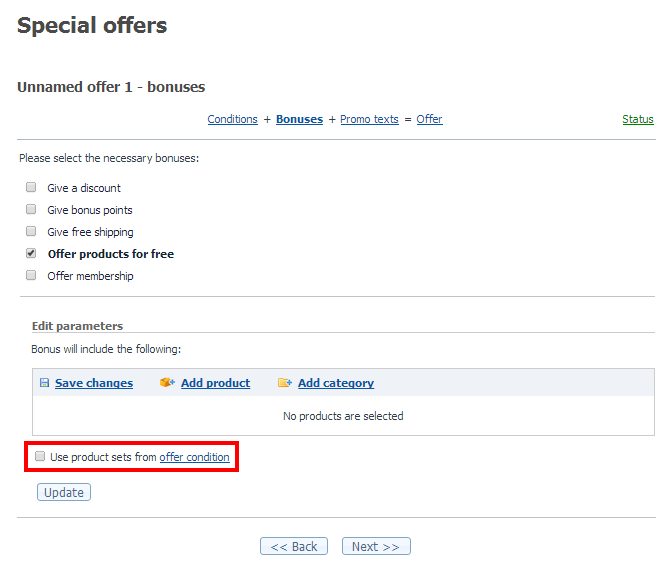
If you want to give away for free the same products that you have selected in the "Conditions" section of the offer configuration (i.e., the same product sets that a customer is supposed to add to cart to become eligible for receiving your "free products" bonus), enable the option Use product sets from offer condition:
This will spare you the necessity to select products and categories manually one by one.
For example:
- - If the offer condition says that to get free products a customer must buy an apple and two pears, and the option "Use product sets from offer condition" is enabled, the customer who adds 1 apple and 2 pears to their shopping cart will be able to add 1 apple and 2 pears to their cart for free; so all in all they will get 2 apples and 4 pears.
- If the offer condition says that to get free products a customer must buy four products from the category "Sale", and the option "Use product sets from offer condition" is enabled, the customer who adds 4 products from the category "Sale" to their shopping cart will be able to select free products from the same category, and the first product they select will be added to their cart automatically in the quantity of 4.
- If you have selected Offer membership, specify what membership should be offered to a customer if the offer conditions are satisfied. If necessary, you can specify more than one membership so the customer will be able to choose.
Click Update. The parameter will be saved.
Apply the changes
Select the checkbox next to the title of the bonus whose parameters you’ve just defined. Click Next>>. The bonus will be assigned to the special offer being configured.
After all the necessary bonuses have been defined, you can move on to configuring promo blocks.
Promo texts
The module supports two types of offer descriptions: short and detailed. Short descriptions are used in short promo blocks appearing at the top of store pages. Detailed descriptions are used for the ‘Special offers’ page and other pages providing detailed information about offers. Both short and detailed descriptions may contain HTML-formatted text and/or images. You can create offer descriptions via the section ‘Promo texts’ of the offer configuration dialog.
To create descriptions that will be used in the offer’s short and detailed promo blocks, do the following:
1. Go to the ‘Promo texts’ section of the offer configuration dialog.
2. Create a short description of the offer for use in a short promo block. Do one of the following:
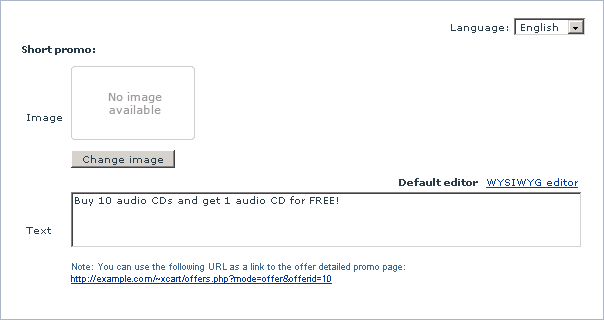
- If all the information that needs to be demonstrated in the short promo block is contained in a single image file, use the field ‘Image’ to select the necessary file. Click Update to apply the changes.
- If you want your short promo block to contain text, use the field ‘Text’ to enter the information about the special offer. You can use either plain or HTML-formatted text. If you need to include images, create links to them using the href attribute. To save the changes, click Update.
- Short promo blocks based on an image or consisting of plain text are clickable: they allow your store visitors to access the detailed offer description. If you use HTML formatting, the promo block does not become clickable automatically. If you need it clickable, be sure to use the link provided below the ‘Text’ field in the HTML code of your short promo block.
3. Create a detailed description of the offer for use in a detailed promo block by entering the necessary offer info into the ‘Detailed promo’ field. You can use either plain or HTML-formatted text. If you need to include images, create links to them using the href attribute. To save the changes, click on Update.
4. Create a detailed description of the offer for use in a promo block, which will be shown on the cart page, if the offer applies. To do so enter the necessary offer info into the ‘Checkout promo’ field. You can use either plain or HTML-formatted text. If you need to include images, create links to them using the href attribute. To save the changes, click on Update.
5. Create a detailed description of the offer for use in a promo block, which will be shown on the cart page, if customer order doesn't satisfy the offer conditions. To do so enter the necessary offer info into the ‘Items/total promo’ field. You can use either plain or HTML-formatted text. If you need to include images, create links to them using the href attribute. To save the changes, click on Update.
After the necessary promo blocks have been created, you can move on to the final step of offer configuration - setting offer details.
Offer details
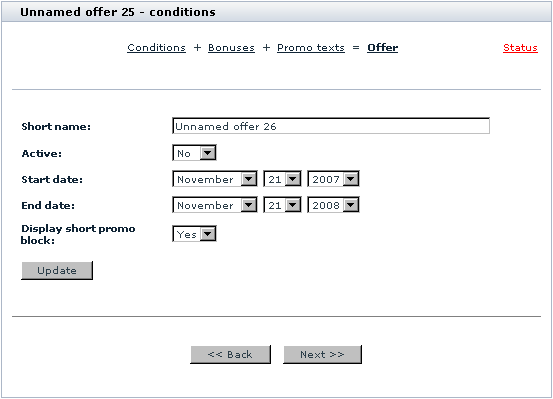
The final configuration step allows you to enable the created offer and define some important offer details (short name and validity period).
To define offer details, do the following:
1. Go to the ‘Offer details’ section of the offer configuration dialog.
2. Think of a short name that would help you recognize the offer you’ve created among the other offers in your store. Enter the name into the ‘Short name’ field. 3. Use the ‘Start date’ and ‘End date’ to define the period during which the offer will be valid. 4. Specify whether you want a short promo block to be used for this offer. 5. Click Update. 6. Make sure all the necessary settings have been adjusted properly (The link Status at the top right of the offer configuration dialog must be green). 7. Make the offer available to customers: select Yes from the ‘Active’ drop-down box. 8. Click Update.
If you have properly completed all the configuration steps, your offer is now ready for use.
Managing special offers
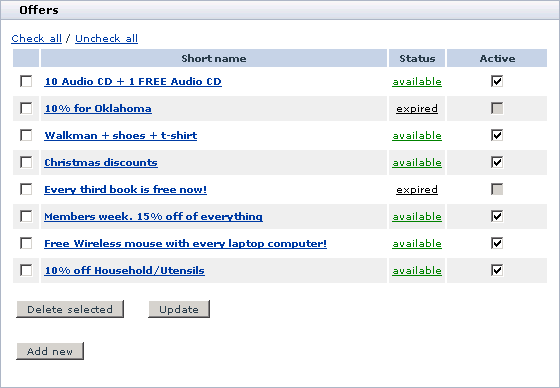
All the special offers existing in your store can be seen in the Offers list. To access the Offers list, click Special offers in the Inventory menu or the link List of offers in the ‘Special offers’ section menu.
Special offers appear in the list by the short names given to them at the last step of offer configuration. Clicking on an offer name provides access to the details of that offer and allows you to view/edit the offer conditions, bonuses, promo texts, availability and validity period.
The links in the STATUS column show the current status of the offers:
- available means all the settings necessary for the functioning of the offer are provided and today’s date is somewhere within the offer validity period;
- upcoming means all the settings necessary for the functioning of the offer are provided, but the offer validity period has not begun yet;
- expired means the offer validity period is over;
- incomplete means the offer configuration has not been finished properly.
Clicking on a status link allows you to update the status of an offer.
The ACTIVE column shows which of your special offers are currently active (available to customers):
- selected checkboxes mark the offers which are currently available to customers;
- unselected checkboxes mark inactive offers;
- inactive checkboxes mark the offers which cannot be active (expired or incomplete offers).
You can change the availability of your special offers by selecting/unselecting the checkboxes in the ACTIVE column. Be sure to click on Update to apply the changes.
The special offers you no longer need may be deleted. To delete one or more special offers, select the checkbox(es) to the left of the offer name(s) and click on Delete selected. To select/unselect all existing special offers at once, use the links Check all / Uncheck all at the top of the Offers list.
Viewing orders
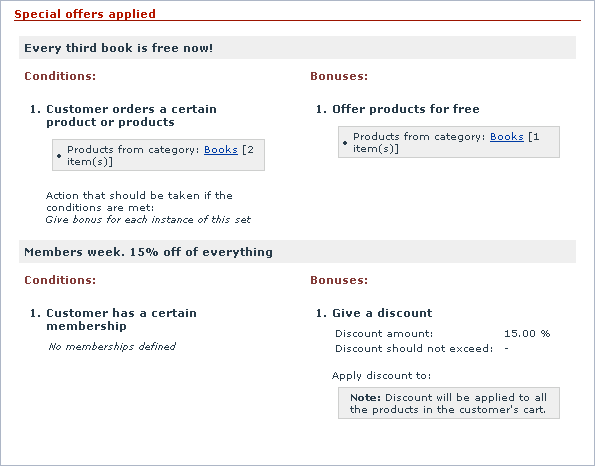
All the details of special offers, applied to a certain order, can be viewed in the Special offers applied section of the Order details page.
Managing bonus points
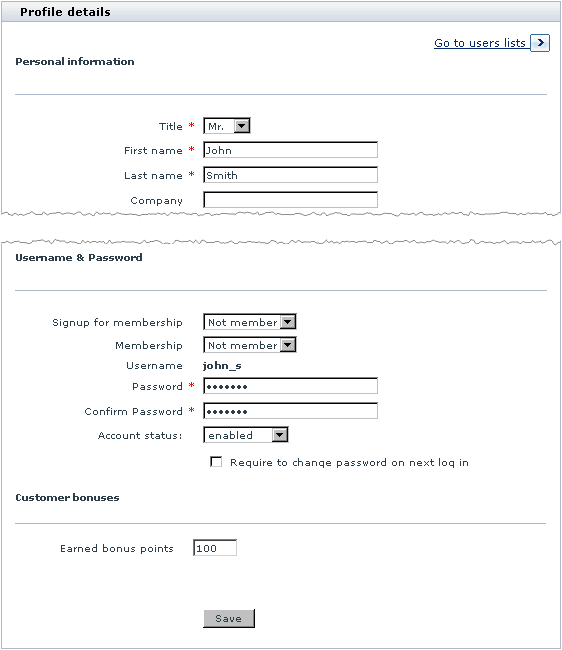
Information about the number of bonus points that a customer has is stored in the customer’s profile. In some cases, it may be necessary to change the number of bonus points that a customer has on his account. The task of editing the number of collected bonus points may be performed by a person with administrative privileges.
To change the number of bonus points, do the following:
1. In the administrative interface, search for the necessary user profile (Management menu -> Users Management -> Search for users).
2. Scroll down to the profile section ‘Customer bonuses’.
3. Edit the number in the field ‘Earned bonus points’.
4. Click Save. The number of bonus points will be updated.

