Difference between revisions of "X-Cart:Static Pages"
(skin1/ --> skin/common_files/) |
(Actualized in the contents of ticket 104677) |
||
| Line 15: | Line 15: | ||
* message.html | * message.html | ||
| − | |||
* permission_denied.html | * permission_denied.html | ||
* shop_closed.html | * shop_closed.html | ||
* under_update.html | * under_update.html | ||
| − | + | Instructions on adding static pages are available in [[#Adding Static Pages | Adding Static Pages]]. | |
| − | + | Instructions on managing existing static pages are available in [[#Managing Static Pages | Managing Static Pages]]. | |
==Adding Static Pages== | ==Adding Static Pages== | ||
| − | To add a new static page: | + | '''To add a new static page:''' |
| − | |||
| − | |||
| − | |||
| − | |||
| − | |||
| − | |||
| − | # | + | # Go to the '<u>Static pages</u>' section of your store's Admin area (<u>Content</u> -> <u>Static pages</u>). This opens the '<u>Static pages</u>' form.<br><br>[[Image:static_pages.gif|584px]]<br><br> |
| − | # Click the '''Save''' button at the bottom of the '<u>Static page details</u>' | + | # ''(If your store supports multiple languages)'' From the '''Language''' selector at the top of the '<u>Static pages</u>' form, select the language the static page is going to be added for. |
| + | # If you are creating an embedded page, click the '''Add new...''' button in the '<u>Embedded level</u>' subsection. If you are creating a root-level page, click the '''Add new...''' button in the '<u>Root level</u>' subsection.<br><br>This opens the '<u>Static page details</u>' form.<br><br> | ||
| + | # On the '<u>Static page details</u>' form, provide details for the static page to be created (See [[#Defining Static Page Details]]). | ||
| + | # Click the '''Save''' button at the bottom of the '<u>Static page details</u>' form. | ||
| − | + | Clicking '''Save''' creates the static page and pops up the confirmation message that the static page has been created successfully. | |
| − | To return to the list of your store's static pages, click the Pages list | + | To return to the list of your store's static pages, click the '''Pages list''' button at the top of the '<u>Static page details</u>' form. |
| Line 45: | Line 41: | ||
==Managing Static Pages== | ==Managing Static Pages== | ||
| − | Your store's embedded and root level static pages can be managed using the controls | + | Your store's embedded and root level static pages can be managed using the controls on the '<u>Static pages</u>' form. |
| − | To find all your store's static pages for a certain language: | + | '''To find all your store's static pages for a certain language:''' |
# Select the desired language as current. | # Select the desired language as current. | ||
| − | # Click the '''Find pages''' button. The '<u>Static pages</u>' | + | # Click the '''Find pages''' button. The '<u>Static pages</u>' form will open up a list of all the root-level static pages it finds in the <u>/xcart</u> directory and all the embedded pages it finds in the <u>/xcart/skin/common_files/pages/<current_language</u> directory (where <current_language> is a two-letter code of the language currently selected in the '''Current language''' box at the top of the page). |
| − | To preview a page: | + | '''To preview a page:''' |
# Select the language of the page as current. | # Select the language of the page as current. | ||
| − | # Find the page | + | # Find the page on the '<u>Static pages</u>' list and click the '''Preview''' button by the page title. |
| − | To change the order | + | '''To change the order of static page links on the '<u>Help</u>' menu box in a certain language:''' |
# Select the desired language as current. | # Select the desired language as current. | ||
| Line 63: | Line 59: | ||
# Click the '''Update''' button. | # Click the '''Update''' button. | ||
| − | To change | + | '''To change availability status of an embedded page for a certain language:''' |
# Select the desired language as current. | # Select the desired language as current. | ||
| − | # Find the page | + | # Find the page to change status for on the '<u>Static pages</u>' list and then select the required status - Enabled or Disabled - from the <u>STATUS</u> drop-down box by its title. |
# Click the '''Update''' button. | # Click the '''Update''' button. | ||
| − | To edit the details of a static page (name, content, etc): | + | '''To edit the details of a static page (name, content, etc.):''' |
# Select the language of the page as current. | # Select the language of the page as current. | ||
| − | # Find the page | + | # Find the page on the '<u>Static pages</u>' list and then click on its title. |
| − | # | + | # On the '<u>Static page details</u>' form, edit the necessary details. |
# Click the '''Save''' button. | # Click the '''Save''' button. | ||
| − | To delete a static page in a certain language: | + | '''To delete a static page in a certain language:''' |
# Select the language of the page as current. | # Select the language of the page as current. | ||
| − | # Find the page | + | # Find the page to be deleted on the '<u>Static pages</u>' list and then select the check box next to its title. |
# Click the '''Delete selected''' button. | # Click the '''Delete selected''' button. | ||
==Defining Static Page Details== | ==Defining Static Page Details== | ||
| − | + | Static page details are defined on the '<u>Static page details</u>' form: | |
: [[Image:static_page_details.gif|637px]] | : [[Image:static_page_details.gif|637px]] | ||
| − | For | + | For embedded static page, provide the following details: |
| − | * <u>Page file</u>: | + | * <u>Page file</u>: file name of the static page. |
| − | * <u>Page name</u>: | + | * <u>Page name</u>: name, by which you and your customers will be able to identify this static page. |
| − | * <u>Clean URL</u>: | + | * <u>Clean URL</u>: clean URL value for this static page. Instructions on editing this field are available in [[X-Cart:Clean URLs#Defining Clean URL Values]]. |
| − | {{ | + | {{Note|The 'Clean URL' field should be adjusted only if the Clean URLs functionality is enabled in your X-Cart store. If the Clean URLs functionality is disabled, the 'Clean URL' field appears inactive.}} |
| − | * <u>Page content</u>: | + | * <u>Page content</u>: content HTML source code of the page. |
| − | {{ | + | {{Note|You can edit the content of the page in the WYSIWYG mode if your store has the HTML Editor module enabled. For details, see the [[X-Cart:HTML Editor]] section in this manual.}} |
| − | * <u>Title tag</u>: | + | * <u>Title tag</u>: title to be used in the title tag of the static page. |
| − | * <u>META keywords</u>: | + | * <u>META keywords</u>: keywords to be listed in the keywords meta tag of the static page. |
| − | * <u>META description</u>: | + | * <u>META description</u>: description to be placed in the description meta tag of the static page. |
| − | For more information on using the description and keywords meta tags, see the | + | For more information on using the description and keywords meta tags, see the [[X-Cart:Configuring Page Titles and Meta Tags]] section of this manual. |
| − | * <u>Status</u>: | + | * <u>Status</u>: allows to specify whether the page is available for viewing to visitors of your store's Customer area. |
| − | * <u>Position</u>: | + | * <u>Position</u>: position of the static page on the list on the '<u>Static pages</u>' form and (if the '<u>Show a link to the page in Help menu?</u>' option is enabled) on the Help menu box of your store's Customer area. |
| − | * <u>Show a link to the page in Help menu?</u>: | + | * <u>Show a link to the page in Help menu?</u>: allows to specify whether the link to this page should be included in the <u>Help</u> menu box of your store's Customer area. |
For a root level static page, provide the following details: | For a root level static page, provide the following details: | ||
| − | * <u>Page file</u>: | + | * <u>Page file</u>: filename for this static page. |
| − | * <u>Page name</u>: | + | * <u>Page name</u>: name, by which you will be able to identify this static page. |
| − | * <u>Page content</u>: | + | * <u>Page content</u>: content/HTML source code of this page. |
==Creating Versions of a Static Page for Other Languages== | ==Creating Versions of a Static Page for Other Languages== | ||
| − | If your store supports | + | If your store supports multiple languages, you must create each same static page in each of the supported languages. |
| − | To create a new language version of an existing static page: | + | '''To create a new language version of an existing static page:''' |
| − | # Select the language in which the static page exists as current for the Admin area ( | + | # Select the language, in which the static page exists as current, for the Admin area (use the '''Current language''' selector). |
# Go to the '<u>Static pages</u>' section. | # Go to the '<u>Static pages</u>' section. | ||
| − | # | + | # On the '<u>Static pages</u>' form, look up the page to be translated to other language and click on its name. This opens the '<u>Static page details</u>' form with the details of the page you have selected. |
| − | # Switch the ' | + | # Switch the '''Current language''' selector to the language you want to translate the page to. |
| − | # | + | # On the '<u>Static page details</u>' form, edit the page details. |
| − | #* Provide | + | #* Provide the language-specific page name, content, status and position. |
| − | #* For an embedded static page, provide language-specific meta keywords and meta description | + | #* For an embedded static page, provide the language-specific meta keywords and meta description and specify whether the link to the page in this language is to be included in the <u>Help</u> menu box of your store's Customer area. |
# Click the '''Save''' button. | # Click the '''Save''' button. | ||
| − | + | Clicking '''Save''' creates the static page and pops up the confirmation message that the static page has been created successfully. | |
== See also == | == See also == | ||
| Line 139: | Line 135: | ||
[[Category:X-Cart user manual]] | [[Category:X-Cart user manual]] | ||
[[Category:X-Cart user manual]] | [[Category:X-Cart user manual]] | ||
| − | |||
[[Category:X-Cart user manual]] | [[Category:X-Cart user manual]] | ||
[[Category:X-Cart user manual]] | [[Category:X-Cart user manual]] | ||
Revision as of 15:00, 9 February 2011
Contents
Overview
You can add static pages to your store to include additional information which does not fit into the standard X-Cart's page set. X-Cart allows you to create static pages of two types:
- Embedded
- Root
Root level pages are fully independent HTML files. They exist in X-Cart root (the directory where your X-Cart store is installed), hence the name. Root pages do not depend on the rest of X-Cart pages, so they must be full HTML-files (must include tags like <HTML>...</HTML>).
Embedded pages are pages that are placed inside standard X-Cart pages. Their look depends on the design of your store in general, as you create only the page content. The content of embedded pages is displayed in your store's Information column (corresponds to the widest column in any X-Cart's standard template scheme). Links to embedded pages appear in the 'Help' menu box. Embedded pages do not use tags like <HTML>, <HEAD>, <BODY>.
Root level pages are stored in the directory /xcart (X-Cart root), embedded pages - in subdirectories of the directory /xcart/skin/common_files/pages, where the subdirectories are named after the respective languages (for example, pages for the English language are stored in the directory /xcart/skin/common_files/pages/US, pages for the German language - in the directory /xcart/skin/common_files/pages/DE, etc).
Four root level pages are defined by default:
- message.html
- permission_denied.html
- shop_closed.html
- under_update.html
Instructions on adding static pages are available in Adding Static Pages.
Instructions on managing existing static pages are available in Managing Static Pages.
Adding Static Pages
To add a new static page:
- Go to the 'Static pages' section of your store's Admin area (Content -> Static pages). This opens the 'Static pages' form.
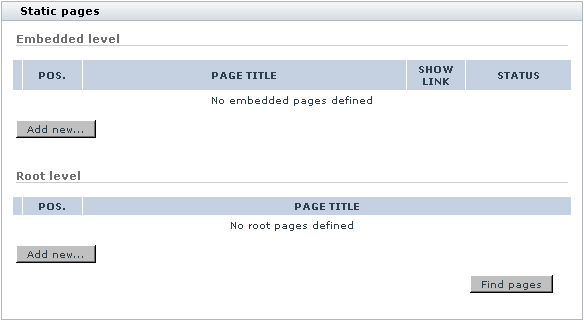
- (If your store supports multiple languages) From the Language selector at the top of the 'Static pages' form, select the language the static page is going to be added for.
- If you are creating an embedded page, click the Add new... button in the 'Embedded level' subsection. If you are creating a root-level page, click the Add new... button in the 'Root level' subsection.
This opens the 'Static page details' form. - On the 'Static page details' form, provide details for the static page to be created (See #Defining Static Page Details).
- Click the Save button at the bottom of the 'Static page details' form.

Clicking Save creates the static page and pops up the confirmation message that the static page has been created successfully.
To return to the list of your store's static pages, click the Pages list button at the top of the 'Static page details' form.
Managing Static Pages
Your store's embedded and root level static pages can be managed using the controls on the 'Static pages' form.
To find all your store's static pages for a certain language:
- Select the desired language as current.
- Click the Find pages button. The 'Static pages' form will open up a list of all the root-level static pages it finds in the /xcart directory and all the embedded pages it finds in the /xcart/skin/common_files/pages/<current_language directory (where <current_language> is a two-letter code of the language currently selected in the Current language box at the top of the page).
To preview a page:
- Select the language of the page as current.
- Find the page on the 'Static pages' list and click the Preview button by the page title.
To change the order of static page links on the 'Help' menu box in a certain language:
- Select the desired language as current.
- Readjust the page position numbers in the POS. column of the 'Static pages' list.
- Click the Update button.
To change availability status of an embedded page for a certain language:
- Select the desired language as current.
- Find the page to change status for on the 'Static pages' list and then select the required status - Enabled or Disabled - from the STATUS drop-down box by its title.
- Click the Update button.
To edit the details of a static page (name, content, etc.):
- Select the language of the page as current.
- Find the page on the 'Static pages' list and then click on its title.
- On the 'Static page details' form, edit the necessary details.
- Click the Save button.
To delete a static page in a certain language:
- Select the language of the page as current.
- Find the page to be deleted on the 'Static pages' list and then select the check box next to its title.
- Click the Delete selected button.
Defining Static Page Details
Static page details are defined on the 'Static page details' form:

For embedded static page, provide the following details:
- Page file: file name of the static page.
- Page name: name, by which you and your customers will be able to identify this static page.
- Clean URL: clean URL value for this static page. Instructions on editing this field are available in X-Cart:Clean URLs#Defining Clean URL Values.
- Page content: content HTML source code of the page.
- Title tag: title to be used in the title tag of the static page.
- META keywords: keywords to be listed in the keywords meta tag of the static page.
- META description: description to be placed in the description meta tag of the static page.
For more information on using the description and keywords meta tags, see the X-Cart:Configuring Page Titles and Meta Tags section of this manual.
- Status: allows to specify whether the page is available for viewing to visitors of your store's Customer area.
- Position: position of the static page on the list on the 'Static pages' form and (if the 'Show a link to the page in Help menu?' option is enabled) on the Help menu box of your store's Customer area.
- Show a link to the page in Help menu?: allows to specify whether the link to this page should be included in the Help menu box of your store's Customer area.
For a root level static page, provide the following details:
- Page file: filename for this static page.
- Page name: name, by which you will be able to identify this static page.
- Page content: content/HTML source code of this page.
Creating Versions of a Static Page for Other Languages
If your store supports multiple languages, you must create each same static page in each of the supported languages.
To create a new language version of an existing static page:
- Select the language, in which the static page exists as current, for the Admin area (use the Current language selector).
- Go to the 'Static pages' section.
- On the 'Static pages' form, look up the page to be translated to other language and click on its name. This opens the 'Static page details' form with the details of the page you have selected.
- Switch the Current language selector to the language you want to translate the page to.
- On the 'Static page details' form, edit the page details.
- Provide the language-specific page name, content, status and position.
- For an embedded static page, provide the language-specific meta keywords and meta description and specify whether the link to the page in this language is to be included in the Help menu box of your store's Customer area.
- Click the Save button.
Clicking Save creates the static page and pops up the confirmation message that the static page has been created successfully.
See also
Where do I edit my "About our site", "Terms & Conditions", "Privacy statement" pages?