Difference between revisions of "X-Cart:Two Factor Authentication"
m (→Configuring the Two-Factor Authentication module) |
(→Two-Factor Authentication module configuration settings) |
||
| Line 76: | Line 76: | ||
Here is an explanation of the Two-Factor Authentication module configuration settings: | Here is an explanation of the Two-Factor Authentication module configuration settings: | ||
<br /> | <br /> | ||
| − | :* '''Authy API key''': Your Authy API key. This can be found in your authy.com dashboard after registering and activating your account. | + | :* '''Authy API key''': Your Authy API key. This can be found in your authy.com dashboard after registering and activating your account. [https://www.twilio.com/docs/authy/obtain-your-app-id 1. Create an Authy app] [https://www.twilio.com/docs/authy/api#authy-api-keys 2. Get the API KEY] |
The following three options: | The following three options: | ||
:* '''Enable two-factor authentication for administrators''' | :* '''Enable two-factor authentication for administrators''' | ||
Revision as of 13:59, 7 February 2020
Contents
Overview
What X-Cart's Two-Factor Authentication module does
X-Cart's Two-Factor Authentication module allows you to add two-factor authentication to your X-Cart store's website and make it available to some or all types of your store's users (administrators / providers / customers). The two-factor authentication service is provided by Authy.com.
How it works
Basically, two-factor authentication requires that the user trying to log in has not one but two pieces of privileged information: something the user knows (like the user's regular password for access to the store site) and something the user has in their pocket (some sort of security token). In the case of Authy's authentication system, the security token used as an extra means of identification is the user's mobile phone.
With the Two-Factor Authentication module enabled, the log-in process for X-Cart store users is as follows:
- A user wishing to log in to the store clicks the Sign In link. The store's regular authentication form opens.
- The user enters his or her account credentials (login and password). Provided that the credentials entered by the user are accepted by the store, the user is presented with a form for entering their security token. For customer users the form is displayed in a popup, for administrators and providers - on a separate page.
- If the user has a smartphone device with Authy application installed, they open the application on their phone to obtain the Authy token. A new token is generated every 20 seconds while the application is running. If the user does not have a smartphone with the Authy mobile app installed, after submitting the login and password they simply receive their security token in a text message (SMS).
- The user types the token from the Authy app/SMS into the provided form and submits it. The store sends the token to Authy API. Authy tells the store whether the token is correct.
- If the token is correct, the user is securely logged in.
Here's what it looks like in your store:


Why Authy?
- Improves account security
Even if the username and password are stolen by means of some spyware, the hacker will not be able to take over the user's account, as he will also need a token to log in.
- Does not store account credentials
Even if the Authy server is compromised, the hacker will not get any usernames or passwords, as they are NOT stored by Authy.
- Supports all cell phones
Free Authy apps are available for iPhone, Android and Blackberry. For other types of cell phones the security tokens are sent via text messages. Optionally, admin can enable forced sending of tokens via SMS, regardless of whether the Authy application is installed on the user's phone or not.
- Free plan available
Using the service requires an account with Authy. Authy offers several subscription plans, from free (1,000 Users, 500 Auths / mo) to enterprise.
Quick Start
To enable Authy's two-factor authentication service at your X-Cart store, follow these steps:
- Sign up for Authy's service at Authy.com.
- If you are going to use a smartphone for authentication, download from the Authy site and install on your phone device the application that will be used to generate security tokens for log-in (To download the app, point the browser on your phone device to www.authy.com/install). Run the application on your phone and complete the steps required to register your phone in Authy's system.Note: Using Authy's downloadable app is completely optional; if you prefer security tokens sent via SMS, you do not have to install anything on your phone - simply skip this step and proceed to Step 3.
- Activate your Authy account by signing in. Note that to sign in you will be required to enter a security token from your phone. You can enter a token generated by the Authy app on your phone device or request the token to be sent to your cellphone via text-message. After signing in to your Authy account you'll find your API keys for sandbox (use it for testing) and production. Keep these keys private.
- Install the Two-Factor Authentication module in X-Cart (See System requirements and installation).
- Enable the module in X-Cart's back end and enter your Authy API key in its settings (See Enabling the Two-Factor Authentication module and Configuring the Two-Factor Authentication module).
- Specify your phone number and country in your profile. Be sure to enter the phone number using the international format: + (plus sign) then country code, then space or dash, then phone number.
That is all. Now if you log out and try to log in to the store again, you will notice an extra step added to the authentication process on your site: after entering your regular site login and password you will be required to enter a security token from your mobile phone.
System requirements and installation
To be able to successfully install and use the Two-Factor Authentication module, you need a working copy of X-Cart version 4.1.x or later installed on your server. Make sure that the version of the module is the same as the version of the installed copy of X-Cart.
To install X-Cart's Two-Factor Authentication module:
- Obtain a distribution package for X-Cart's Two-Factor Authentication module by downloading it from the File Area section of your X-Cart Account. The distribution package you need is contained in the archive file two-factor-auth-x.y.z.tgz where x, y and z are the version numbers of the module. Make sure the version of the module is the same as the version of the installed X-Cart.
- Copy the distribution package to the X-Cart root directory on your server or hosting account.
- If you are using a Windows-based server, or a UNIX-based server without terminal access:
- a) Decompress the archive with the module distribution package to a directory on your system using your favorite compression program (WinZIP or any other archiver with support for TAR files).
- b) Use an FTP client to upload all the files contained in the archive (retaining the directory structure) to the X-Cart root directory on your server or your hosting account.
- If you are using a UNIX-based server with terminal access:
- a) Use an FTP client to upload the archive with the distribution package to the X-Cart root directory on your server or your hosting account.
- b) Decompress the package using the following command:
tar -xzvf two-factor-auth-x.y.z.tgz
- Important: Make sure you keep the directory structure while unpacking and uploading the distribution package, otherwise some necessary files can be overwritten!
- In a web browser, run the installation script httр://<YOUR_XCART_DOMAIN>/install-two-factor-auth.php replacing <YOUR_XCART_DOMAIN> with the actual domain name of your X-Cart store.
- Enter the Auth code, accept the License Agreement and click Next.
- The installation script patches any files that need to be patched and activates the module. Click Next to continue the installation.Note: If you are using a custom skin, you will need to patch it manually. Otherwise, the module will not work in this skin.
- The installation script generates a new system fingerprint. Click Next to complete the installation.
- Use the ADMINISTRATOR AREA link to log in to the Admin area.
Enabling the Two-Factor Authentication module
After the Two-Factor Authentication module installation has been completed, the module you have installed needs to be enabled in your store:
- In Admin area, go to the Modules section (Settings menu->Modules).
- Locate the entry for 'Two-Factor Authentication' module.Note: In X-Cart versions 4.6 and later, the Two-Factor Authentication module would be found on the 'Built-in and installed modules' tab under the 'Security' tag.
- X-Cart versions 4.6 and later: Select the Enable check box to the left of the module name.
X-Cart versions prior to 4.6: Select the check box to the left of the module name and click the Apply changes button.
The module will be activated.
Configuring the Two-Factor Authentication module
After the Two-Factor Authentication module has been enabled in your store, you should check and adjust its configuration:
- In the Modules section (Settings menu->Modules), click the Configure link opposite the module name ('Two-Factor Authentication').
The module configuration page (titled by the name of the module) opens.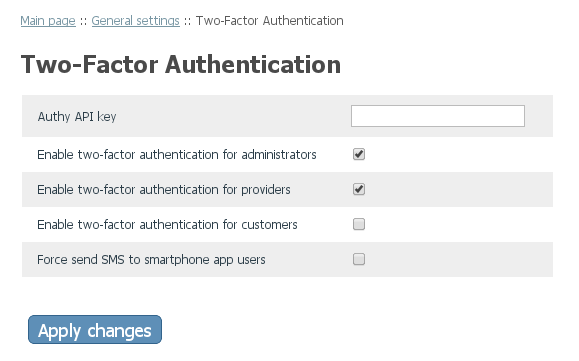
- Adjust the settings on the module configuration page. Detailed information regarding the Two-Factor Authentication module configuration settings is available below.
- Click the Apply changes button to save the changes.

Two-Factor Authentication module configuration settings
Here is an explanation of the Two-Factor Authentication module configuration settings:
- Authy API key: Your Authy API key. This can be found in your authy.com dashboard after registering and activating your account. 1. Create an Authy app 2. Get the API KEY
The following three options:
- Enable two-factor authentication for administrators
- Enable two-factor authentication for providers
- Enable two-factor authentication for customers
are used to specify the types of users to which two-factor authentication should be available in your store.
- Force send SMS to smartphone app users: Normally the service does not send text messages containing secure tokens to the users whose phones are registered with Authy as using the downloadable application. However, if you still want the tokens to be sent to such users via text messages, enable this option.
Two Factor Authentication FAQ
Q: What if my phone number changes? Will I be able to log in to the store?
A: Do not worry, you will not lose access to your store if your phone number changes. Simply follow the instructions below.
If you can still use your old phone number after getting a new one, the following method is recommended:
1. Log in to your X-Cart store and open your user pofile for editing.
2. Replace the old phone number stored in your profile with your new phone number. When the profile with the new phone number is saved, X-Cart will automatically register a new user in the Authy service.
3. If you are going to use the downloadable Authy application to generate tokens, install the application on your new phone and complete the registration steps. If the application is already installed on your phone, simply register your new phone number in it.
After completing the above steps you should be able to log in to your store as usual using your new phone number.
If your old phone number is no longer available, use one of the following methods:
I.
1. Go to https://www.authy.com/phones/change and type in your previous phone number and your new phone number. Authy will send you and e-mail message requiring a confirmation that it is really you who wants to have your phone number changed. After you send the confirmation, Authy will take up to 36 hours to change the phone number. When that happens, the ID by which your old phone was identified by Authy service will be assigned to your new phone.
2. If you are going to use the downloadable Authy application to generate tokens, install the application on your new phone and complete the registration steps. If the application is already installed on your phone, simply register your new phone number in it.
3. Log in to the store. After entering your login and password, you will be prompted to enter your Authy security token: "Please open the "Authy" app on your phone <your old phone number>" or "SMS with token has been sent to your phone <your old phone number>". Please disregard this request to use your old phone number (X-Cart shows the old number because phone numbers for the above messages are taken from the store's own database, not from Authy) and enter a token from your new phone.
4. After logging in to the store, remember to update the phone number in your X-Cart store user pofile. This step is really important for the following reason: In itself, having an old phone number stored in your profile does not prevent you from logging in to the store with two-factor authentication enabled - up until the moment you decide to update your user profile. As soon as you save the profile with outdated phone number information in it (you may be updating some other information and simply forget to change the phone number), X-Cart will register a new Authy user to that phone number. If this happens, you will be required to enter a security token from the phone you no longer have, which means you will have to follow the entire procedure over again.
II.
(This method is recommended if, for some reason, it is not possible to use the first method.)
1. Temporarily disable the two-factor authentication feature for your X-Cart store:
In the Two-Factor Authentication module config file modules/TwoFactorAuth/config.php, find the following block of code:
/*
* Uncomment line below to disable TwoFactorModule temporarely
*/
#define('DISABLE_TWOFACTOR', 1);
and uncomment the line "define('DISABLE_TWOFACTOR', 1);" by removing the comment symbol before it.
2. Log in to the store (you will not be required to enter any token) and edit your user profile to update your phone number information.
3. Re-enable the two-factor authentication feature via modules/TwoFactorAuth/config.php by restoring the comment symbol you have removed.
4. After the two-factor authentication feature has been re-enabled, X-Cart will automatically register a new Authy user to the new phone that has been added to your user profile.
5. If you are going to use the downloadable Authy application to generate tokens, install the application on your new phone and complete the registration steps. If the application is already installed on your phone, simply register your new phone number in it.