Difference between revisions of "X-Cart:X-HotProducts"
m (→Installation) |
m |
||
| Line 3: | Line 3: | ||
== Overview == | == Overview == | ||
| − | <u>X-HotProducts</u> is a software package that includes three independent modules: | + | <u>X-HotProducts</u> is a software package that includes three independent modules: [[#New Arrivals module|New Arrivals]], [[#On Sale module|On Sale]] and [[#Previously Ordered Products module|Previously Ordered Products]]. |
| − | + | <br /><br /> | |
| − | + | ||
| − | + | === New Arrivals module=== | |
| + | The <u>New Arrivals</u> module allows you to showcase the latest additions to your product catalog. | ||
| − | |||
Depending on the module settings, the list of recently added products can be displayed in the <u>New Arrivals menu</u> in the Customer area sidebar (menu column): | Depending on the module settings, the list of recently added products can be displayed in the <u>New Arrivals menu</u> in the Customer area sidebar (menu column): | ||
| Line 34: | Line 34: | ||
| − | === On Sale === | + | === On Sale module === |
| + | The <u>On Sale</u> module adds the "On Sale" label to the thumbnail and main image of any product. | ||
| + | |||
On Sale products can be visible on the <u>Home page</u> (main column): | On Sale products can be visible on the <u>Home page</u> (main column): | ||
| Line 41: | Line 43: | ||
| − | === Previously Ordered Products === | + | === Previously Ordered Products module === |
| + | The <u>Previously Ordered Products</u> module allows your customers to quickly find, add to cart and re-order the products they have already ordered at your store. | ||
| + | |||
Link to the <u>Previously Ordered Products</u> page can be visible in the header of the page: | Link to the <u>Previously Ordered Products</u> page can be visible in the header of the page: | ||
| Line 69: | Line 73: | ||
| − | == System requirements == | + | == System requirements for installing the X-HotProducts package == |
| − | To be able to successfully install and use X-HotProducts | + | To be able to successfully install and use the modules of <u>X-HotProducts package</u>, you must have a working copy of X-Cart Gold or X-Cart Pro v4.4.0 or later already installed on your server. Make sure that the version of the <u>X-HotProducts package</u> you are installing is the same as the version of X-Cart on which your store is based. |
| − | {{Note1|Note: If you do not remember the version | + | {{Note1|Note: If you do not remember the version of X-Cart on which your store is based, you can look it up in the <u>Environment info</u> section of the <u>Summary</u> page in X-Cart Admin area (<u>Tools menu -> Summary</u>).}} |
| − | {{Note1|Important: | + | {{Note1|'''Important:''' If using PHP4, iconv extension must be enabled.}} |
| − | == | + | == Installing the X-HotProducts package == |
| − | X-HotProducts installation | + | X-HotProducts installation process is the same for both X-Cart Gold and X-Cart Pro. |
To install X-HotProducts: | To install X-HotProducts: | ||
| − | + | # Obtain the X-HotProducts distribution package by downloading it from the File Area section of your {{QA}}. The distribution package you need is contained in the archive file <u>X-HotProducts-x.y.z-with-installer.tgz</u> where <u>x</u>, <u>y</u> and <u>z</u> stand for X-Cart version (These need match the version of X-Cart on which your store is based). | |
| − | + | # Put the distribution package to the X-Cart root directory on your server or hosting account. | |
| − | + | #* ''If you use a Windows-based server, or a UNIX-based server without terminal access:'' | |
| − | * 'If you use a Windows-based server, or a UNIX-based server without terminal access:' | + | #: a) Decompress the archive with the X-HotProducts distribution package to a directory on your system using your favorite compression program (WinZIP or any other archiver with support for TAR files). |
| − | + | #: b) Use an FTP client to upload all the files contained in the archive (retaining the directory structure) to the X-Cart root directory on your server or your hosting account. | |
| − | : a) Decompress the archive with the X-HotProducts distribution package to a directory on your system using your favorite compression program (WinZIP or any other archiver with support for TAR files). | + | #* ''If you use a UNIX-based server with terminal access:'' |
| − | + | #: a) Use an FTP client to upload the archive with the distribution package to the X-Cart root directory on your server or your hosting account. | |
| − | : b) Use an FTP client to upload all the files contained in the archive (retaining the directory structure) to the X-Cart root directory on your server or your hosting account. | + | #: b) Decompress the package using the following command: |
| − | + | #: <pre>tar -xzvf X-HotProducts-x.y.z-with-installer.tgz</pre> | |
| − | * 'If you use a UNIX-based server with terminal access:' | + | #: {{Note1|'''Important:''' Make sure you keep the directory structure while unpacking and uploading the distribution package, otherwise some necessary files can be overwritten! }} |
| + | # In a web browser, run the installation script <u>httр://<YOUR_XCART_DOMAIN>/install-hot-products.php</u>, replacing <u><YOUR_XCART_DOMAIN></u> with the actual domain name of your X-Cart based store. | ||
| + | # Enter the Auth code, accept the License Agreement and click the '''Next''' button.<br />{{Note1|Note: The Auth code is a random code that was generated after you installed your copy of X-Cart. If you do not remember the Auth code, find it in the <u>Summary</u> section of the X-Cart Admin area (<u>Administration menu -> Summary</u>) before the License info subsection. Another way to obtain the code is to retrieve the value of the variable <u>$installation_auth_code</u> from the file <u><xcart_dir>include/install.php</u>}} | ||
| + | # The installation script copies the files and activates the modules. Click the '''Next''' button to continue the installation. | ||
| + | # The installation script generates a new system fingerprint. Click the '''Next''' button to complete the installation. | ||
| + | # Use the ADMINISTRATOR AREA link to access the Admin area.<br /><br /> | ||
| − | + | == Enabling the modules of the X-HotProducts package== | |
| − | + | After the X-HotProducts installation has been completed, the modules you have installed (<u>New Arrivals</u>, <u>On Sale</u> and <u>Previously Ordered Products</u>) need to be enabled in your store: | |
| − | < | + | # In Admin area, go to the <u>Modules</u> section (<u>Settings menu->Modules</u>). |
| + | # Choose the module(s) you wish to enable by selecting the respective check box(es) on the left. | ||
| + | # Click the '''Apply changes''' button. This activates the selected module(s).<br /><br /> | ||
| − | + | == Configuring the modules of the X-HotProducts package== | |
| − | + | Two modules of the <u>X-HotProducts</u> package - <u>New Arrivals</u> and <u>On Sale</u> - provide configuration settings which you can adjust according to your preference: | |
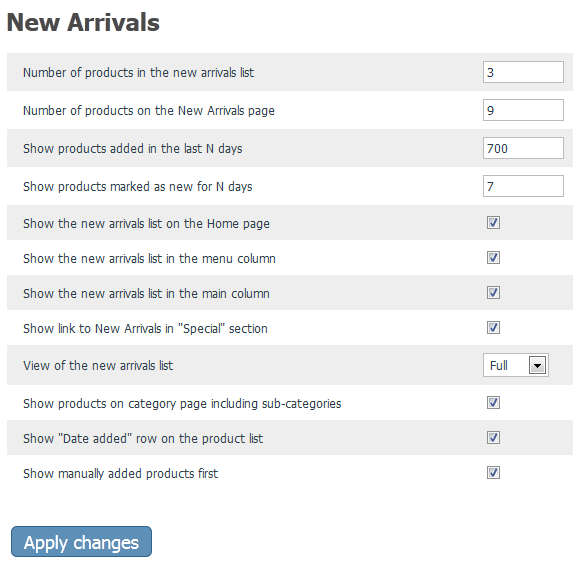
| + | # In the <u>Modules</u> section (<u>Settings menu->Modules</u>), click the <u>Configure</u> link opposite the module name.<br />The module configuration page (titled by the name of the module) opens.<br />{{Note1|Note: Alternatively, the configuration pages for X-Cart modules can be accessed by choosing Settings menu->General options->Modules tab).}}<br>The configuration pages for the modules of the <u>X-HotProducts</u> package look as follows:<br /> | ||
| + | #:''<u>New Arrivals</u> module:'' | ||
| + | #: [[Image:new_arrivals_settings.png|border]]<br /><br /> | ||
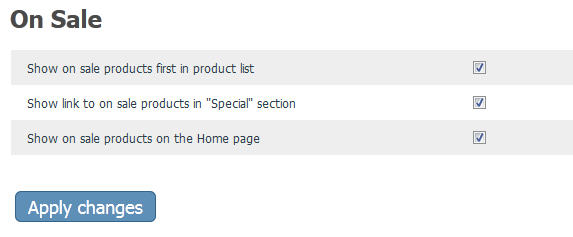
| + | #:''<u>On Sale</u> module'': | ||
| + | #: [[Image:on_sale_settings.png|border]]<br /> | ||
| + | # Adjust the settings on the module configuration page as needed (See [[#ModulesSettings |below]] for details). | ||
| + | # Click the '''Apply changes''' button to save the changes. | ||
| − | + | <div id="ModulesSettings"> </div>Most of the module settings are self explanatory, so here are just a few notes: | |
| − | |||
| − | + | <u>New Arrivals</u> module settings: | |
| − | |||
| − | |||
| − | |||
| − | |||
| − | |||
| − | |||
| − | |||
| − | |||
| − | |||
| − | |||
| − | |||
| − | |||
| − | |||
| − | |||
| − | |||
| − | |||
* <u>Number of products in the new arrivals list</u>: Specify the count of products visible in the new arrivals list on the category page and home page; | * <u>Number of products in the new arrivals list</u>: Specify the count of products visible in the new arrivals list on the category page and home page; | ||
* <u>Number of products on the New Arrivals page</u>: Specify the count of products visible on the "New Arrivals" page; | * <u>Number of products on the New Arrivals page</u>: Specify the count of products visible on the "New Arrivals" page; | ||
| Line 131: | Line 132: | ||
* <u>Show products on category page including sub-categories</u>: Select the checkbox to show new arrivals not only from the current category, but also from the sub-categories; | * <u>Show products on category page including sub-categories</u>: Select the checkbox to show new arrivals not only from the current category, but also from the sub-categories; | ||
| − | + | <u>On Sale</u> module settings: | |
| − | |||
| − | |||
| − | |||
| − | |||
| − | |||
| − | |||
| − | |||
| − | |||
| − | |||
| − | |||
| − | |||
| − | |||
| − | |||
| − | |||
| − | |||
| − | |||
| − | |||
* <u>Show on sale products first in the product list</u>: The "On Sale" products will be displayed first for the "Default" sorting method; | * <u>Show on sale products first in the product list</u>: The "On Sale" products will be displayed first for the "Default" sorting method; | ||
* <u>Show link to the On Sale page in the "Special" section</u>: Select the checkbox to show the "On Sale" link to the "On Sale" page in the "Special" section of the site; | * <u>Show link to the On Sale page in the "Special" section</u>: Select the checkbox to show the "On Sale" link to the "On Sale" page in the "Special" section of the site; | ||
* <u>Show on sale products on the Home page</u>: Select the checkbox to show on sale products on the home page of your store. | * <u>Show on sale products on the Home page</u>: Select the checkbox to show on sale products on the home page of your store. | ||
| − | |||
| − | |||
| − | |||
| − | |||
| − | |||
| − | |||
| − | |||
| − | |||
| − | |||
| − | |||
| − | |||
| − | |||
| − | |||
| − | |||
| − | |||
| − | |||
| − | |||
Revision as of 01:17, 26 June 2012
Contents
Overview
X-HotProducts is a software package that includes three independent modules: New Arrivals, On Sale and Previously Ordered Products.
New Arrivals module
The New Arrivals module allows you to showcase the latest additions to your product catalog.
Depending on the module settings, the list of recently added products can be displayed in the New Arrivals menu in the Customer area sidebar (menu column):

in the product list section (main column):

and on the Home page:

The "Simple" view of the new arrivals list can be set:

On Sale module
The On Sale module adds the "On Sale" label to the thumbnail and main image of any product.
On Sale products can be visible on the Home page (main column):

Previously Ordered Products module
The Previously Ordered Products module allows your customers to quickly find, add to cart and re-order the products they have already ordered at your store.
Link to the Previously Ordered Products page can be visible in the header of the page:

Previously Ordered Products page:

Links to the pages with the "New Arrivals" and "On Sale" products can be visible in the "Special" section (menu column):

Roles in Hot Products module management
If you are an X-Cart GOLD administrator/provider or an X-Cart PRO administrator:
- You can enable/disable and configure the modules included into the Hot Products;
- You can set the "on sale" check-box on the product modify page for every product in your store:

System requirements for installing the X-HotProducts package
To be able to successfully install and use the modules of X-HotProducts package, you must have a working copy of X-Cart Gold or X-Cart Pro v4.4.0 or later already installed on your server. Make sure that the version of the X-HotProducts package you are installing is the same as the version of X-Cart on which your store is based.
Installing the X-HotProducts package
X-HotProducts installation process is the same for both X-Cart Gold and X-Cart Pro.
To install X-HotProducts:
- Obtain the X-HotProducts distribution package by downloading it from the File Area section of your X-Cart Account. The distribution package you need is contained in the archive file X-HotProducts-x.y.z-with-installer.tgz where x, y and z stand for X-Cart version (These need match the version of X-Cart on which your store is based).
- Put the distribution package to the X-Cart root directory on your server or hosting account.
- If you use a Windows-based server, or a UNIX-based server without terminal access:
- a) Decompress the archive with the X-HotProducts distribution package to a directory on your system using your favorite compression program (WinZIP or any other archiver with support for TAR files).
- b) Use an FTP client to upload all the files contained in the archive (retaining the directory structure) to the X-Cart root directory on your server or your hosting account.
- If you use a UNIX-based server with terminal access:
- a) Use an FTP client to upload the archive with the distribution package to the X-Cart root directory on your server or your hosting account.
- b) Decompress the package using the following command:
tar -xzvf X-HotProducts-x.y.z-with-installer.tgz
- Important: Make sure you keep the directory structure while unpacking and uploading the distribution package, otherwise some necessary files can be overwritten!
- In a web browser, run the installation script httр://<YOUR_XCART_DOMAIN>/install-hot-products.php, replacing <YOUR_XCART_DOMAIN> with the actual domain name of your X-Cart based store.
- Enter the Auth code, accept the License Agreement and click the Next button.Note: The Auth code is a random code that was generated after you installed your copy of X-Cart. If you do not remember the Auth code, find it in the Summary section of the X-Cart Admin area (Administration menu -> Summary) before the License info subsection. Another way to obtain the code is to retrieve the value of the variable $installation_auth_code from the file <xcart_dir>include/install.php
- The installation script copies the files and activates the modules. Click the Next button to continue the installation.
- The installation script generates a new system fingerprint. Click the Next button to complete the installation.
- Use the ADMINISTRATOR AREA link to access the Admin area.
Enabling the modules of the X-HotProducts package
After the X-HotProducts installation has been completed, the modules you have installed (New Arrivals, On Sale and Previously Ordered Products) need to be enabled in your store:
- In Admin area, go to the Modules section (Settings menu->Modules).
- Choose the module(s) you wish to enable by selecting the respective check box(es) on the left.
- Click the Apply changes button. This activates the selected module(s).
Configuring the modules of the X-HotProducts package
Two modules of the X-HotProducts package - New Arrivals and On Sale - provide configuration settings which you can adjust according to your preference:
- In the Modules section (Settings menu->Modules), click the Configure link opposite the module name.
The module configuration page (titled by the name of the module) opens.Note: Alternatively, the configuration pages for X-Cart modules can be accessed by choosing Settings menu->General options->Modules tab).
The configuration pages for the modules of the X-HotProducts package look as follows:
- New Arrivals module:
- On Sale module:
- Adjust the settings on the module configuration page as needed (See below for details).
- Click the Apply changes button to save the changes.


Most of the module settings are self explanatory, so here are just a few notes:
New Arrivals module settings:
- Number of products in the new arrivals list: Specify the count of products visible in the new arrivals list on the category page and home page;
- Number of products on the New Arrivals page: Specify the count of products visible on the "New Arrivals" page;
- Show products added in the last N days: Only products added in the last N days will be displayed in the New Arrivals sections;
- Show the new arrivals list on the Home page: Select the checkbox to show new arrivals on the home page of your store;
- Show the new arrivals list in the menu column: Select the checkbox to show new arrivals in the Customer area sidebar;
- Show the new arrivals list in the main column: Select the checkbox to show new arrivals section in the main part of the page;
- Show link to the New Arrivals page in the "Special" section: Select the checkbox to show "New Arrivals" link to the "New Arrivals" page in the "Special" section of the site;
- View of the new arrivals list: Select how the new arrivals will look: as usual products or in the simple mode;
- Show products on category page including sub-categories: Select the checkbox to show new arrivals not only from the current category, but also from the sub-categories;
On Sale module settings:
- Show on sale products first in the product list: The "On Sale" products will be displayed first for the "Default" sorting method;
- Show link to the On Sale page in the "Special" section: Select the checkbox to show the "On Sale" link to the "On Sale" page in the "Special" section of the site;
- Show on sale products on the Home page: Select the checkbox to show on sale products on the home page of your store.