LiteCommerce:2CheckoutCom
|
2Checkout.com is a payment processing gateway supported by LiteCommerce. When you enable this module the corresponding online payment method is available for your store. Then you can easily configure your store to talk to 2Checkout payment service. When customers pay for the items purchased from your store, 2Checkout handles the transaction in a secure environment.
All you need is a merchant account with 2Checkout to accept your customers’ credit card or online checks. If you do not have a 2Checkout account, you can find more information and sign up at http://www.2checkout.com
Configuring the Module
To configure 2Checkout.com module's settings, click on the 'Modules' section of the 'Settings' menu, and select '2Checkout.com' in the list of the activated modules.
2Checkout.com payment version
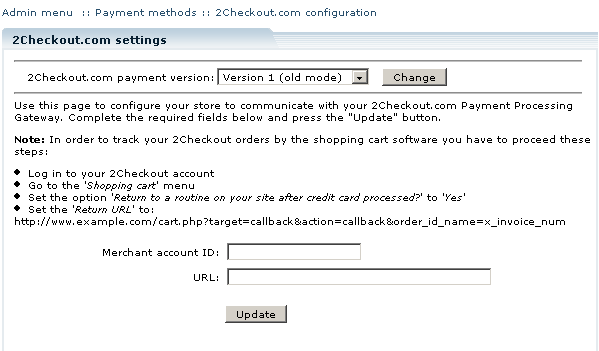
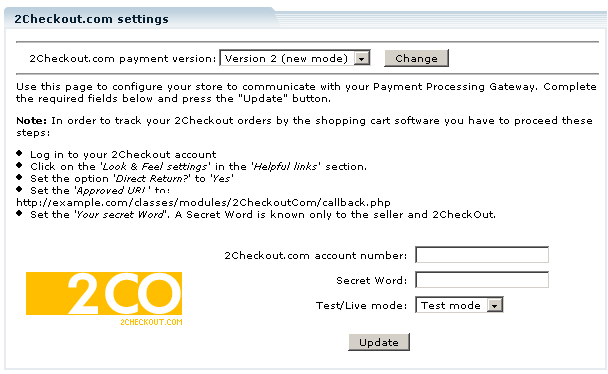
Select Version 1 (old mode) or Version 2 (new mode) from the drop-down box and click 'Change'. Follow the steps, corresponding to your payment version, given below to complete the settings.
Version 1 (old mode)
1. Login to your merchant account on 2Checkout.com.
2. Go to the 'Shopping cart' menu.
3. Set the option 'Return to a routine on your site after credit card processed?' to 'Yes'.
4. Enter a URL into the 'Return URL' field. The URL you need is located on the 2Checkout configuration page in your LiteCommerce-based store. Find the line: 'Set the 'Return URL' to:', copy the URL and paste into the required field in your 2Checkout merchant account.
5. Now return to your LiteCommerce-based store: Admin menu :: Payment methods :: 2Checkout.com configuration
6. Enter your 2Checkout.com Merchant Account ID into the provided field.
7. Enter the URL for sending requests to 2Checkout into the 'URL' field.
8. Click on Update to complete the settings.
Version 2 (new mode)
1. Log in to your 2Checkout account
2. Click on the 'Look & Feel settings' in the 'Helpful links' section.
3. Set the option 'Direct Return?' to 'Yes'
4. Enter a URL into the 'Approved URL' field. The URL you need is located on the 2Checkout configuration page in your LiteCommerce-based store. Find the line: 'Set the 'Approved URL' to:', copy the URL and paste into the required field in your 2Checkout merchant account.
5. Set 'Your secret Word'. A Secret Word is known only to the seller and 2CheckOut.
6. Now return to your LiteCommerce-based store: Admin menu :: Payment methods :: 2Checkout.com configuration. Enter your 2Checkout.com account number and Secret Word in the provided fields.
7. Select Test mode or Live mode from the drop-down box.
8. Click on Update to complete the settings.
Activating 2Checkout Payment Method
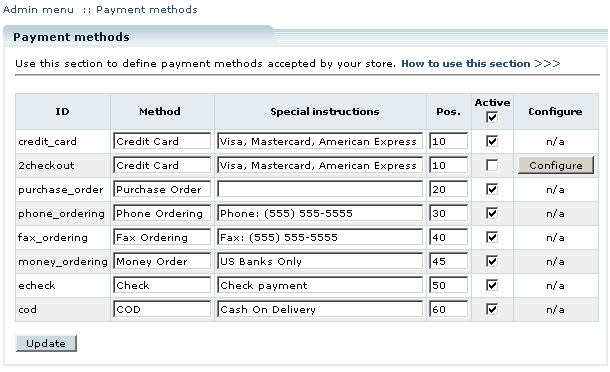
When you have configured 2Checkout payment gateway settings, you need to activate 2Checkout payment method in order to make it available to your customers:
- Click on the 'Payment methods' link in the 'Settings' menu of the Administrator Zone.
- New payment method with '2checkout' ID is now available in the list of existing payment methods. Activate it by placing a check mark in the 'Active' field.
- Click on the Update button to finalize the setup.


