LiteCommerce:Managing Payment Methods
|
The 'Payment methods' section of the 'Settings' menu contains the list of payment methods available at your store and the settings for those payment methods which require configuring.
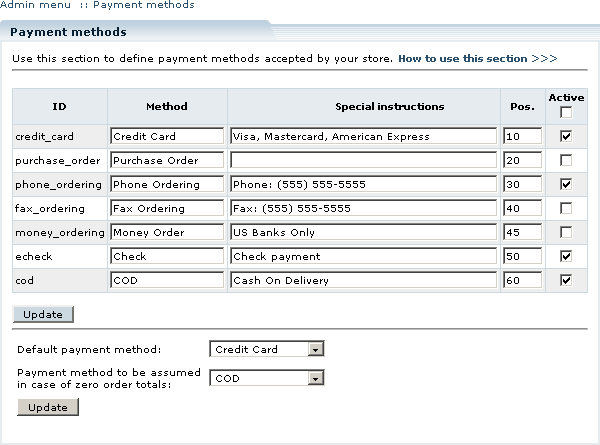
The basic installation of LiteCommerce contains a list of several offline payment methods (Figure 3-14).
Each payment method is defined by its unique non-editable 'ID' and contains a number of parameters:
- The name of the payment method as it will appear in the Customer Zone is defined by the 'Method' field.
- The 'Special instructions' field of the payment method definition can be used to supply important payment information to your customers (E.g.: special instructions for check payment could read "Make your check payable to Our Company").
- Methods are sorted in ascending order of 'Pos.' (position) values. The order in which payment methods appear in the list defines the order in which those methods appear in the Customer Zone.
- Methods can be activated and deactivated. Inactive methods are not offered in the checkout process in the Customer Zone.
You can simultaneously edit the parameters of several payment methods in the 'Payment methods' section. When you finish editing, click on the 'Update' button underneath the list of payment method definitions to save your settings and have them instantly reflected in the Customer Zone.
Two new payment parameters have been included in LiteCommerce software version 2.2:
- 'Default payment method', which defines which payment method should appear as a default option in the checkout process, and
- 'Payment method to be assumed in case of zero order totals', which defines the payment method to be used in certain cases when the use of Gift Certificates, Egoods or Promotion Tools add-on modules makes it possible to place orders with zero totals.
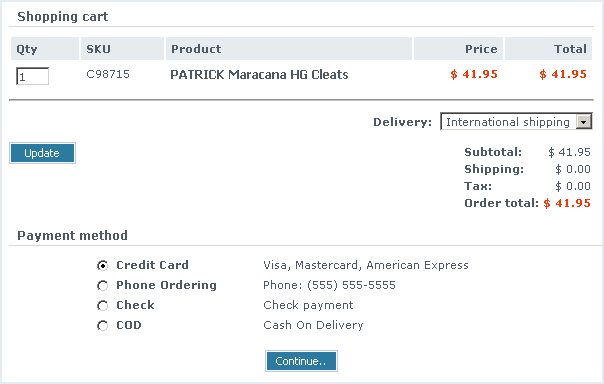
Figure 3-15: Payment method selection screen at the Customer Zone, corresponding to the settings provided in Figure 3-14
When your customers use the store, they see the list of available payment methods at the payment selection screen (Figure 3-15) during the checkout. See LiteCommerce:Completing Orders page for further details.
Defining Credit Card Types
Your customers can use credit cards of different types to pay for orders they place at your store. The list of credit cards accepted at your store can be modified using the 'Credit card types' section of the 'Settings' menu.
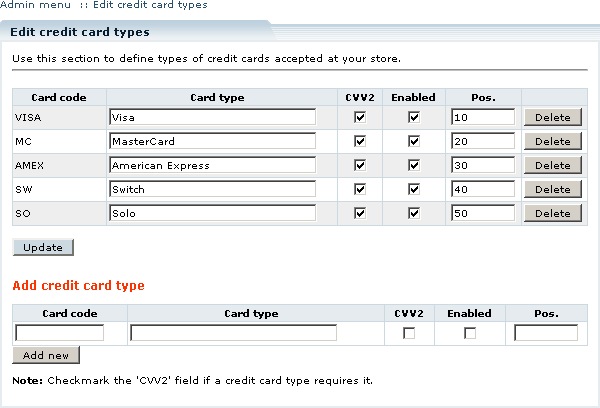
By default, five credit card types can be used: VISA, MasterCard, American Express, Switch and Solo (Figure 3-16).
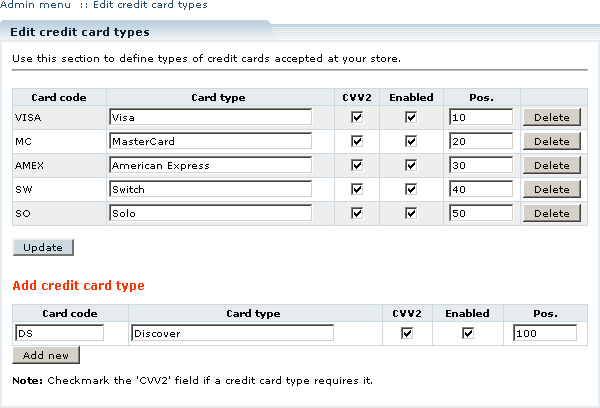
You can add more credit card definitions by specifying card parameters in the 'Add credit card type' form (Figure 3-17). The following card type details must be provided:
- Card code - this is the code which will be used in your store database, it does not necessarily have to comply with conventional codes.
- Card type - this is the name of the card as it will appear in the Customer Zone of your store.
- CVV2 - checkmark this option if you would like to enable CVV2 verification; CVV2 verification requires that your customer provides the valid CVV2 code of his card in order to proceed with the transaction.
- Enabled - checkmark this option to enable the use of the card type or clear the checkbox to disable it; only enabled credit card types can be used by your customers.
- Pos. - this parameter defines the position of the credit card type in the list; credit cards are sorted in the ascending order.
After you have completed the 'Add credit card type' form, click on the 'Add new' button to save the new credit card definition. If the details were filled in correctly, the 'Credit card added successfully' message will appear and you will see an updated list of credit card types.
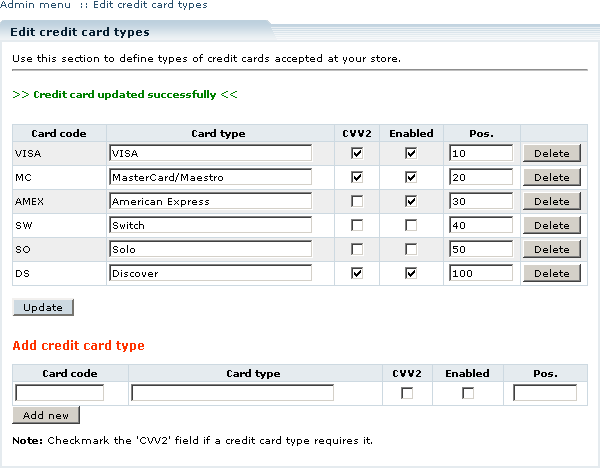
You can modify credit card definitions in the list, changing card type names, list positions and other parameters. The only parameter that cannot be changed is the 'Card code'. Once you make changes to credit card type definitions, click on the 'Update' button for your changes to be saved. 'Credit card updated successfully' message indicates that your changes have been saved (Figure 3-18).
In order to delete a credit card definition, click on the corresponding 'Delete' button.
Using Online Payment Methods
In case you would like to process payment transactions online, you need to employ payment processing gateways (also known as payment service providers or PSPs). Payment gateways offer electronic payment processing services to Internet merchants. They operate by establishing secure communication channels from your customers to the financial institutions that approve transactions and capture funds. When transaction is complete, the payment gateway sends payment confirmation to your store so that the store administrator can take the necessary actions to fulfill the order.
In order to take the benefit of online order processing, you must acquire commercial add-on modules which provide your store with the ability to communicate with the payment gateways. Each payment gateway (such as PayPal, Authorize.Net, 2Checkout or CardinalCommerce) has its unique interface, so you need to purchase an appropriate module that integrates LiteCommerce with the payment gateway of your choice. It is possible to install several payment gateway interfaces and use them simultaneously.
Once a payment gateway add-on module is installed and activated, payment methods it supports become available in the list of payment methods provided in the 'Payment methods' section of the 'Settings' menu in the Administrator Zone of your store and can be configured from there.
For detailed information on installing, configuring and using payment gateway add-on modules, please see the corresponding manuals at LiteCommerce:PDF manuals.
