LiteCommerce:Managing Taxes
|
Contents
Using Tax Scheme Definitions
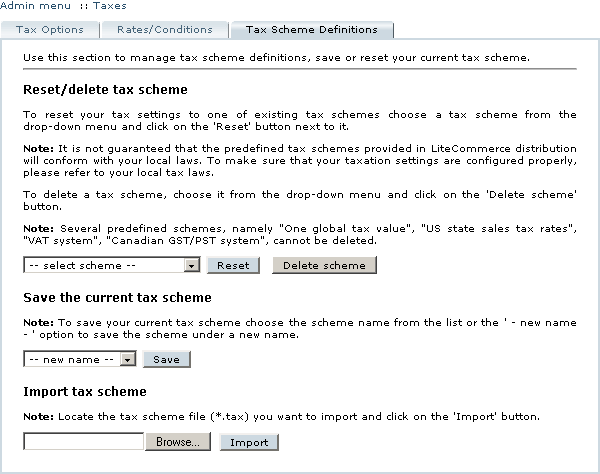
A complete set of tax options, rules and conditions defined is called a tax scheme. While only one tax scheme can be in effect at each particular time, multiple tax schemes can be defined. The schemes can be saved to your store database, restored from the database to be applied to the store, deleted, exported to and imported from a file on your local computer. All tax scheme operations are performed from the 'Tax Scheme Definitions' tab of the 'Taxes' section located in the 'Settings' menu (Figure 3-35).
Using Predefined Tax Schemes
LiteCommerce software contains a number of predefined tax schemes, namely 'One global tax value', 'US state sales tax rates', 'VAT system', 'VAT system (alternative)' and 'Canadian GST/PST system', which cannot be modified or deleted. These tax schemes can be used as a base for your store's own tax scheme or simply viewed as references/samples.
Resetting, Saving and Deleting Tax Schemes
To switch your store to one of the existing tax schemes, choose a tax scheme from the drop-down menu under the 'Reset/delete tax scheme' title and click on the 'Reset' button next to it. Doing so will replace the tax scheme settings in the 'Tax Options' and 'Rates/Conditions' tabs and redirect the browser to the 'Tax Options' tab. You can adjust tax rates/conditions to meet the requirements of your local, national and international laws and save the customized scheme under a new name.
To save the tax scheme currently defined in the 'Tax Options' and 'Rates/Conditions' tabs of the 'Taxes' section, under the 'Save the current tax scheme' title choose the scheme name from the list of existing schemes or the ' -- new name -- ' option to save the scheme under a new name and click on the 'Save' button. If you have chosen the ' -- new name -- ' option, you will be asked to provide a name for the scheme. Type the name in the text field provided and click on the 'OK' button.
To delete a tax scheme, choose it from the drop-down menu under the 'Reset/delete tax scheme' title and click on the 'Delete scheme' button. This operation is irreversible.
Exporting/Importing Tax Schemes
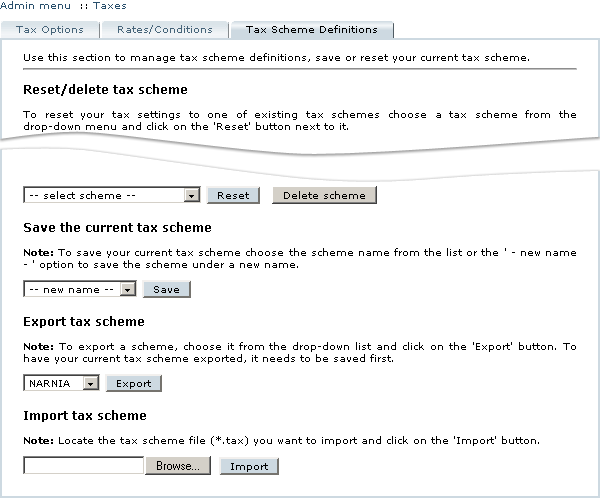
If you have at least one custom tax scheme saved, 'Export tax scheme' title appears in the 'Tax scheme definitions' tab, providing you with the possibility to export existing schemes to your local computer as a single file (Figure 3-36).
To export a scheme, choose it from the drop-down list and click on the 'Export' button. Next you will be prompted to select the folder where the scheme will be exported to and specify the filename. To have your current tax scheme exported, you need to save it first.
If you have a tax scheme definition file (a file with the '.tax' extension created by LiteCommerce software) and you would like to import it to your LiteCommerce store system, click on the 'Browse...' button to locate the file on your local computer and then click on the 'Import' button to import it. The new tax scheme definition will replace the tax scheme settings in the 'Tax Options' and 'Rates/Conditions' tabs.
Defining the Way the Taxes are Displayed in the Customer Zone
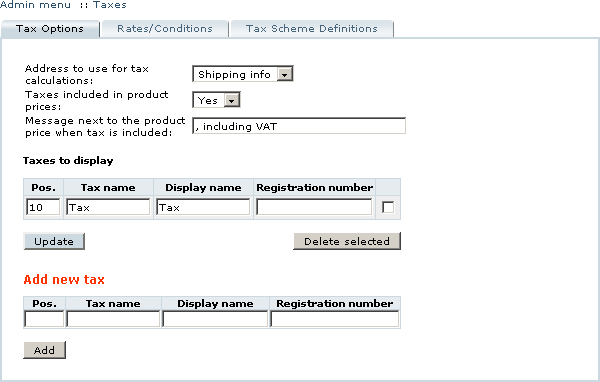
The 'Tax options' tab in the 'Taxes' section of the 'Settings' menu (Figure 3-37) controls the way the taxes are presented in the Customer Zone.
The following options can be configured here:
- 'Address to use for tax calculations', which can be set to either 'Shipping info' or 'Billing info';
- 'Taxes included in product prices', which can be set to 'No' to display calculated taxes separately from the subtotal or to 'Yes'. If you choose to include taxes in product prices, you can specify a message to be displayed next to product prices.
To set the options, specify their new values and click on the 'Update' button to save your new settings.
The 'Tax options' page also contains a list of taxes to be displayed in the shopping cart and checkout pages. You can choose to display only the total tax amount (see Figure 3-7-X), or display individual taxes on separate lines.
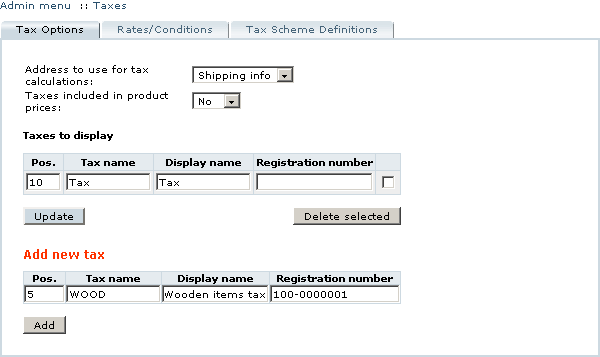
To have a tax displayed, fill the 'Add new tax' form (Figure 3-38) with the following data:
- Pos. (position) - an optional numeric value to denote a position of a tax in the list of taxes displayed. Position values are sorted in ascending order.
- Tax name - the name of the tax as it appears in the 'Rates/Conditions' tab of the 'Taxes' section. You can specify any taxes that have been defined in the 'Rates/Conditions' tab. Tax name 'Tax' is predefined and is used to denote the total tax. Specifying a non-existent tax name here does not affect tax calculations, and since there is no rule to calculate such a tax, it would not be displayed in the shopping cart and checkout pages despite the fact that it has been added to the 'Taxes to display' list.
- Display name (tax label) - the name of the tax as it will appear in the shopping cart and checkout pages at the Customer Zone.
- Registration number - your company's tax registration number, optional.
After you have filled the form fields, click on the 'Add' button to have the tax added to the display list.
You can modify the list of taxes to be displayed by editing the corresponding fields and clicking on the 'Update' button to save your changes.
To remove a tax from the list of taxes being displayed in the shipping cart:
- locate the tax in the list,
- place a checkmark in the field to the right from the tax details, and
- click on the 'Delete selected' button.
Removing a tax from the display list does not remove it from the 'Rates/Conditions' page and does not affect the tax calculations.
Defining Tax Rules and Conditions
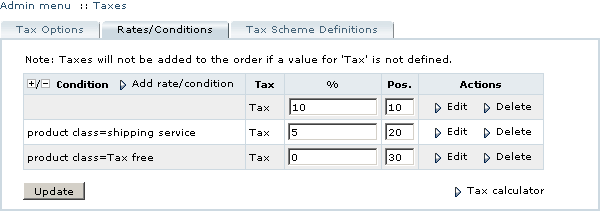
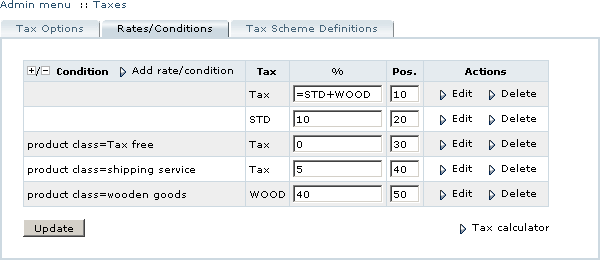
LiteCommerce software features a sophisticated mechanism for defining tax rules and performing tax calculations. Taxes are calculated according to the rules specified in the 'Rates/Conditions' tab of the 'Taxes' section (Figure 3-39). They are calculated independently for each product in the shopping cart and for the shipping service, and then summed up into a tax total.
Here is how taxes are calculated. For example we have the following list of conditions:
- Tax=10 (no conditions)
- Tax=8.25 (for US & California)
- Tax=1 (for product class=shipping service)
- Tax=0 (for product class=Tax free)
1. For each product in the cart a suitable condition is found depending on product class. Then it is checked whether there are any suitable conditions depending on location.
2. Tax is calculated for predefined type 'shipping service'.
3. All the results are summed up to form a tax total.
The procedure described above is true if all the rules are defined. If some of the rules are not defined (for example, no rule for product class=shipping service or no rule for product class=Tax free) calculation will be done according to available rules. This means that if no specific rule is defined for shipping service, tax will be calculated for shipping as well as for all other product classes.
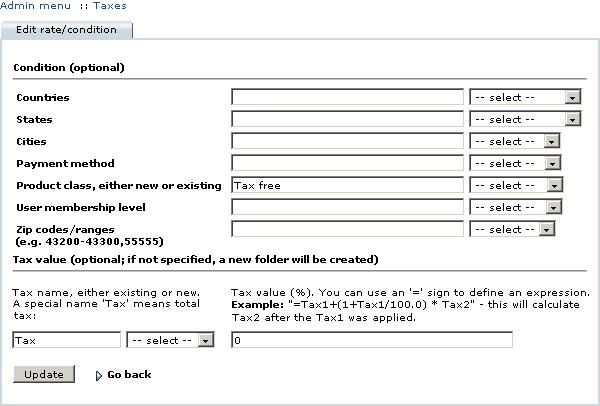
Taxes are defined by their names, conditions on which they apply, their values (%) and list positions. You can change tax values and positions by editing the corresponding fields in the list of tax rules and clicking on the 'Update' button to save the modifications. To edit tax name and conditions, locate it in the list and click on the corresponding 'Edit' link. This will open the 'Edit rate/condition' page (Figure 3-39) where you can edit the tax conditions, name and value by changing the corresponding data fields and clicking on the 'Update' button you save your changes.
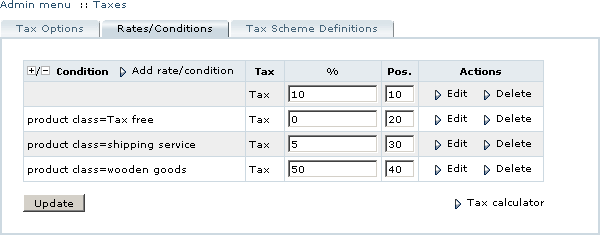
Depending on miscellaneous conditions, some taxes can have varying values. In such cases, tax rates have to be defined independently for each condition. When LiteCommerce software calculates taxes applicable to a product, it starts with the top condition and proceeds through the whole list. The last matching condition is used to calculate the applicable rate. For correct calculation of taxes it is essential that tax definitions are placed in the proper order by adjusting their 'Pos.' values: more general conditions must be placed before the specific ones to avoid undesirable replacements.
The 'shipping service' product class is predefined, with shipping charges automatically falling into it, which makes it possible to define taxes on shipping charges separately. Other product classes can be defined using the 'Add rate/condition' page, there is no limit on their amount. A product can be assigned a product class from the list of defined product classes using the 'Product info' page (for further details on managing product catalog see the section "Modifying Product Details").
Adding tax rates
To add a new tax rate definition:
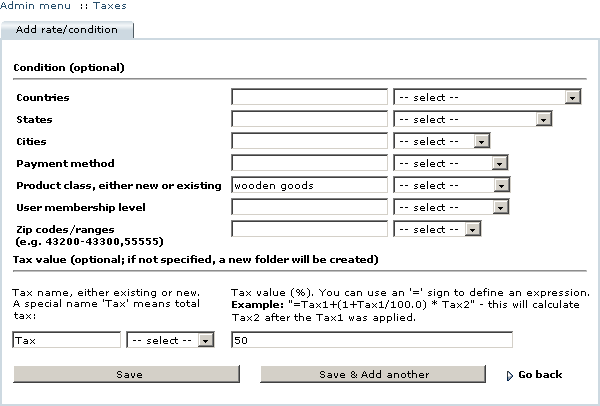
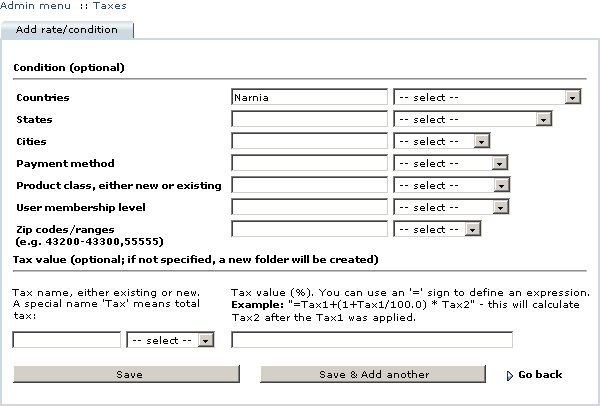
- click on the 'Add rate/condition' link at the top of the list of tax definitions. The 'Add rate/condition' page will appear (Figure 3-41);
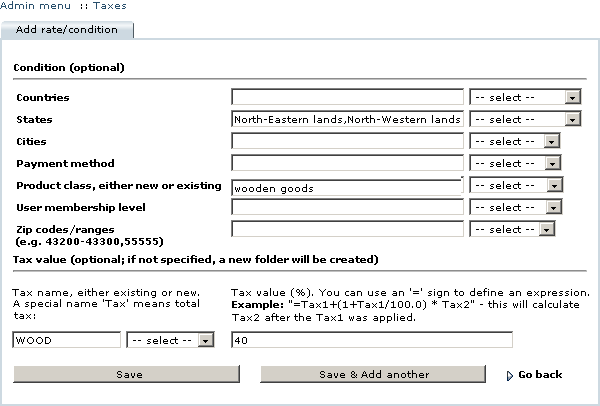
- specify the relevant conditions by selecting the appropriate options from drop-down lists on the right or typing the explicit values in the corresponding text fields (Figure 3-41 demonstrates an addition of a product class named 'wooden goods');
- specify the tax name, either existing or new;
- specify the tax value either as a percentage of product price (without the percentage '%' sign) or as a formula comprised of existing tax names, preceded by the equality sign '=';
- click on the Save' button (you can click on the 'Save & Add another' button instead to add more tax rate definitions).
![]()
Creating complex tax schemes
In cases of complex tax rules and conditions it is preferable to have all tax rules organized into a tree-like structure with most general conditions appearing at the first (root) level of the tree and more specific conditions defined within them. Multiple geographical areas using the same tax calculation formulas with different tax rates is one typical example.
To define a root level condition:
- click on the 'Add rate/condition' link at the top of the list of tax definitions, the 'Add rate/condition' page will appear (Figure 3-44);
- specify the relevant conditions by selecting the appropriate options from drop-down lists on the right or typing the explicit values in the corresponding text fields;
- leave the tax name and tax value fields empty;
- click on the 'Save' button (you can click on the 'Save & Add another' button instead to add more conditions and/or tax rate definitions).
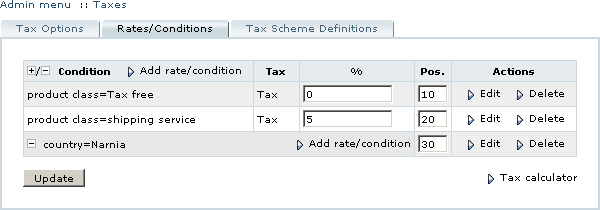
The newly defined condition will appear in the list of tax rates and conditions as shown in Figure 3-45.
You can now specify taxes for the new condition and define sub-conditions and taxes for those sub-conditions by clicking on the 'Add rate/condition' link to the right from the root condition.
Defining combined conditions
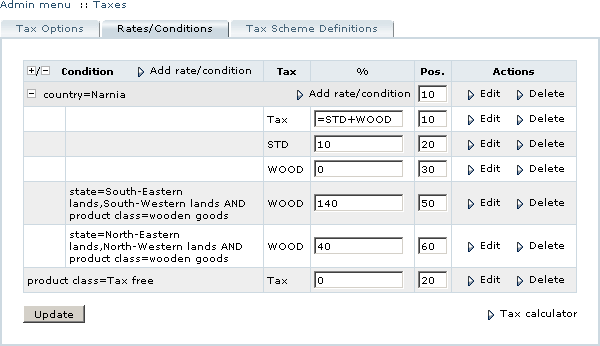
Multiple conditions can be used to form one combined condition (Figure 3-46). The combined condition is met if every component of it is met.
One component of a combined condition can have one or several values. It is considered to be met if one of the values is matched. Multiple values are grouped into comma-separated lists without spaces before or after the comma sign as shown in Figure 3-46 (see the 'States' condition).
![]()
Note that the list of sub-conditions and conditional taxes has 'Pos.' ordering of its own, the same ordering rules apply to both root level conditions and sub-conditions. Also note the '[-]' sign to the left from the root level condition ('country=Narnia') which signifies that the list of sub-conditions and tax rates for this condition has been revealed. Clicking on the '[-]' sign hides the list and turns the '[-]' sign into '[+]' (Figure 3-48). Clicking on the '[+]' sign reveals the list once again. This feature is useful when extremely complex tax schemes are being used.
Using tax calculator
The 'Tax calculator' tool located in the 'Rates/Conditions' tab of the 'Taxes' section comes handy when you need to see the tax values for various conditions using the tax scheme definition in use. To use the tool:
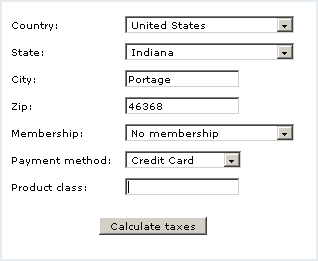
- Click on the 'Tax calculator' link. A new browser window will open (Figure 3-49).
- Specify the conditions for which you would like the taxes to be estimated and click on the 'Calculate taxes' button. Calculated tax rates will appear underneath.
- You can specify other conditions and see their rates without reopening the tax calculator.
Deleting tax rates and conditions
To delete a tax rate or condition definition, in the 'Rates/Conditions' tab locate the definition in the list and click on the 'Delete' link.
