X-Cart:Amazon Payments
Overview
With Amazon Payments, hundreds of millions of Amazon customers can pay on your site with the information already stored in their Amazon accounts. It's fast, easy and secure and helps you add new customers, increase sales, and reduce fraud costs. Leverage the trust of Amazon to grow your business. And with X-Cart, it's easy to set up.
- Trusted by Customers: Make Amazon's customers your customers with a simpler way to pay. Amazon buyers are highly satisfied with their payment experience on Amazon. Add Amazon Payments to your site and give them a familiar choice they already know and trust.
- Increase sales. Capture sales you might otherwise miss from buyers who are reluctant to enter their credit card information. Increase buyer confidence and encourage new customers to buy on your site and return to buy again.
- Proven Fraud Protection. Reduce your costs and protect your business with Amazon's proven fraud detection. Protect your business with the same sophisticated fraud detection technology used by Amazon.com at no additional cost.
- No add-on fees, period. Help lower the total cost of accepting payments for your business with low, volume-based pricing: 2.9% +$0.30 per transaction, or less. You know up front what you will pay because there are no hidden fees or add-ons for monthly use, setup, cancellation or unused authorizations.
X-Cart provides a module that enables Amazon Payments at your store - Checkout by Amazon.
When the Checkout by Amazon module is enabled and configured, a special button appears on the cart page:
Customers review all order details, including promotions, shipping costs and tax, in a single co-branded pop-up and complete the order in a single click.
When customers click the Pay with Amazon button, they are redirected to Amazon, where all the required information is stored and used. When the order has been successfully placed, a customer is offered to return to your store and continue shopping.
Setting up Checkout by Amazon
To use Checkout by Amazon at your store, you will need to complete the following steps:
- Enable X-Cart's 'Checkout by Amazon' module:
- In your store's Admin area, go to the Modules page (Settings menu->Modules).
- In the list of modules, find the name of the module - Checkout by Amazon - and select the check box next to it.
- Click Apply changes.
The module is enabled. A link to the module's configuration page ('Configure') appears next to the module's description. You can use this Configure link to access the Checkout by Amazon configuration page.
- If you haven't yet done so, sign up for Checkout by Amazon. For your convenience, we provided a Sign up for Checkout by Amazon button on the module configuration page.
- After you’ve completed the signup process, log in to the Seller Central website at https://sellercentral.amazon.com/ and obtain some information that you will need to enter in X-Cart:
- Your Checkout by Amazon Merchant ID (a 14-digit string such as "AEIOU1234AEIOU"). This can be obtained on the Settings->Checkout Pipeline Settings page.
- An Access key ID and a Secret key that are associated with your Checkout by Amazon account. These can be obtained on the Integration->Access Key page.
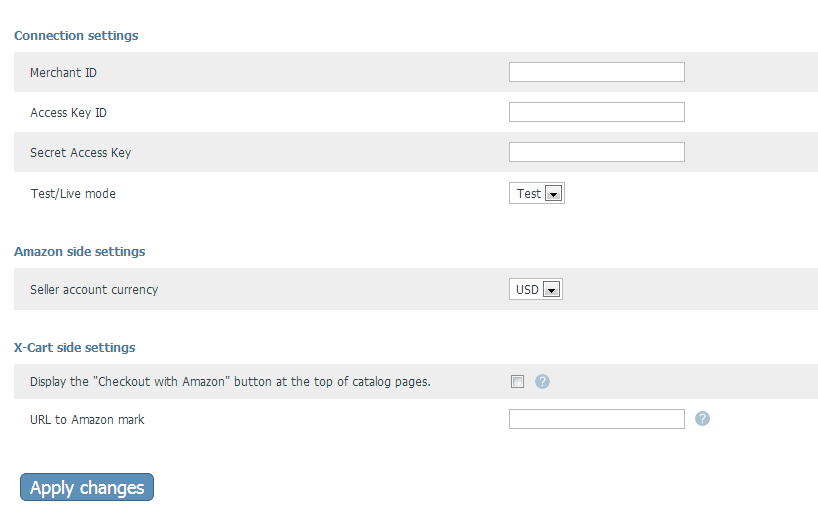
- In your store's Admin area, go to the Checkout by Amazon configuration page (General settings/Modules ->Checkout by Amazon) and adjust the module's configuration settings:

- Merchant ID: Enter your Merchant ID.
- Access Key ID: Enter your Access Key ID.
- Secret Access Key: Enter your Secret Access Key.
- Test/Live mode: Select whether you are going to use your Sandbox account (Test mode) or your production account (Live mode).
- Seller account currency: Specify the type of currency supported by your seller account. Your X-Cart store will send prices to Amazon Checkout in this currency (There is no currency converter, so it is expected that your store uses the same currency). At present, Amazon Checkout supports only two types of currency - Pound Sterling (GBP) and United States Dollar (USD).
- Display the "Checkout with Amazon" button at the top of catalog pages: Enable this option if you want to enable the "Pay with Amazon" button at the top of all catalog pages in your store. Note that in some cases using this option can slow down your shop pages. Please test your pages before leaving this option enabled in the production mode.
- URL to Amazon mark: Specify the image URL for the Amazon Payment mark you would like to use to communicate to your customers that you are now accepting Amazon payments. You can access the resources page providing some Amazon Payment marks and graphics using the Amazon Payment Marks link in the help tooltip for the 'URL to Amazon mark' setting. Leave this field empty if you do not wish to use a mark.
Be sure to save the changes.
- Make sure you have the correct "callback URL" specified in your Seller Center account:
- On the Settings->Checkout Pipeline Settings page of Seller Central, click the Edit button to edit your Checkout Pipeline Settings.
- On the Checkout by Amazon configuration page of your store's Admin area, locate the lines saying: "This URL should be used as 'Merchant URL' in your Checkout by Amazon account: https://[your_store's_secure_URL]/payment/ps_amazon.php", copy the URL and paste it it the 'Merchant URL' field in Seller Central. Please do not use this URL in the 'Integrator URL' field!
- Click Update to save the changes.
Please note that in Live mode Checkout by Amazon only communicates with servers that have SSL certificates installed. Make sure your server has a valid SSL certificate, otherwise the module will not be able to function correctly, as your store will not be able to receive any messages or notifications from Checkout by Amazon. In Test mode an HTTP connection can be used.
See also: