X-Cart:Orders
Contents
Orders in X-Cart
In an X-Cart based store, customers purchase products by placing orders. An order is a collection of information about a purchase, which includes:
- information about product items being purchased (product titles, quantities, prices);
- information about the customer who is making the purchase (personal information, billing and shipping addresses, contact information);
- information about the method of delivery selected by the customer (name of method, shipping cost);
- information about the payment method selected by the customer (name of method, payment details);
- discounts, coupon codes or gift certificates applied;
- total amount.
Each order has its unique order id number and, at any moment in time, is characterized by a status. For information on the system of order statuses used in X-Cart, see the section Order Statuses.
Roles in order management
If you are an X-Cart GOLD or GOLD PLUS administrator/provider or an X-Cart PLATINUM or PRO administrator:
- You can manage all the orders in your store (Study the section #Managing Orders):
- search for orders, - view orders, edit customer notes, add notes that are not visible to customers and modify order details, - update order statuses, - print order invoices and shipping labels, - export orders, - delete orders.
If you are an X-Cart PLATINUM or PRO provider:
- You can manage the orders that contain your products (Study the section #Managing Orders):
- search for orders, - view orders, edit customer notes, add notes that are not visible to customers, - assign the status Complete to orders processed by the administrator, - print order invoices and shipping labels, - export orders.
- You cannot delete any orders.
Order Statuses
Statuses of orders paid for by offline payment methods
When a customer chooses to pay for an order using an offline payment method (a payment method that requires manual processing of payment by the store administrator), the order is created with the status Queued ('Q'). This is the initial status indicating that the order has been created in the store's database and is waiting to be processed by the store administrator.
After an order has been placed with the status Queued, the store administrator must process it: arrange for the payment to be received from the customer and ensure that the order is packed and shipped to the customer. Typically, each store processes orders according to its own workflow. The store administrator can track the stages of the process in X-Cart by manually updating the status of the order at each order processing stage. The following order statuses can be used:
- Processed - The status indicating that the payment has been received by the store.
- Complete - The status indicating that all work on the order has been completed. For example, this status can be assigned to an order by the store administrator or (in X-Cart PLATINUM and PRO) by the product provider after the order has been shipped.
- Declined - The status indicating that the order has been canceled by the store administrator. For example, this status may be used when an order is found to be fraudulent.
- Backordered -The status indicating back orders. It can be manually assigned to orders containing products that are temporary out of stock.
- Failed - The status indicating that the payment transaction has not been completed successfully.
Statuses of orders paid for by online payment methods
When a customer chooses to pay for an order using an online payment method, the order is created with the status Not finished ('I'). This is the initial status indicating that the order has been created in the store's database, but a response from the online payment processor has not been received yet; the transaction is neither successful nor failed.
After the order has been placed, the online payment processor processes the payment and exchanges information about the status of the payment transaction with X-Cart. X-Cart interprets the information received from the payment processor and automatically updates the order's status. The following statuses may occur:
- Queued - The status indicating that the online payment processor has returned a temporary status indicating waiting (for example, an order processed through PayPal may get the status 'Queued' when PayPal returns 'Pending' status).
- Processed - The status indicates that the "Capture" or "Authorize and capture" request has been successfully processed and accepted by the online payment processor.
- Pre-Authorized - The status indicating that the amount corresponding to the order total has been successfully authorized by the online payment processor; this status occurs only in orders paid for using a payment method working in 'Auth only' mode.
- Failed - The status indicating that payment processing has failed.
Orders that receive the status Pre-Authorized require further manual processing by the store administrator: the store administrator must either capture the amount for which authorization was issued or void the transaction. If he or she performs the 'Capture' action and the payment is captured successfully, the status of the order is updated to Processed. If he or she performs the 'Void' action, the authorization is voided and the order status is updated to Declined. If the store administrator fails to capture or void the authorization within the time limit defined by the payment processor, X-Cart updates the order status to Declined automatically.
Please note that the statuses Complete and Backordered are not assigned to orders paid for by online payment methods automatically. If you wish to use these statuses for orders, you can assign them manually.
Managing Orders
Finding orders
X-Cart allows you to search for orders contained in the store's database. To find a specific order:
1. Go to the 'Orders Management' section of your store. Click on Search for orders in the Management menu.
2. Use the 'Search for orders' form to provide criteria for your search.
- You can use basic search:

- and advanced search (accessible by clicking the [+] More search options link):

- Basic search allows you to search for orders by the date/period when they were placed.
- You can select:
- 'All dates' to find orders placed on any date.
- 'This month' to find orders placed in the current month.
- 'This week' to find orders placed during the current week.
- 'Today' to find orders placed during the day.
- 'Specify period below' to adjust the period more specifically (by providing the first and last days of the period in the 'Order date from' and 'Order date through' fields).
- Advanced search allows you to specify additional search parameters to fine-tune your query. You need to specify only the parameters relevant to your search; the more information you provide about the order(s) being searched for, the more accurate the search results will be. You can provide the following information:
- 'Order id' - Range of order IDs that needs to be found. You need to specify the initial and the final IDs of the range. It is also possible to provide just one of the two values:
- providing just the initial order id returns all the orders with id's ranging from the specified id to the greatest id in the database;
- providing just the final order id returns all the orders with id's ranging from the smallest id in the database to the specified id.
- 'Order id' - Range of order IDs that needs to be found. You need to specify the initial and the final IDs of the range. It is also possible to provide just one of the two values:
- 'Order total' - Range of order totals that needs to be found. You need to specify the minimum and maximum order totals (or just one of the values - same as for the order id's).
- 'Payment method' - Payment method used for the order(s). The 'Payment method' drop-down box contains only those payment methods that have actually been used for orders in your store.
- 'Delivery method' - Shipping method used for the order(s). The 'Delivery method' drop-down box contains only those shipping methods that have actually been used for orders in your store.
- 'Order status' - Order's status (Not finished, Queued, Processed, Pre-Authorized, Backordered, Declined, Failed or Complete).
- 'Provider' - The provider whose products are contained in the order(s).
- 'Order features' - Features describing the order(s). To select multiple features, hold down the 'Ctrl' key while clicking the names of features with your mouse.
- 'Search for pattern' - Substring that you wish to be searched for.
- 'Search in Title / Options' - Field of the table 'xcart_order_details' in which you wish the substring specified in the 'Search for pattern' field to be searched for (Selecting Title enables search in the 'product' field, Options - in the 'product_options' field).
- 'SKU' - SKU of the product contained in the order(s).
- 'Product ID #' - ID of the product contained in the order(s).
- 'Price' - Price range that includes the price of the product contained in the order(s).
- 'Customer' - Substring that you wish to be searched for (By default, search is conducted by the username of the customer who placed the order; if you select First Name or Last Name in the following line, the substring will also be searched for in the 'firstname' and 'lastname' fields of the table 'xcart_orders').
- 'Search in: First Name / Last Name' - Field of the table 'xcart_orders' in which you wish the pattern specified in the 'Customer' field to be searched for - in addition to the customer's username (Selecting First Name enables search in the 'firstname' field, Last Name - in the 'lastname' field).
- 'Search by address: Ignore address / Billing / Shipping / Both' - Whether the customer's address must be used and the type of this address.
- select Ignore address if you wish customer's address to be ignored (Address fields are inactive if Ignore address radio button is selected);
- select Billing / Shipping / Both to be able to specify an address.
- 'City', 'State', 'Country', 'Zip/Postal code' - Customer address fields.
- 'Phone/Fax' - Customer's phone or fax number.
- 'email' - Customer's email address.
- One-time/multiple customer - select from All, One-time customer and Return customer.
3. If you wish to immediately export the search results to a CSV file, select the 'Export search results to a CSV file' check box.
4. Click the Search button.
After you click on Search, X-Cart searches for the order(s) in the database and outputs a list of search results in a dialog box titled 'Search results':

For each of the found orders, the 'Search results' dialog box provides the following details:
- # - The order ID.
- STATUS - The current status of the order.
- CUSTOMER - The full name and username of the customer who placed the order. For registered customers, the name and username represent a link that can be used to view the customer's user profile. For customers whose user profile has been deleted no link is provided; such customers are marked in the order search results as 'deleted'.
- PROVIDER (the column is visible only to store administrators) - The username of the provider who is the owner of the products contained in the order.
- DATE - The date on which the order was placed.
- TOTAL - The total amount of the order.
Clicking on an order in the 'Search results' dialog box allows you to view the details of this order.
The buttons below the search results allow you to perform various operations on the found orders:
- X-Cart PLATINUM/PRO administrator and X-Cart GOLD/GOLD PLUS administrator/provider users can update order statuses and delete selected orders.
- all users (X-Cart PLATINUM/PRO administrator, X-Cart PLATINUM/PRO provider and X-Cart GOLD/GOLD PLUS administrator/provider) can print invoices and shipping labels for selected orders and export orders.
X-Cart retains the parameters you define for an order search until your session expires. This means that, if you decide to do a new search after you have already searched for something in your current session, the 'Search for orders' form will still have all the settings you used during your previous search. Make sure these old settings agree with what you are going to search for or readjust the search parameters. If the advanced search section of the 'Search for orders' form contains any settings that you do not need for your new search, you can quickly clear this section by clicking the 'Reset filter' link at the bottom of the 'Search for orders' form.
Updating order statuses
Users with administrator privileges (X-Cart GOLD, GOLD PLUS, PLATINUM and PRO) can change the statuses of orders displayed as a list in the 'Search results' dialog box.
To change the status(es) of one or more orders, do the following:
- Find the orders whose statuses need to be changed.
- In the 'Search results', re-adjust the STATUS drop-down boxes opposite these orders.
- Click the Update status button.
Viewing orders
At any time, you can view any order that is stored in the database, provided you have the permissions to access this order.
To view an order:
- Find the order.
- In the 'Search results' dialog box, click on the order id, date of placement or total amount of the order. This opens the 'Order details' page with all the information about the order:
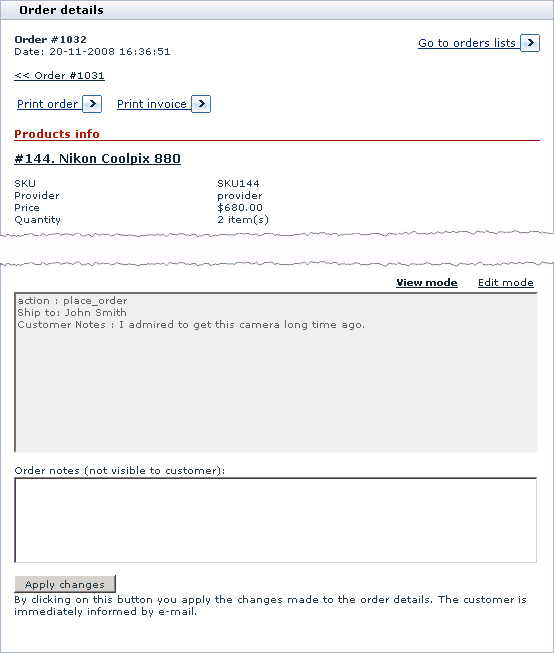
The 'Order details' page provides the following information:- 'Products information' section: Information about the products contained in the order.
- 'Order information' section: Payment method and shipping method selected for the order, order subtotal amount, discounts applied, shipping cost, order total amount.
- 'Customer info' section: Information about the customer who placed the order.
- 'Customer notes' field: Notes entered by the customer at the time of order placement.
- 'Status' field: Order status.
- 'Tracking number' field: Order tracking number.
- 'Order details (not visible to customer and provider)' section: Notes about the order that are visible only to the store administrator. For orders paid for using an online payment method, this section also contains a link titled 'Payment gateway log'. Clicking on this link allows you to view information about this order that was received from the payment processor.
- 'Order notes (not visible to customer)' section: Notes about the order that are visible only to the store administrator and (in X-Cart PLATINUM and PRO versions) product providers.

To go back from the 'Order details' page to the orders list, you can use the link Go to orders list at the top.
Editing order details
Updating the status of an order
The status of an order opened for viewing can be updated directly from the 'Order details' page.
Administrator users:
If the order is in a status other than Pre-Authorized, you can change its status as follows:
- On the 'Order details' page, find the drop-down box displaying the order's current status.
- From this drop-down box, select a new status.
- Click the Apply changes button.
When you click on Apply changes, the order status changes to the status you selected.
Provider users:
You can assign the status Complete to orders that have been successfully processed and now have the status Processed:Click the Complete order button at the bottom of the 'Order details' form. The order status changes to Complete.
Processing a Pre-Authorized order
If the order is in Pre-Authorized status, you can either capture the authorized amount or void the authorization.
For PayPal, Authorize.Net, LinkPoint, Sage Pay VSP Direct or NetRegistry e-commerce orders, you can do this using the buttons below the 'Order details' field:
- To perform the 'capture' action, click the button Capture.
- To perform the 'void' action, click the button Decline.
After the action chosen by you is successfully completed, the status of the order is automatically updated to Processed or Declined, respectively.
For VirtualMerchant orders, the ability to perform the 'capture' and 'void' actions from X-Cart's interface is not supported (the buttons Capture and Decline are not displayed); however, you can perform these actions using your VirtualMerchant account backoffice.
Editing customer notes
If necessary, you can edit customer notes stored with an order.
To edit customer notes:
- On the 'Order details' page, find the 'Customer notes' text area.
- Edit the text contained in this text area.
- Click the Apply changes button.
Adding notes to an order
To add notes to an order opened for viewing:
- On the 'Order details' page, find the 'Order notes (not visible to customer)' text area.
- Type your notes into this text area.
- Click the Apply changes button.
Editing the 'Order details' field of an order
Administrator users can edit the contents of the 'Order details' field of orders.
To edit the contents of the 'Order details' field, do the following:
- On the 'Order details' page, find the section 'Order details (not visible to customer and provider)'. In this section, you should see a field containing the order details.
- To start editing the contents of this field, click the Edit mode link at the top right-hand corner of the field. This enables Edit mode.
- Edit the contents of the 'Order details (not visible to customer and provider)' field.
- Click the Apply changes button. This turns off the Edit mode and saves the changes.
Printing order invoices and shipping labels for orders
X-Cart allows you to print order invoices and shipping labels for orders.
To print invoices:
- Find the orders for which you need to print invoices.
- Select the check boxes next to them in the 'Search results' dialog box.
- Click the Invoices for selected button. A new window should appear displaying invoices for the selected orders.
- Print the page contained in the new window.
To print shipping labels:
- Find the orders for which you need to print shipping labels.
- Select the check boxes next to them in the 'Search results' dialog box.
- Click the Quick labels for selected button. A new window should appear displaying shipping labels for the selected orders.
- Print the page contained in the new window.
Exporting orders
X-Cart provides a number of options for exporting orders. It is possible to export all the orders stored in the database, all the orders returned by an order search query or just some specific orders. Several export formats are supported: standard format (for use with 4.1.x versions of X-Cart), 4.0.x compatible format (three variations are available depending on the desired delimiter - tab, comma or semicolon) and, if QuickBooks module is enabled, IIF (QuickBooks 2002, 2003).
To export all orders:
- Go to the 'Orders Management' section of your store. Click on Search for orders in the Management menu.
- Scroll down to the 'Export/Delete orders' section (administrator users) / 'Export orders' section (provider users) and select the desired file format from the 'File format for export' drop-down box.
- Click the Export all button.
If you have chosen to export orders in the standard format, X-Cart creates a set of orders for exporting via X-Cart's 'Import/Export' section.
If you have chosen any format other than standard, you are offered to save the results of order export on your local computer in the form of a CSV or IIF file.
To export specific orders:
- Find the orders that need to be exported.
- In the 'Export orders' subsection of the 'Search results' dialog box, select the desired file format for export.
- Do one of the following:
- If you wish to export all the found orders, click the Export all found button.
- If you wish to export just some of the returned results, select the check boxes next to the orders that need to be exported and click the Export selected button.
If you have chosen to export orders in the standard format, X-Cart creates a set of orders for exporting via X-Cart's 'Import/Export' section.
If you have chosen any format other than standard, you are offered to save the results of order export on your local computer in the form of a CSV or IIF file.
Deleting orders
X-Cart allows administrator users to delete orders. If you are an administrator, you can delete some or all of the orders stored in the database.
To delete all orders:
- Click on Search for orders in the Management menu to go to the 'Orders Management' section of your store.
- Scroll down to the 'Export/Delete orders' section.
- Click the Delete all orders button. When prompted, confirm the deletion:

After you confirm the deletion, the orders are deleted.
To delete specific orders:
- Find the orders that need to be deleted.
- In the 'Search results' dialog box, select the check boxes next to the orders that need to be deleted.
- Click the Delete selected button. When prompted, confirm the deletion:

After you confirm the deletion, the orders are deleted.
FAQ
How To Increase or Alter order number
Go to the "Patch/Upgrade" section of your xcart admin area and submit this code via the "SQL query(ies)" form:
ALTER TABLE xcart_orders AUTO_INCREMENT = xxxxxx;
Set xxxxx to be the order number you wish your orders to go from. Please, make sure this number is bigger then the last order number in your cart.
For example:
ALTER TABLE xcart_orders AUTO_INCREMENT = 10000;
I use HTTPS in the admin area and keep getting the non-secure objects on the screen warning. Why is that?
X-Cart uses a free Google Maps API which can be accessed only over a non-secure (HTTP) connection. Thus, if you are viewing the order page in the admin back over a secure (HTTPS) connection, the browser may pop up a warning about non-secure objects on the screen.
Google Maps API HTTP services is available over a secure (HTTPS) connection to Google Maps API Premier customers.
For more info please refer to Google's FAQ:
Possible solution: disable the warning message in the browser: