X-Cart:Product Options
Contents
Overview
What Product Options module does
If you wish to sell products that differ from one another but slightly (e.g. in color or in size), there's no need to create a separate X-Cart product for each of these variations. Instead, you can treat them as one product and sell them under the same product title. To enable your customers to choose the necessary product variation, you can describe the difference between the variations in terms of product options - choices available to select from when ordering a product item. When adding an item to the shopping cart, your customers will choose the desired option or combination of options and thus will let you know which of the variations they want.
The module Product Options allows you to use options for products. Depending on the nature of the product being sold and on the quantity of variations of the product that need to be made available for sale, your approach to defining product options will be different.
The module allows you to define product options of three types: price modifier, product variant and custom text field.
Price modifier is an option type that allows you to define how choosing this or that product option modifies the price of the product item. The amount by which the product's price is increased or reduced can be expressed as an absolute or a percentage value.
Example:
Product: "Gone With The Wind", a book by Margaret Mitchell
Base price: $7.99

Options: Paperback (base price), Hardcover (+ $19.01).

Prices of product variations (based on the product base price modified by options):
Paperback - $7.99,
Hardcover - $27.00 (= $7.99 + $19.01)
Options of the price modifier type are good for describing features that can be made available to the customer on demand (like gift wrap, or anything that you can obtain as soon as a customer orders it - for example, red color for a t-shirt, provided you are the t-shirt producer and red is one of the standard colors that you use for t-shirts).
Product variant is an option type that helps you define all the possible combinations of product options available in specific product items. Product variations treated as product variants can have their own SKUs, prices, weights and product images, and you can track their quantity in stock separately.
Example:
Product: T-shirt

Options:
Color:    White, Blue
Size:      S, M, L, XL

Variants:

White + S          Blue + S
White + M          Blue + M
White + L          Blue + L
White + XL         Blue + XL
Custom text field is an option type that facilitates customization and personalization for product items. It enables customers to provide a detailed description of the options they wish to go with the item. For example, when a customer purchases a product item as a gift for someone else, he or she might want a card to be sent along with it; a custom text field in the list of the item's options would be a nice way to allow the customer to create a custom card message.
Product Options is available as a built-in module in all X-Cart editions. It does not require installation and can be enabled in the Modules section of X-Cart Admin area.
Roles in Product Options module management
If you are an X-Cart GOLD or GOLD PLUS administrator/provider or an an X-Cart PLATINUM or PRO administrator:
- You can enable/disable Product Options module and adjust its configuration settings (See Enabling and Configuring 'Product Options').
- You can create and manage options of any type for any product in the store (See Managing Product Options):
- add product option groups and define specific option values
- manage product option groups and specific option values
- You can define product option exceptions to disable certain combinations of product options (Study Managing Product Option Exceptions).
- You can define properties (prices, weights, stock quantities) of previously created product variants and add images for them (See Managing Product Variants).
If you are an X-Cart PLATINUM or PRO provider:
- You can create and manage options of any type for any of your products (See Managing Product Options):
- add product option groups and define specific option values
- manage product option groups and specific option values
- You can define product option exceptions to disable certain combinations of product options (Study Managing Product Option Exceptions).
- You can define properties (prices, weights, stock quantities) of previously created product variants and add images for them (See Managing Product Variants).
Enabling and Configuring 'Product Options'
To begin using the module:
1. Enable Product options module (Administration menu->Modules).
- When the module is enabled, you can see:
- Product options link in the 'Product Management' section menu (when a product is opened for editing);
- Product options options section in General settings/Modules options.
2. Adjust the module settings via General settings/Modules options->Product options options.

- Redirect a customer who clicks the "Buy Now" or "Add to wish list" buttons of a product with product options to product details page: Select this check box in order for a customer using the "Buy now" or "Add to wish list" buttons to order or add to wish list a product with product options to be redirected to the 'Product details' page. Leave the check box unselected to allow the customer to be redirected to the cart page, as usual (To edit the options of a product added to the cart, the customer will have to use the 'Edit options' link.)
- The dynamic updating of the Save Money label depending on the selected product options is enabled: select this check box to dynamically update the Save Money label on the 'Product details' page depending on the product options selected by a customer. Leave the check box unselected if you wish the Save Money label value to depend solely on the base price of the product.
3. Click the Save button.
Video tutorial
Managing Product Options
Adding option groups
Before you start defining any product options, a few words need to be said about product option groups.
You might already have guessed that individual product options like white, blue, S, M, L, XL, paperback or hardcover do not go into X-Cart unsorted. For a customer who decides to purchase a color t-shirt, it would be natural, firstly, to think, what properties of a t-shirt would be essential (for most people, these are likely to be size and color), and then to decide, how exactly these properties need to be expressed in the t-shirt being purchased (for example, XL and red). When defining options for products, you will want to adopt a similar approach, so your customers will find your options easy to understand and use. X-Cart's approach to creating product options stands in accord with this allowing you to proceed naturally from stating the product's property that needs to be defined (for example, size) to providing values by means of which the property can be defined (for example, S, M, L, XL). This means that any options that you create in your store are created not independently, but in groups (for example, a group of options defining size, a group of options defining color, etc). To add product options means to add a product option group and (in the case of price modifier and product variant option types) to define individual option values that will be available within this group. Note that, in the case of the custom text field type, you do not define any option values, as the value is to be defined by the customer.
To add a price modifier/product variant/custom text field product option group for a specific product:
1. Find the product for which you wish to define price modifier product options, product variants or a custom text field. Open this product for modification.
2. In the 'Product Management' section menu, click the link 'Product Options'. This opens the section of your store that allows you to define and edit product options for the product being viewed/modified.
- If you have not yet defined any options for the product, you should be able to see a dialog box titled 'Add new option group':

- If you have already added at least one option group, you should be able to see a dialog box 'Product option groups'. To access the 'Add new option group' dialog box from the 'Product option groups' list, click the Add new button.
3. Adjust the fields of the 'Add new option group' dialog box:
Price modifier type
- Option group name - Name by which the option group will be identified in the 'Product option groups' list and on the shopping cart page, when products with product options are added to cart.
- Option text - Description of the option group that will appear on the 'Product details' page of the Customer area as the name of the field from which your customers will select specific option values.
- Option group type - Type of the options that will be created within the group (Select Price modifier).
- OrderBy - Numeric value defining the position of the option group field relative to the other option group fields that will be displayed on the same 'Product details' page .
- Availability - Check box defining the availability of the option group to customers (Selecting the check box makes the option group field visible in the Customer area and enables your customers to select option values from this group. Unselecting the check box hides the option group field from the Customer area).
- Options list - Specific option values from which your customers will be able to choose when ordering the product.
- Enter one option per line and press Enter after each option to create a new line.
- For options that are not going to modify the product's price, simply enter option names. For options that will make the product's price cheaper or more expensive, describe how exactly the product's price is going to be changed if the option is selected. Use the symbols = (equals), + (plus), - (minus) and % (percent).
- For example, if you were selling color t-shirts:
- 'White' would mean 'Choosing the color white will not affect the price of the t-shirt'.
- 'Red=+3%' would mean 'A red t-shirt will be 3% more expensive than a white t-shirt'.

Product variant type
- Option group name - Name by which the option group will be identified in the 'Product option groups' list and on the shopping cart page, when products with product options are added to cart.
- Option text - Description of the option group that will appear on the 'Product details' page of the Customer area as the name of the field from which your customers will select specific option values.
- Option group type - Type of the options that will be created within the group (Select Product variant).
- OrderBy - Numeric value defining the position of the option group field relative to the other option group fields that will be displayed on the same 'Product details' page .
- Availability - Check box defining the availability of the option group to customers (Selecting the check box makes the option group field visible in the Customer area and enables your customers to select option values from this group. Unselecting the check box hides the option group field from the Customer area).
- Options list - Specific option values from which your customers will be able to choose when ordering the product.
- Enter one option per line and press Enter after each option to create a new line.
- As product variants' prices are defined on a separate page, you just need to define option names.

Custom text field type
- Option group name - Name by which the custom text field option being created will be identified in the 'Product option groups' list and on the shopping cart page, when products with the custom text field are added to cart.
- Option text - Description of the option that will appear on the 'Product details' page of the Customer area as the name of the custom text field.
- Option group type - Type of the option (Select Custom text field).
- OrderBy - Numeric value defining the position of the custom text field relative to the other option group fields that will be displayed on the same 'Product details' page .
- Availability - Check box defining the availability of the option to customers (Selecting the check box makes the custom text field visible in the Customer area and enables your customers to enter text into it. Unselecting the check box hides the custom text field from the Customer area).
- Options list - the field is inactive, as custom text fields are not supposed to provide options to select from.

4. Click the Add option group button. You should see an Information box with a confirmation message. This means the option group has been added to the list of product option groups.
Now you can edit the details of the option group, add a translation for the option group, view the list of available option groups or add another option group.
To edit the option group details, scroll down to the bottom of the page, on which the Information box is displayed. Use the dialog box titled 'Update option group' to change any details that need to be changed and click the Update option group button to save the changes.
To add a translation for the option group, from the language selector located at the top right-hand corner of the 'Update option group' dialog box select a language in which you wish to add a translation, replace the values displayed in the dialog box fields by values in the selected language and save the changes. For information on product option translations, see #Multilingual product options further in this section.
To view the list of product option groups, click the link Back to option groups list at the top of the 'Update option group' dialog box.
To add another product option group, click the link Add new option group.
(If you created a Product variant option group) To set prices, weights and stock quantities for the individual product variants within the created option group, go to the 'Product variants' section (Click the link 'Product variants' in the 'Product Management' section menu). For information on managing product variants, refer to #Managing Product Variants further in this section of this manual.
Managing product option groups and product option values
Previously created product option groups can be viewed in the 'Product option groups' dialog box, which is available in the 'Product Options' section:

The table columns provide the following information regarding each of the listed product option groups:
- CLASSID number (a unique number generated automatically and assigned to a product option group for the purpose of identification).
- OPTION CLASS - Name of the option group.
- OPTION TYPE - Type of the option group (Price modifier, Product variant, Custom text field).
- ORDERBY - Numeric value defining the position of the product option group relative to the other product option groups of the same product (affects the order of product option groups in the 'Product option groups' list and the order of option fields on the 'Product details' page of the product in the Customer area.
- AVAILABILITY - Check box defining the availability of the product option group to customers (Selecting the check box makes the corresponding product option group field visible in the Customer area. Unselecting the check box hides the option group field from the Customer area, but leaves it available for editing in the store's back end).
- OPTIONS LIST - List of option values defined in the option group.
The controls of the 'Product option groups' dialog box allow you to perform certain operations on existing product option groups.
To change the order of the product option groups, edit the values in the ORDERBY column for all the groups whose position needs to be changed and click the Update button.
To change the availability status of a product option group, change the value of the AVAILABILITY check box opposite its name and click the Update button.
To delete a product option group, select the check box opposite its name and click the Delete selected button.
To modify an option group:
1. Click on the option name link in the 'Product option groups' dialog box. This should open a dialog box 'Update option group' allowing you to edit the parameters of the product option group and to change the set of option values included into the option group.

2. If necessary, edit the parameters of the product option group:
3. Edit the values of the 'Option group name', 'Option text', 'Option group type', 'OrderBy' and 'Availability' fields.
4. Click the Update option group button to save the changes.
5. If necessary, edit the set of option values in the 'Options list' section.
To change an existing option value in a group of the product variant type, adjust the fields in the following columns:
- OPTION VALUE - Name of the option value.
- ORDERBY - Number reflecting the position of the option value within the option group.
- AVAILABILITY - Availability of the option value to customers.
For the price modifier type, in addition to the columns OPTION VALUE, ORDERBY and AVAILABILITY, which have the same meaning as in the Product variant type, also adjust the fields in these columns:
- OPTION - Number defining the amount by which the product's price is modified. Can be positive (like "3.00") for mark-ups or negative (like "-3.00") for discounts.
- SURCHARGE - Type of the surcharge (Absolute or Percent).
If you wish to remove one or more of the option values from the option group being edited, select the check boxes to the left of those option values that need to be removed and click the Delete selected button.
To add some more option values, first add the desired number of field rows in the 'Add option value' subsection using the Add row button, then complete these fields and save the changes using the Update option group button (Rows created on accident, which do not need to be added to the options list, can be removed by clicking the Remove row button in the respective rows).
After editing any values in the 'Options list' subsection, be sure to click the Update option group button to save the changes.
Multilingual product options
If your store supports more than one languages, you need to provide translations of your product option groups into all the languages supported by your store.
Translations for any option group can be added at any time after the creation of the option group is completed.
To add a translation for a product option group:
- Open the details of the product option group so you can edit them using the 'Update option group' dialog box.
- Use the language selector located in the 'Update option group' dialog box to select the language in which you wish to add a translation. The interface changes to the selected language.
- Replace the values of the fields 'Option group name', 'Option text' and, if necessary, 'Options list' with new values in the selected language.
- Click the Update option group button to save the changes.
Managing Product Option Exceptions
Product option exceptions
When using more than one option groups of the price modifier or product variant types for one product, not all the possible combinations of the options may be actually available. This problem can be handled by setting up exceptions. An exception is a combination of options with which a product cannot be added to the shopping cart.
Example:
You sell t-shirts available in two colors: white and blue. White t-shirts are available in four sizes: S, M, L and XL. Blue t-shirts are available in the sizes S, M, L, but not available in XL.
You set up product variants for the product T-shirt, defining the product option groups as follows:
Color:  White, Blue
Size:   S, M, L, XL
This leaves you with all the t-shirts available in all the sizes. However, you do not want to allow your customers to order blue XL t-shirts, as there is not such a thing. So, you need to disable the combination 'blue + XL'.
A good way to handle that is to add the said combination to the list of product option exceptions. Then, when a customer selects the color blue and the size XL for a t-shirt, the page will display a message saying that the selected combination of options is unavailable. If, regardless of the message, the customer attempts to add the product to the cart without first changing the options, he or she will get a JavaScript warning pop-up with the same message and will not be allowed to proceed to checkout until the options are readjusted.
Adding product option exceptions
To add a combination of options to the list of product option exceptions:
- In the 'Product Options' section, scroll down to the dialog box titled 'Product option exceptions':
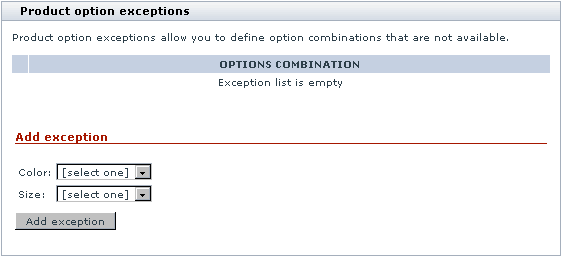
The 'Add exception' section of the dialog box contains some drop-down boxes titled by the names of the defined option groups. - Use the drop-down boxes to create the unavailable combination of options (In the above example, you would have to select Blue from the box titled 'Color' and XL from the box titled 'Size').
- Click the button Add exception.
The combination gets added to the list of unavailable option combinations in the upper section of the 'Product option exceptions' dialog box: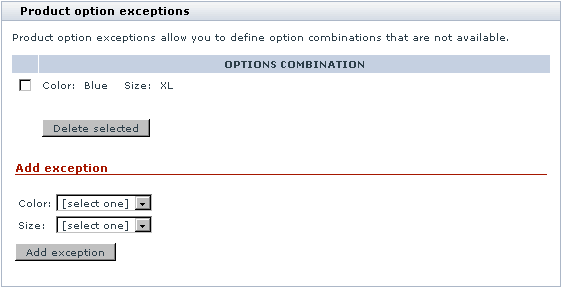


Deleting product option exceptions
To delete one or more product option exceptions:
- In the list of product option exceptions, select the check boxes next to the exceptions that need to be removed.
- Click the Delete selected button.
Product options validation
The dialog box titled 'Validation script (Javascript)', which is located in the 'Product Options' section, allows you to provide JavaScript validation for product options. The text area provided in this dialog box is intended for adding JavaScript code that you wish to be called when a customer selects a certain combination of options.

Validation JavaScript code can be typed into the text area of the 'Validation script (Javascript)' dialog box directly or pasted from clipboard. To save the code entered into the text area, click the Update button.
For example, talking about the same t-shirts and the combination of options that we chose to be unavailable (Blue + XL), you may wish to add some code that would produce a JavaScript warning (like "Sorry, the combination of Blue and XL is not available currently. Please check back later") on the screen when someone tries to add a blue XL t-shirt to the cart.
The following code sample highlights the use of JavaScript for creating a JavaScript warning:
var value = product_option_value("Color");

var value2 = product_option_value("Size");

if (value !== false && value == "Blue" && value2 !== false && value2 == 'XL') {

   xAlert("Sorry, the combination of Blue and XL is not available currently. Please check back later"); // or alert(...)

   return false;

}
In the above code sample, Color and Size are option group names in the default admin language, Blue and XL - names of specific option values in the default admin language (Note that some users may prefer using ClassId numbers instead of option group names).
The return false statement at the end stops the submission of the form, which results in the product not getting added to the cart. However, if we use return true instead, the warning message becomes merely informative and the customer is allowed to proceed to checkout.
It is possible to create different scenarios for different languages:
if (store_language == "FR") ...
Please note that names of product option groups and option values contained in your validation code need to be kept in sync with the descriptions of the respective option groups in the language that is the store's default admin language. This means that if some of your product option groups (and - along with that - option values) change their names in the default admin language, you will have to replace the names contained in the validation code by the new names and update the code in order to keep your validation script functional. You should understand that a change of option group/option value names may occur not only as a result of direct editing of the names in the group details, but also as a result of internal processes which may be caused by actions seemingly unrelated to editing of option group or option value names. An example of the latter case may be a change of the name of a product option group and all the names of option values within that group as a result of updating the option group after changing the store's default admin language.
To better understand the interdependencies, consider the following situation:
Your store has German for the default admin language. The interface of the back end you are currently using is in German, and you create a product option group named 'Größe' (the German word for 'Size').
Next, you add an English translation for the group, and in that translation the name of the group is, naturally, 'Size'.
You also create a validation script in which you refer to the option group as 'Größe'.
So far so good.
Then at some point you decide you want English to be your store's default admin language, not German, so you readjust the default admin language. At first, after the language change, your script based validation continues functioning correctly. However, one day your validation suddenly stops working. What happened?
Most probably, after the change of the default admin language, you used an English interface to view the details of the product option group in question and, intentionally or accidentally, updated the option group details by clicking the Update option group button. As at that time English was already your store's default admin language, clicking the button while the current interface was in English caused all the German names in the original description of the option group (including 'Größe') to be replaced by English equivalents from the English description.
So, in fact, it is natural that your validation script has stopped working: the group name used in the validation script code is still 'Größe', while the correct identifier of the option group is now 'Size'.
Managing Product Variants
Individual option values from different option groups of the product variant type are joined by X-Cart to form product variants (T-shirts: Blue+S, Blue+M, Blue+L, Blue+XL, etc).
A product's list of variants can be viewed at any moment after the necessary option groups are defined:
- Open the product for modification.
- In the 'Product Management' section menu, click the link 'Product Variants'.
The 'Product Variants' dialog box that is displayed at this point allows you to view the product's variants and to adjust their specific properties.
For example, if you set a product's details as follows:
Product details:

Product name: T-shirt

SKU: SKU17430

Price: $14.99

Weight: 1 lbs

Quantity in stock: 100

Product options:

Color: White, Blue

Size: S, M, L, XL
in the 'Product variants' section you should see something like this:

The column VARIANTS shows all the possible combinations of options that form variants of the product.
The link [+] Filter product variants allows you to reduce the number of product variants displayed on the page.
The fields in the SKU, WEIGHT, QUANTITY IN STOCK and PRICE columns allow you to edit the respective values for each of the listed variants, while the controls of the 'Edit selected images' subsection allow you to manage the product images of specific variants.
When you first enter the 'Product variants' page, the values displayed in the WEIGHT, QUANTITY IN STOCK and PRICE columns equal those of the base product ('Weight', 'Quantity in stock' and 'Price' fields on the 'Product details' page), while the SKU values represent the slightly modified SKU of the base product. You can keep the suggested values or change them according to your needs. If you choose to change any values, be sure to click the Update button to save the changes.
The column IMAGE is intended for icons of product variant images. Initially, this column contains only 'No image available' icons. A 'No image available' icon opposite a specific product variant means that a product image for that product variant has not been defined. If you do not add an image specifically for a product variant, the product image of the base product will be displayed to the customer when the variant is selected. To add an image for a product variant, select the check box next to that variant (or - if you wish to apply the same image to several variants - select the check boxes next to all the variants to which the image needs to be applied), click the Change images link in the 'Edit selected' line and use the 'Image selection' window to select an image to be added. After the selected image appears in the IMAGE column, click on Update to apply. Before the Update button has been clicked, you can cancel the application of the selected image by clicking on Back to default image. It is also possible to remove the previously added variant images: select the check boxes next to the variants for which you wish to remove images, then click Back to default image, and click Apply changes.
The column DEF allows you to set the product's default variant - a variant whose options are to be shown in the 'Products list' and on the 'Product details' page by default. To set a specific variant as default, select the radio button opposite it and click the Update button.
FAQ
How to create product variants?
1. Add a new "Product Option" group of type "Product variant". See: Adding option groups .
2. Click the "Product variants" link to see a list of product variants. See: Managing product variants.
There you can define prices and images for each of the variants.
Online demo pages:
Product options management tool:
https://demo.x-cart.com/demo/admin/product_modify.php?productid=17551§ion=options
Product variants management tool:
https://demo.x-cart.com/demo/admin/product_modify.php?productid=17551§ion=variants
Customer front-end:
https://demo.x-cart.com/demo/Binary-Mom.html
How to prohibit customers from adding a product without making an option selection?
1. Add "Make selection" as the first option, for example:
Product: Book

Option class: Cover

Options list:
- Make selection
- Soft
- Hard
2. Create a validation JavaScript code in order to prohibit customers from adding the product with the "Make selection" option selected. For example:
var Option_Group_Cover = product_option_value("Cover");

if (Option_Group_Cover !== false && Option_Group_Cover == "Make selection")  {
alert("Please select Cover!");
return false;
}
Another example of validation JavaScript code for a product with two option classes:
Product: T-Shirt

Option class: Size

Options list:
- Make selection
- S
- M
- L

Option class: Color

Options list:
- Make selection
- Black
- Brown
- Blue
var Option_Group_Size = product_option_value("Size");
var Option_Group_Color = product_option_value("Color");

if ((Option_Group_Size !== false && Option_Group_Size == "Make selection") ||
(Option_Group_Color !== false && Option_Group_Color == "Make selection")) {
alert("Please make a selection in the pull-down menus above!");
return false;
}