Difference between revisions of "LiteCommerce:AOM:Managing orders"
(→Editing the list of ordered products) |
|||
| (6 intermediate revisions by the same user not shown) | |||
| Line 11: | Line 11: | ||
* '''Delivery method''', which allows you to search through orders which use the specified delivery method. | * '''Delivery method''', which allows you to search through orders which use the specified delivery method. | ||
| − | This modified search form allows you to search through orders with regular and custom order statuses (custom statuses are defined in the 'Order life cycles' section of the 'Setting' menu, see Section [ | + | This modified search form allows you to search through orders with regular and custom order statuses (custom statuses are defined in the 'Order life cycles' section of the 'Setting' menu, see Section [[LiteCommerce:AOM:Using_the_module#Defining_Order_Lifecycles | 'Defining order life cycles']] for details). |
[[Image:lc-aom-07.gif|center|595px|<br> Figure 7: Modified order search form with sample search parameters]] | [[Image:lc-aom-07.gif|center|595px|<br> Figure 7: Modified order search form with sample search parameters]] | ||
| Line 53: | Line 53: | ||
The newly created order has a unique number and an 'Incomplete' status. It inherits customer information and shipping and payment methods from the parent order. Review new order details and then proceed to the 'Order info' tab to change the order status and process the order. | The newly created order has a unique number and an 'Incomplete' status. It inherits customer information and shipping and payment methods from the parent order. Review new order details and then proceed to the 'Order info' tab to change the order status and process the order. | ||
| − | [[Image: | + | [[Image:aom_img13.png|center|597px|<br> Figure 11: Splitting an order]] |
{{Note1|The 'Split selected into new order' button is disabled if there is only one product title in an order or if the order details have been edited and not saved. Review and save or cancel your order modifications before you can proceed with the order split operation.}} | {{Note1|The 'Split selected into new order' button is disabled if there is only one product title in an order or if the order details have been edited and not saved. Review and save or cancel your order modifications before you can proceed with the order split operation.}} | ||
| Line 63: | Line 63: | ||
{{Note1|Customer's membership change and other modifications performed in the 'Customer information' page do not affect the customer's profile records and are only relevant in the scope of the order being edited.}} | {{Note1|Customer's membership change and other modifications performed in the 'Customer information' page do not affect the customer's profile records and are only relevant in the scope of the order being edited.}} | ||
| − | [[Image: | + | [[Image:aom_img14.png|center|597px|<br> Figure 12: Editing customer information]] |
====Changing order totals==== | ====Changing order totals==== | ||
| Line 73: | Line 73: | ||
Make the necessary changes in the right-hand column. You can choose a semi-automatic way of completing the information by clicking on the ''''Calculate'''' button to let LiteCommerce system recalculate shipping rates, bonus points and other calculable data for you. Alternatively you can modify all the fields manually and click on the ''''Update'''' button to save your current order settings. | Make the necessary changes in the right-hand column. You can choose a semi-automatic way of completing the information by clicking on the ''''Calculate'''' button to let LiteCommerce system recalculate shipping rates, bonus points and other calculable data for you. Alternatively you can modify all the fields manually and click on the ''''Update'''' button to save your current order settings. | ||
| − | [[Image: | + | [[Image:aom_img15.png|center|<br> Figure 13: Editing order totals]] |
====Manual credit card processing==== | ====Manual credit card processing==== | ||
| Line 87: | Line 87: | ||
Once you make a modification to an order, 'Review and Save Order' tab appears automatically in the 'Order details' section. When you have finished editing an order, switch to the 'Review and Save Order' tab (Figure 14), review the modified order details and then click on the ''''Save changes'''' button to completely replace the original order details with the modified order details or click on the ''''Undo changes'''' button to discard order modifications. | Once you make a modification to an order, 'Review and Save Order' tab appears automatically in the 'Order details' section. When you have finished editing an order, switch to the 'Review and Save Order' tab (Figure 14), review the modified order details and then click on the ''''Save changes'''' button to completely replace the original order details with the modified order details or click on the ''''Undo changes'''' button to discard order modifications. | ||
| − | [[Image: | + | [[Image:aom_img16.png|center|<br> Figure 14: Reviewing order modifications]] |
{{Note1|Your changes do not take effect on an order until you click on the 'Save changes' button.}} | {{Note1|Your changes do not take effect on an order until you click on the 'Save changes' button.}} | ||
| Line 99: | Line 99: | ||
Choose 'Order history' tab to review the history of order modifications (Figure 9). Order history records reflect order status changes, notes updates and all other modifications displayed in reverse chronological order. You can see the date and time the corresponding change took place and the login of the administrator who made it. | Choose 'Order history' tab to review the history of order modifications (Figure 9). Order history records reflect order status changes, notes updates and all other modifications displayed in reverse chronological order. You can see the date and time the corresponding change took place and the login of the administrator who made it. | ||
| − | [[Image: | + | [[Image:aom_img11.png|center]] |
===Cloning an order=== | ===Cloning an order=== | ||
| Line 111: | Line 111: | ||
The new order is assigned its own unique order number and you are redirected to the 'Ordered products' page of the order (Figure 15). Complete the required order information in the 'Ordered products', 'Customer information' and 'Order totals' pages. | The new order is assigned its own unique order number and you are redirected to the 'Ordered products' page of the order (Figure 15). Complete the required order information in the 'Ordered products', 'Customer information' and 'Order totals' pages. | ||
| − | [[Image: | + | [[Image:aom_img17.png|center|<br> Figure 15: Creating an order]] |
Next switch to the 'Review and save order' tab where you will specify the initial status of an order and save order details by clicking on the ''''Save changes'''' button (Figure 16). | Next switch to the 'Review and save order' tab where you will specify the initial status of an order and save order details by clicking on the ''''Save changes'''' button (Figure 16). | ||
| − | [[Image: | + | [[Image:aom_img18.png|center|<br> Figure 16: Finalizing order creation]] |
{{Note1|The 'Save changes' button does not appear unless you specify all the necessary information: the product(s) being ordered, payment and shipping methods.}} | {{Note1|The 'Save changes' button does not appear unless you specify all the necessary information: the product(s) being ordered, payment and shipping methods.}} | ||
| Line 121: | Line 121: | ||
You can then choose the 'Order info' tab to process the order in a regular way and use the 'Order history' tab (Figure 17) to view order history. | You can then choose the 'Order info' tab to process the order in a regular way and use the 'Order history' tab (Figure 17) to view order history. | ||
| − | [[Image: | + | [[Image:aom_img19.png|center|<br> Figure 17: Order history of a newly created order]] |
[[Category:LiteCommerce modules]] | [[Category:LiteCommerce modules]] | ||
[[Category:LiteCommerce user manual]] | [[Category:LiteCommerce user manual]] | ||
Latest revision as of 11:41, 6 October 2010
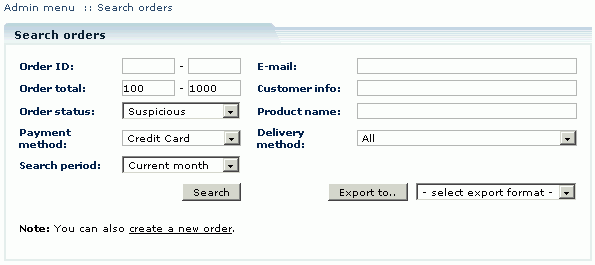
This section of the manual describes the changes to the 'Orders' section in the Administrator Zone introduced by the module. One change you will notice immediately is the modified 'Search orders' form (Figure 7) with an updated 'Search period' parameter and the following search option fields:
- Order ID, which allows you to search for the exact order by order number,
- Order total range, which allows you to narrow your search to orders with order totals within the specified range,
- Order status, which allows you to search for orders in a certain stage of the order life cycle,
- Payment method, which allows you to search through orders which use the specified payment method,
- Search period, which allows you to narrow your search to the desired period, say current month,
- E-mail, which allows you to search for all orders of specific customers, if you know their e-mail addresses,
- Customer info, which allows you to search orders by the customer's name and other details in his profile, including billing and shipping details,
- Product name, which allows you to search orders by the names and SKU's of products ordered, and
- Delivery method, which allows you to search through orders which use the specified delivery method.
This modified search form allows you to search through orders with regular and custom order statuses (custom statuses are defined in the 'Order life cycles' section of the 'Setting' menu, see Section 'Defining order life cycles' for details).
The form also contains a link that takes you to a new order creation page (see Section 'Creating a New Order' for further details on this feature). Once you click on the 'Search' button, the search displays the list of orders matching your search criteria. Click on the order number or the corresponding 'details >>' link to review order details.
Contents
Reviewing order details
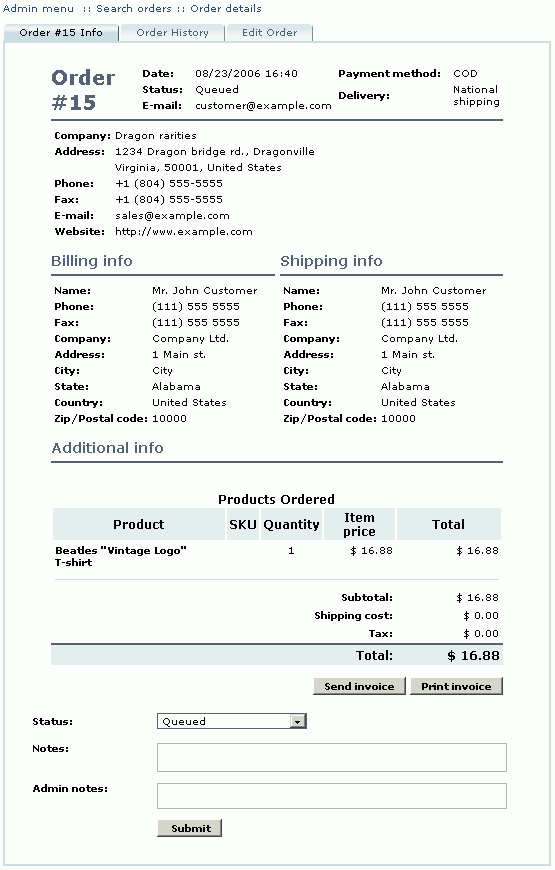
In the list of orders click on the order number or the corresponding 'details >>' link to review order details. With the AOM module installed and activated, 'Order details' page acquires extensive order management functionality. The page consists of three tabs, namely 'Order Info', 'Order History' and 'Edit Order' (with the fourth one, 'Review and Save Order', added if you make modifications to order details). The 'Order Info' tab contains full order details and allows you to change order status and send or print the invoice (Figure 8).
Note that the 'Admin notes' field has been introduced in the 'Order Info' tab for added convenience of order processing. The contents of this field is never revealed to customers.
Changing order details
The 'Edit order' tab enables you to modify every aspect of an order, including billing and shipping information, customer information and the list of products ordered. Order editing is performed in several elementary steps, each represented by a separate page. 'Ordered products', 'Customer information' and 'Order totals' are the basic pages, which allow you to edit the corresponding aspects of an order. Extra 'Gift Certificates' and 'Discount Coupon' pages are added by the Gift Certificates and Promotion Tools modules respectively. When you finish editing an order, you will review the modifications and submit your changes using the 'Review and Save Order' tab.
Editing the list of ordered products
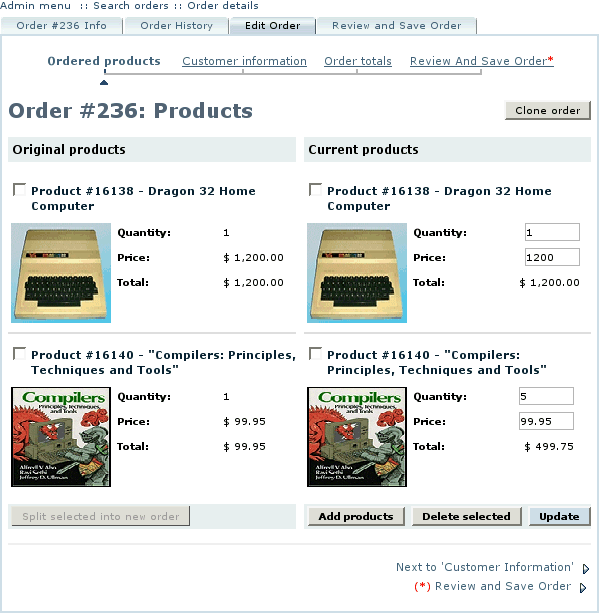
Switch to the 'Ordered products' page (Figure 10) to add or remove products from an order, update product quantities and prices.
To change the product price or the quantity of product items, modify the corresponding fields underneath the product name in the right column and click on the 'Update' button. Please be aware that the AOM module is just a means for order editing, it is not supposed to bring all the functionality of the customer zone to the admin zone. So, for example, if a special offer is applicable to an order, the store admin will not see it while editing this order using the functionality of the AOM module.
To remove a product from an order, place a checkmark next to the product name in the right column and click on the 'Delete selected' button. You can remove several products simultaneously.
To add a product or several products, click on the 'Add products' button. The 'Search product' form comes up in a new window. Find a product or products to add, place checkmarks in the corresponding fields and click on the 'Add' button. The selected products are added to the order in the background.
When you finish adding products, close the browser window with the 'Search product' form.
Splitting an order
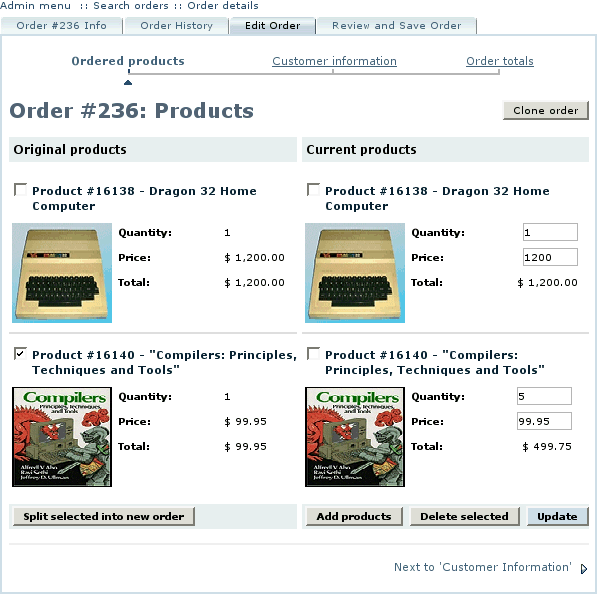
In certain cases it can be useful to split an order into two and process the two orders separately. To split an order, open the ' Ordered products' page, then in the left column place checkmarks against the products you want to split into a separate order and click on the 'Split selected into new order' button (Figure 11). This operation takes effect immediately and cannot be undone.
The newly created order has a unique number and an 'Incomplete' status. It inherits customer information and shipping and payment methods from the parent order. Review new order details and then proceed to the 'Order info' tab to change the order status and process the order.
Changing customer information
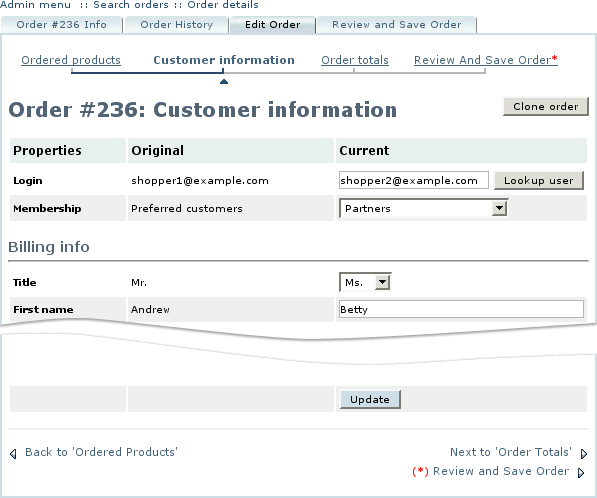
Open the 'Customer information' page to change the customer's e-mail, membership, billing and/or shipping information (Figure 12). Make the necessary changes in the right-side column and click on the 'Update' button.
Changing order totals
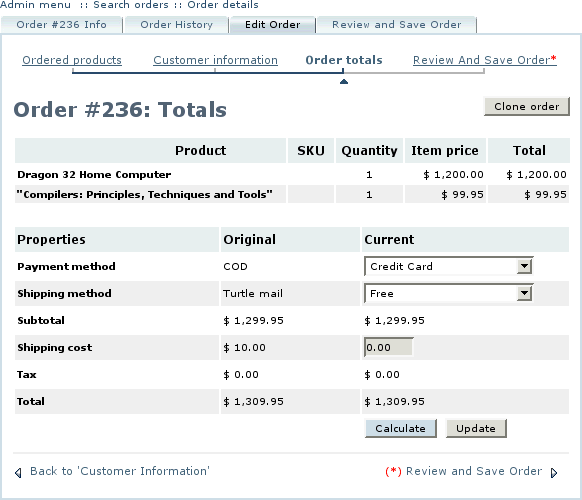
Open the 'Order totals' page (Figure 13) to change order payment method, shipping method and costs and other relevant information (the list of editable fields depends on the set of add-on modules installed on your LiteCommerce shopping system).
Make the necessary changes in the right-hand column. You can choose a semi-automatic way of completing the information by clicking on the 'Calculate' button to let LiteCommerce system recalculate shipping rates, bonus points and other calculable data for you. Alternatively you can modify all the fields manually and click on the 'Update' button to save your current order settings.
Manual credit card processing
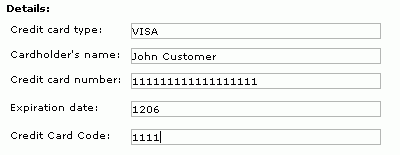
If the customer has chosen offline credit card payment method for the order is is possible to manually edit the credit card details in the 'Order info' tab.
You can enter all the information including credit card type, number, expiration date, code and cardholder's name.
Completing order modifications
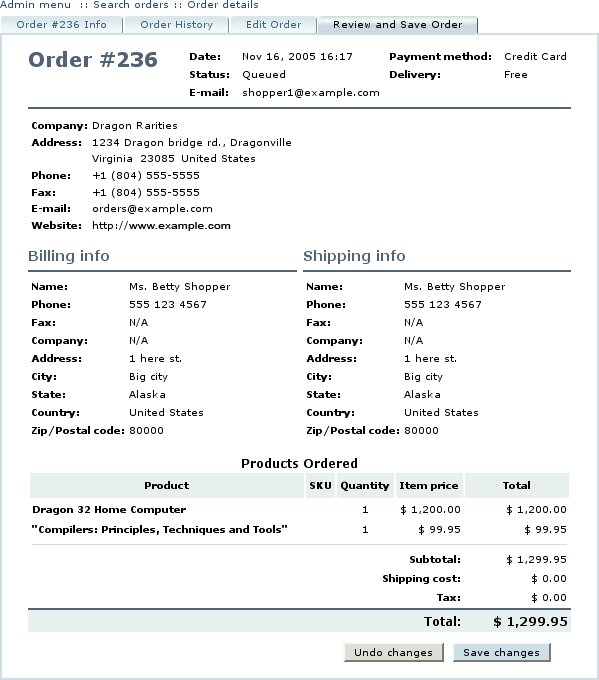
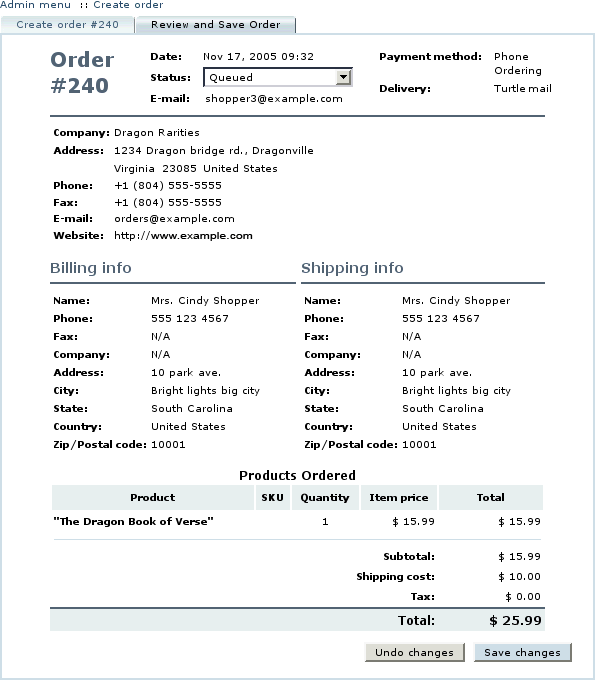
Once you make a modification to an order, 'Review and Save Order' tab appears automatically in the 'Order details' section. When you have finished editing an order, switch to the 'Review and Save Order' tab (Figure 14), review the modified order details and then click on the 'Save changes' button to completely replace the original order details with the modified order details or click on the 'Undo changes' button to discard order modifications.
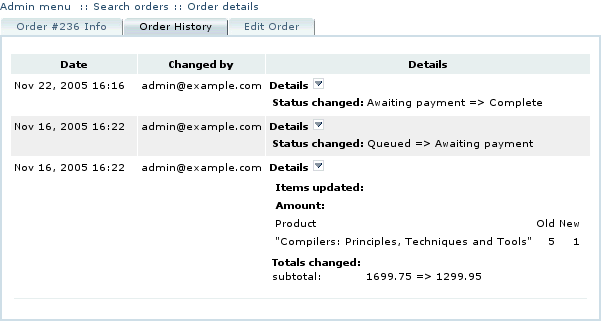
After you have saved your modifications to the order, the details of those modifications become available in the 'Order history' tab.
Reviewing order history
Choose 'Order history' tab to review the history of order modifications (Figure 9). Order history records reflect order status changes, notes updates and all other modifications displayed in reverse chronological order. You can see the date and time the corresponding change took place and the login of the administrator who made it.
Cloning an order
To clone an order, access the order details page, choose the 'Edit order' tab and click on the 'Clone order' button on the right-hand side of the page (Figure 10). A copy of an order is created with a new order number, and you are redirected to the details page of that order. You can then change order information and process the cloned order in a regular way.
Creating a new order
Using AOM add-on you can create new orders and input order details manually. This feature is especially useful if your store accepts telephone ordering or other forms of offline order placement along with online sales, and you would like to use the same powerful LiteCommerce mechanism to manage all kinds of orders at your store. To create an order, select the 'Create order' section from the 'Management' menu. Alternatively you can click on the 'create a new order' link in the 'Search orders' form.
The new order is assigned its own unique order number and you are redirected to the 'Ordered products' page of the order (Figure 15). Complete the required order information in the 'Ordered products', 'Customer information' and 'Order totals' pages.
Next switch to the 'Review and save order' tab where you will specify the initial status of an order and save order details by clicking on the 'Save changes' button (Figure 16).
You can then choose the 'Order info' tab to process the order in a regular way and use the 'Order history' tab (Figure 17) to view order history.
