Difference between revisions of "LiteCommerce:AffiliateSystem"
(→Configuring email notifications) |
m |
||
| (One intermediate revision by one other user not shown) | |||
| Line 1: | Line 1: | ||
| + | {{LC2_disclaimer}}<br /><br /> | ||
| + | {{LC 2.x}} | ||
| + | |||
== What LiteCommerce Affiliate System module is == | == What LiteCommerce Affiliate System module is == | ||
Latest revision as of 12:55, 31 May 2012
|
Contents
What LiteCommerce Affiliate System module is
In the recent years, affiliate marketing has become an important tool of e-commerce. Thousands of merchants now use affiliate marketing in their business programs. It has proven to be a powerful and cost-effective marketing solution offering great benefits for both an affiliate and a merchant. The affiliate marketing scheme can be simply described as a commission-based arrangement where a referring site receives a commission on sales by merchant. Setting up your own affiliate program, or referral program, helps you to promote your web site and increase your online sales.
Implemented as an add-on, LiteCommerce Affiliate System module is tightly integrated with LiteCommerce software bringing a feature rich affiliate marketing mechanism into your LiteCommerce-driven online store. Now you do not have to employ affiliate management service providers or set up third-party affiliate tracking software and integrate it with your shopping cart - once you install the Affiliate System module and assign affiliate plans to your partners, LiteCommerce automatically tracks all customers and their orders coming from the partners' sites and calculates partners' commissions.
How Affiliate System module works
After the module is installed, the store administrator configures the basic module's settings, defines affiliate plans, adds banners to be used by partners and sets up the partner registration form. The administrator also defines and changes commission rates and other settings, manages partners' participation in affiliate plans and commission payments, and has access to detailed information on referred sales, partners' commission amounts and partners' affiliate trees.
To become a partner, a user has to sign up for an affiliate program. After he is registered for the affiliate program and assigned a certain affiliate plan, he can place your store's banners on his web site or page and start getting commissions for orders placed by customers referred to your store from his web space. A partner can access and choose available store banners, see pertinent commission reports and real-time statistics and update his details in his own partner area.
A partner can establish an affiliate tree of his own by referring new partners to your store. A new partner referred by him becomes his affiliate and the referrer gets a certain percentage from each order placed by a customer referred to the store from his affiliate's web space. An affiliate partner in his turn can also have affiliates of his own. The scheme of commission tiers is fully customizable by the administrator.
Configuring the Module
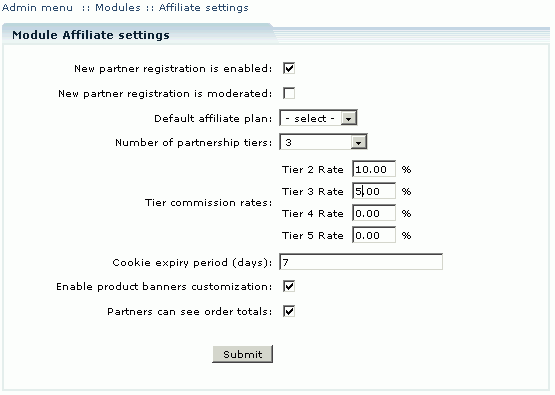
To configure Affiliate System module's general settings, proceed to the 'General settings' section of the 'Affiliates' menu. Alternatively, you can click on the 'Modules' section of the 'Settings' menu, select 'Affiliate' in the list of the installed modules and configure the general settings from there.
Select the 'New partner registration is enabled' checkbox to enable partner registration form in the Customer Zone. When this option is enabled, a 'Join now!' link appears in the affiliate sign-up form.
Select the 'New partner registration is moderated' checkbox to approve your new partners' accounts manually or leave it blank to register new partners automatically.
In the 'Default affiliate plan' drop-down box select a plan that will appear as a default plan in the 'Sign up for partner plan' field of partner registration form.
In the 'Number of partnership tiers' field specify the maximum tier level for which your partners can get the commissions. Default value '1' means that partners do not earn commissions for referring affiliates.
Set 'Tier commission rates' (%) for each affiliate level. Tier commission rates are calculated as a percentage of the basic commission rate of a partnership plan in use. See section 'Partner Payments' for an explanation of tier commission rate calculations.
The 'Cookie expiry period (days)' field specifies a period of days to keep partners' cookie files on users' PCs. When a customer comes to the store via a banner on a partner's website, a cookie is created on the customer's computer. Your partner will earn a commission every time the customer comes to the store and makes a purchase until the partner's cookie expires. This parameter also has an effect on banner click statistics. Leave this field blank if you do not want cookies to be stored in users' browsers.
Select the 'Enable product banners customization' box to enable your partners to modify product banners' settings.
Select the 'Partners can see order totals' box to let your partners see order totals in the 'Referred sales' section of the Partner Zone.
Review the configuration changes and click on the 'Submit' button to save the changes.
Configuring email notifications
If the Affiliate System add-on module is installed , the following email notifications are sent:
- partner_signin_notification: an e-mail sent to partner after signup;
- partner_signin_confirmation: an e-mail sent to partner after the partner has been registered successfully;
- partner_signin_admin_notification: an e-mail sent to admin after a partner has been registered successfully;
- partner_order_processed: an e-mail sent to partner when an order from a referral from this partner is processed;
- partner_declined: an e-mail sent to partner when partnership is declined by site admin.
To edit the notifications go to the 'Template Editor' section of the 'Look & Feel' menu. Here select the 'Mail templates' tab. Click on the corresponding notification title, edit the template and click Save.
Further reading
