Difference between revisions of "X-Cart:Pop-up Anywhere"
(→Installation) |
(→Installation) |
||
| (One intermediate revision by the same user not shown) | |||
| Line 16: | Line 16: | ||
==System requirements== | ==System requirements== | ||
| − | To be able to successfully install and use the <u>Pop-up Anywhere</u> module, you must have a working copy of X-Cart GOLD or GOLD PLUS version 4. | + | To be able to successfully install and use the <u>Pop-up Anywhere</u> module, you must have a working copy of X-Cart GOLD or GOLD PLUS version 4.4.0 or later installed on your server. Make sure that the version of the module is the same as the version of the installed copy of X-Cart. |
{{Note1|'''Note:''' If you do not remember the version of installed X-Cart, find it in the Environment info section of the Summary page in X-Cart Admin area.}} | {{Note1|'''Note:''' If you do not remember the version of installed X-Cart, find it in the Environment info section of the Summary page in X-Cart Admin area.}} | ||
| − | |||
==Installation== | ==Installation== | ||
| Line 34: | Line 33: | ||
# In a web browser, run the installation script <u>httр://<YOUR_XCART_DOMAIN>/install-popup-anywhere.php</u> replacing the variable<u><YOUR_XCART_DOMAIN></u> with the actual domain name of your X-Cart store. | # In a web browser, run the installation script <u>httр://<YOUR_XCART_DOMAIN>/install-popup-anywhere.php</u> replacing the variable<u><YOUR_XCART_DOMAIN></u> with the actual domain name of your X-Cart store. | ||
# Enter the [[X-Cart:FAQs#What_is_Auth_code_and_where_can_I_find_it.3F|Auth code]], accept the License Agreement and click '''Next'''. | # Enter the [[X-Cart:FAQs#What_is_Auth_code_and_where_can_I_find_it.3F|Auth code]], accept the License Agreement and click '''Next'''. | ||
| − | # The installation script patches the files and activates the module. Click '''Next''' to continue the installation.<br />{{Note1|'''Note:''' if you are using custom skin, you will need to manually apply the patches to it. Otherwise, the module will not work in this skin.}} | + | # The installation script patches the files and activates the module. Click '''Next''' to continue the installation.<br />{{Note1|'''Note:''' if you are using custom skin, you will need to manually apply the patches to it. Otherwise, the module will not work in this skin. See [[#How to patch a 3rd party skin after the installation of the Pop-up Anywhere module]]}} |
# The installation script generates a new system fingerprint. Click '''Next''' to complete the installation. | # The installation script generates a new system fingerprint. Click '''Next''' to complete the installation. | ||
# Use the ADMINISTRATOR AREA link to log in to the Admin area.<br /><br /> | # Use the ADMINISTRATOR AREA link to log in to the Admin area.<br /><br /> | ||
Latest revision as of 12:00, 4 September 2013
Contents
- 1 Overview
- 2 System requirements
- 3 Installation
- 4 Enabling the Pop-up Anywhere add-on module
- 5 Managing Pop-up Anywhere
- 6 Configuring pop-up with content from custom template
- 7 Configuring predesigned pop-ups
- 8 Configuring pop-up opened by click
- 9 Customizing the email notification messages sent by the module
- 10 How to patch a 3rd party skin after the installation of the Pop-up Anywhere module
- 11 How to upgrade the module
Overview
What Pop-up Anywhere does
X-Cart's Pop-up Anywhere add-on module allows you create unlimited number of attractive and informative messages for your customers regardless of the page they land on when arriving on your site. The module will help you to capture your customers attention and:
- promote newsletter sign up
- welcome your first-time customers with a greetings message and welcome offer
- get more Facebook likes
- display promotional messages
- display cart total and checkout button permanently on the screen.
With Pop-up Anywhere you don’t need to have all pop-ups on your site all the time. Display rules give you full control over an every pop-up behaviour.
Why Pop-up Anywhere?
The information in your pop-up will grab attention for a few moments of every customer who visits your store. That is why communication through popup has far more impact than communication via sidebars, banners or welcome page.
System requirements
To be able to successfully install and use the Pop-up Anywhere module, you must have a working copy of X-Cart GOLD or GOLD PLUS version 4.4.0 or later installed on your server. Make sure that the version of the module is the same as the version of the installed copy of X-Cart.
Installation
To install the module for X-Cart 4.4.0 or higher:
- Obtain a distribution package for the Pop-up Anywhere add-on module by downloading it from the File Area section of your X-Cart Account. The distribution package you need is contained in the archive file x-popup-anywhere-x.y.z.tgz where x, y and z are the version numbers of the module. Make sure the version of the module is the same as the version of the installed X-Cart.
- Copy the distribution package to the X-Cart root directory on your server or hosting account.
- If you are using a Windows-based server, or a UNIX-based server without terminal access:
- a) Decompress the archive with the Pop-up Anywhere distribution package to a directory on your system using your favorite compression program (WinZIP or any other archiver with support for TAR files).
- b) Use an FTP client to upload all the files contained in the archive (retaining the directory structure) to the X-Cart root directory on your server or your hosting account.
- If you are using a UNIX-based server with terminal access:
- a) Use an FTP client to upload the archive with the distribution package to the X-Cart root directory on your server or your hosting account.
- b) Decompress the package using the following command:
tar -xzvf x-popup-anywhere-x.y.z.tgz
- Important: Make sure you keep the directory structure while unpacking and uploading the distribution package, otherwise some necessary files can be overwritten!
- In a web browser, run the installation script httр://<YOUR_XCART_DOMAIN>/install-popup-anywhere.php replacing the variable<YOUR_XCART_DOMAIN> with the actual domain name of your X-Cart store.
- Enter the Auth code, accept the License Agreement and click Next.
- The installation script patches the files and activates the module. Click Next to continue the installation.Note: if you are using custom skin, you will need to manually apply the patches to it. Otherwise, the module will not work in this skin. See #How to patch a 3rd party skin after the installation of the Pop-up Anywhere module
- The installation script generates a new system fingerprint. Click Next to complete the installation.
- Use the ADMINISTRATOR AREA link to log in to the Admin area.
Enabling the Pop-up Anywhere add-on module
After the Pop-up Anywhere add-on module installation has been completed, the module you have installed needs to be enabled in your store:
- In Admin area, go to the Modules section (Settings menu->Modules).
- Choose the Pop-up Anywhere module by selecting the respective check box on the left.
- Click the Apply changes button. This activates the module.
Managing Pop-up Anywhere
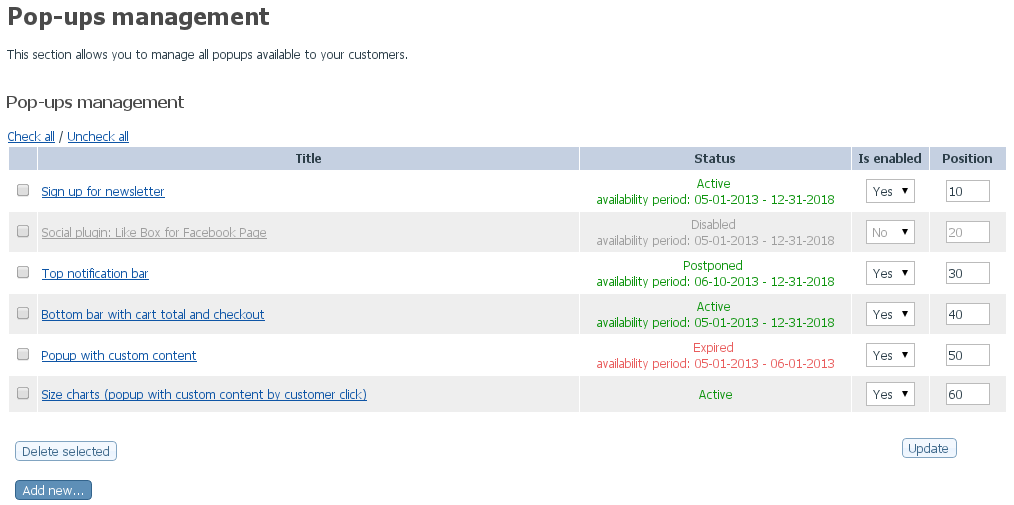
Pop-ups can be configured on the 'Pop-ups Management' page in your store's administration back end. This page can be accessed by clicking the Pop-ups management link in the Content menu. Once you open this page you will see the pop-ups list:
The following information is available about each pop-up:
- Title: Display name of the pop-up (visible to admin only). By default, pop-up title is ‘Pop-up’.
- Position: Position of the pop-up in the pop-ups list
- Enabled: Whether the pop-up is enabled or disabled for customers.
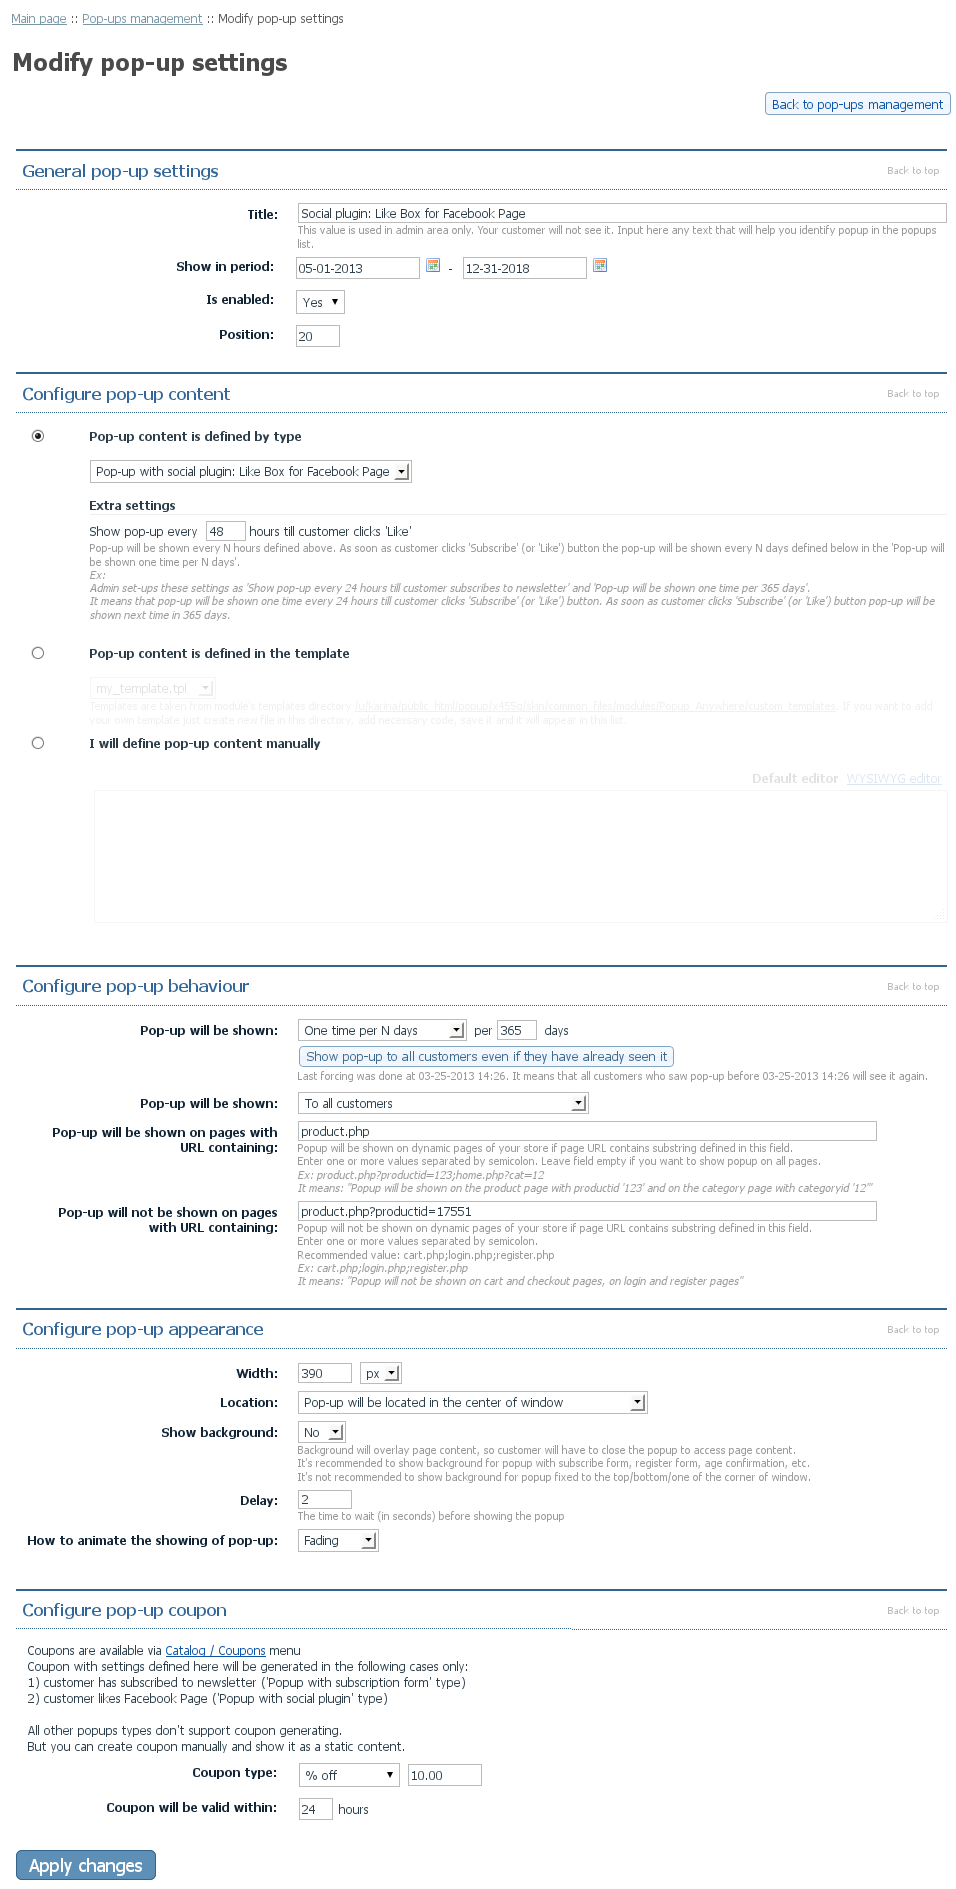
You can adjust position and availability for any pop-up(s) by editing the respective fields in the 'Pop-ups' table. After you're done editing the pop-up settings, be sure to click the Apply changes button to save the changes. After clicking on the pop-up title you will see the Modify pop-up settings page and pop-up’s respective settings:
The General pop-up settings section allows to change ‘Title’, ‘Position’ and ‘Enabled’ settings.
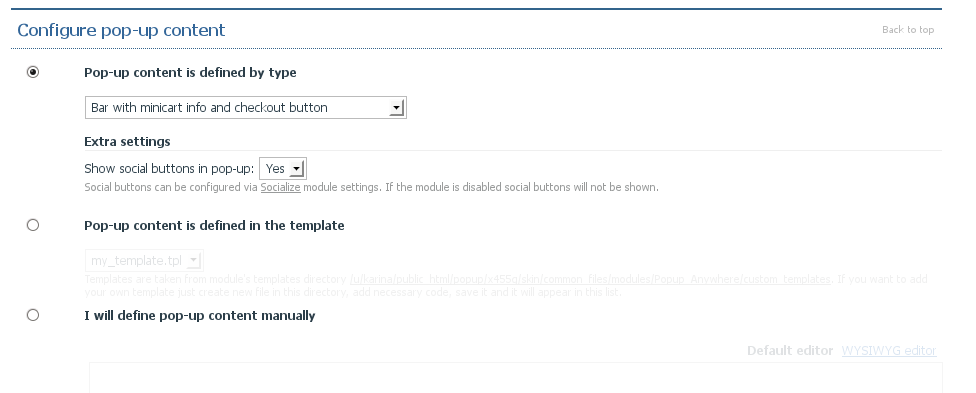
The Configure pop-up content section allows to choose one of the following variant:
- Pop-up content is defined by type: This option allows to use one of the predesigned templates. See #Configuring predesigned pop-ups
- Pop-up content is defined in the template: Pop-up content will be taken from template. See #Configuring pop-up with content from custom template
- I will define pop-up content manually: Pop-up content will be taken from textarea (HTML is supported).
The Configure pop-up behaviour section allows to adjust the following settings:
- Pop-up will be shown: Pop-up can be shown to each customer one time only or every time page is loaded:
- One time per N days: Customer will see this pop-up again in defined number of days.
- Ex: set up 365 days to display pop-up again in 365 days. If the content of popup has been changed you can force showing it to all customers even if they have seen it already. Choose Show pop-up to all customers even if they have already seen it. Last time of forcing is saved in database: 'Last forcing was done at 03-25-2013 15:22'. It means that all customers who saw pop-up before 03-25-2013 15:22 will see it once again.
- Every time page is loaded: Customer will see this pop-up every time page is loaded. Recommended for 'Bar with minicart info and checkout button'.
- When customer clicks the link: Such kind of pop-ups will not be shown automatically on any page. You must modify the required template to insert the special code that is shown when you select this option. See #Configuring pop-up opened by click
- Pop-up will be shown: Pop-up can be shown to the certain group of customers:
- To all customers
- To customers who have logged in only
- To customers who have not logged in only
- Pop-up will be shown on pages with URL containing: Pop-up will be shown on dynamic pages of your store if page URL contains substring defined in this field. Static HTML pages are not supported by the module.
- Ex: the setting is defined as 'product.php?productid=123;home.php?cat=12'. It means: "Popup will be shown on the product page with productid '123' and on the category page with categoryid '12'". Clean URLs are supported.
- Pop-up will not be shown on pages with URL containing: Pop-up will not be shown on dynamic pages of your store if page URL contains substring defined in this field. Static HTML pages are not supported by the module.
- Ex: the setting is defined as 'cart.php;login.php;register.php'. It means: "Popup will not be shown on cart and checkout pages, on login and register pages". Clean URLs module are supported.
The Configure pop-up appearance section allows to adjust the following settings:
- Width: Pop-up width can be set up in pixels or in percents.
- Location: Pop-up location on the customer screen.
- Show background: If ‘Yes’ is selected the pop-up will be in the ‘modal’ mode. It means that background will be grayed-out and customer will not be able to get access to any page elements till close the pop-up. ‘Yes’ is recommended value for pop-ups that requires some action from customer. If pop-up content simple message ‘No’ option can be selected.
- Delay: Time in seconds to wait before showing the pop-up to customer.
- How to animate the showing of pop-up: Pop-up can be shown with ‘Fading in’ or ‘Sliding’ effect.
The Configure pop-up coupon section allows to adjust coupon settings that will be generated as soon as customer clicks 'Like' or 'Subscribe' button. I.e. coupon generating is supported by 'Sign up for newsletter' and 'Social plugin: Like Box for Facebook page' predesigned pop-ups only. This section allows to adjust the following settings:
- Coupon type: Generated coupon can be one of the following types:
- Absolute discount
- Discount in percents
- Free shipping
- Coupon will be valid: Number of hours within coupon will be valid.
You can adjust the settings for any pop-up(s) by editing the respective fields. After you're done editing the pop-up settings, be sure to click the Apply changes button to save the changes.
Configuring pop-up with content from custom template
- Open 'Pop-ups management' page in your store's administration back end. This page can be accessed by clicking the Pop-ups management link in the Content menu.
- Click 'Add new'
- Configure title, availability and position of pop-up.
- Select ‘Pop-up content is defined in template’ in the ‘Configure pop-up content’ section.
- Choose any template from dropdown.
- Custom templates are stored in the X-Cart’s skin/common_files/modules/Popup_Anywhere/custom_templates directory. You can manage the content of this directory using the 'Browse templates' section of your store's Admin area (Administration menu->Edit templates). The module distributive contains ‘my_template.tpl’ template that can be used as the base for your own custom templates. Use ‘Copy selected file to ...’ feature of the ‘Edit templares’ page to copy it and make your own template. (See the section X-Cart:Editing Skin Files).
- Configure appearance and behaviour of the pop-up.
- Click 'Apply changes' to save pop-up settings.
Configuring predesigned pop-ups
The module supports by default four predesigned pop-ups with advanced features.
Configuring 'Sign up for newsletter' pop-up
If you have News Management module enabled in your store and you have at least one news list you can set up and configure pop-up with sign up to newsletter form.
- Open 'Pop-ups management' page in your store's administration back end. This page can be accessed by clicking the Pop-ups management link in the Content menu.
- Click 'Add new'
- Configure title, availability and position of pop-up.
- Select 'Pop-up content is defined by type' in the 'Configure pop-up content' section.
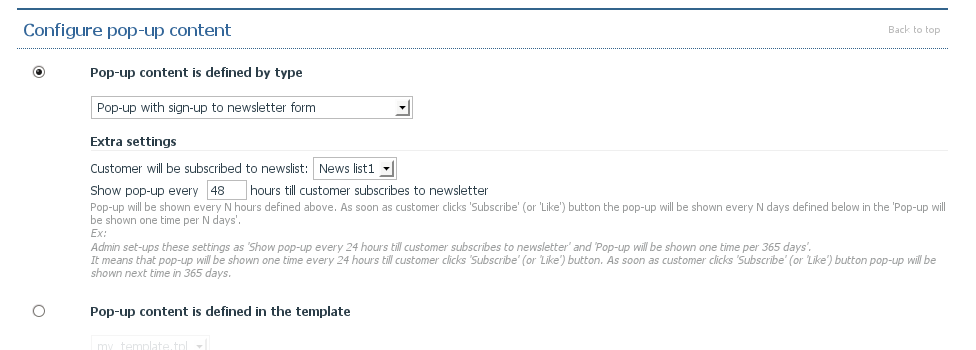
- Select 'Pop-up with sign-up to newsletter form' option.
- Define the following settings:
- Customer will be subscribed to newslist: Select the newslist you want to promote in the pop-up.
- Show pop-up every N hours till customer clicks 'Subscribe' button: If you want to show pop-up every 2 days till customer clicks the 'Subscribe' button fill in this setting with value 48.
- Configure appearance and behaviour of the pop-up.
- Click ‘Apply changes’ to save pop-up settings.
Recommended settings for this type of pop-ups:
- Pop-up will be shown: One time per 365 days
- Pop-up will be shown every 48 hours till customer clicks Subscribe
- Pop-up will not be shown on pages with URL containing: cart.php;login.php;register.php;
- Location: Center
- Width: 450px
- Delay: 0
- Show background: Yes
Configuring 'Social plugin: Like Button for Facebook Page' pop-up
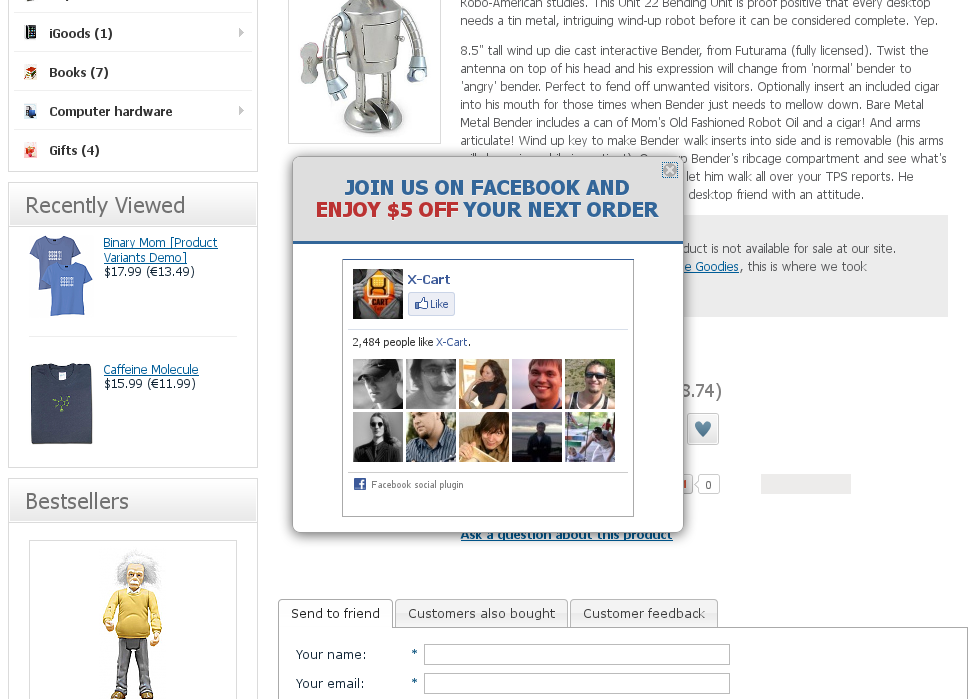
If you have Socialize module enabled in your store and Facebook fan-page URL is defined in the 'Socialize' module settings then you can set up and configure pop-up with social plugin: Like Button for your Facebook Page.
See also Like Box page for more information about Social Plugin and Facebook Pages.
- Select 'Pop-up content is defined by type’ in the ‘Configure pop-up content' section.
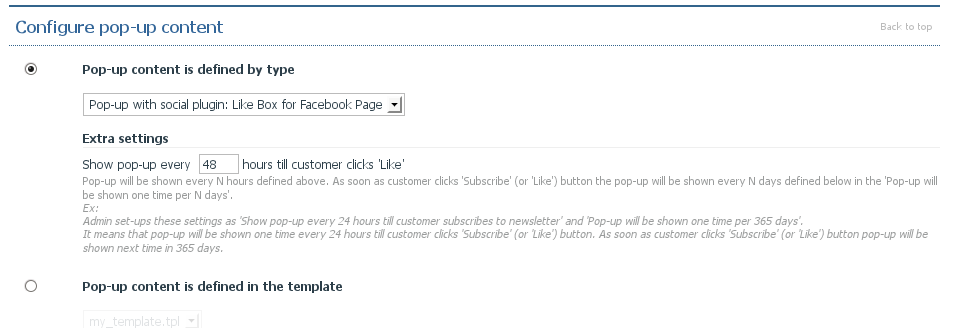
- Select 'Pop-up with social plugin: Like Box for Facebook Page' option.
- Define the following settings:
- Show pop-up every N hours till customer clicks 'Like' button: If you want to show pop-up every 2 days till customer clicks the 'Like' button fill in this setting with value 48.
- Configure appearance and behaviour of the pop-up.
- Click 'Apply changes' to save pop-up settings.
Recommended settings for this type of pop-ups:
- Pop-up will be shown: One time per 30 days
- Pop-up will be shown every 48 hours till customer clicks 'Like'
- Pop-up will not be shown on pages with URL containing: cart.php;login.php;register.php;
- Location: Center
- Width: 320px
- Delay: 3
- Show background: Yes
Configuring 'Notification bar' pop-up
- Open 'Pop-ups management' page in your store's administration back end. This page can be accessed by clicking the Pop-ups management link in the Content menu.
- Click 'Add new'
- Configure title, availability and position of pop-up.
- Select 'Pop-up content is defined by type' in the 'Configure pop-up content' section.
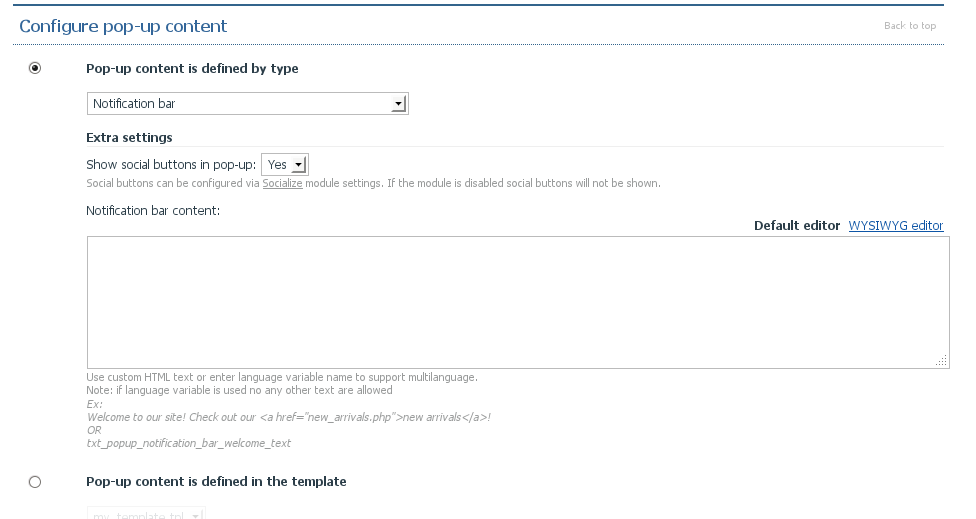
- Select 'Notification bar' option.
- Define the following settings:
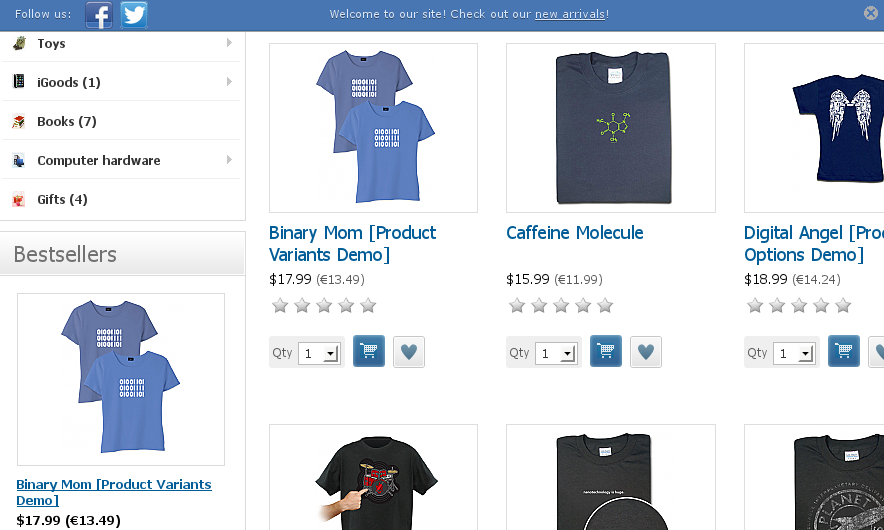
- Show social buttons in pop-up: If you have Socialize module enabled in your store then you can enable this setting
- Notification bar content: Custom HTML text or language variable name. If your store supports one language only then you can enter HTML text in this field. If your store support two or more languages then it's recommended to use language variable to support multilanguage.
- Configure appearance and behaviour of the pop-up.
- Click 'Apply changes' to save pop-up settings.
Recommended settings for this type of pop-ups:
- Popup will be shown: Every time page is loaded
- Pop-up will not be shown on pages with URL containing: cart.php;login.php;register.php;
- Location: Top
- Width: 100%
- Delay: 3
- Show background: No
Configuring 'Bar with cart total and checkout button' pop-up
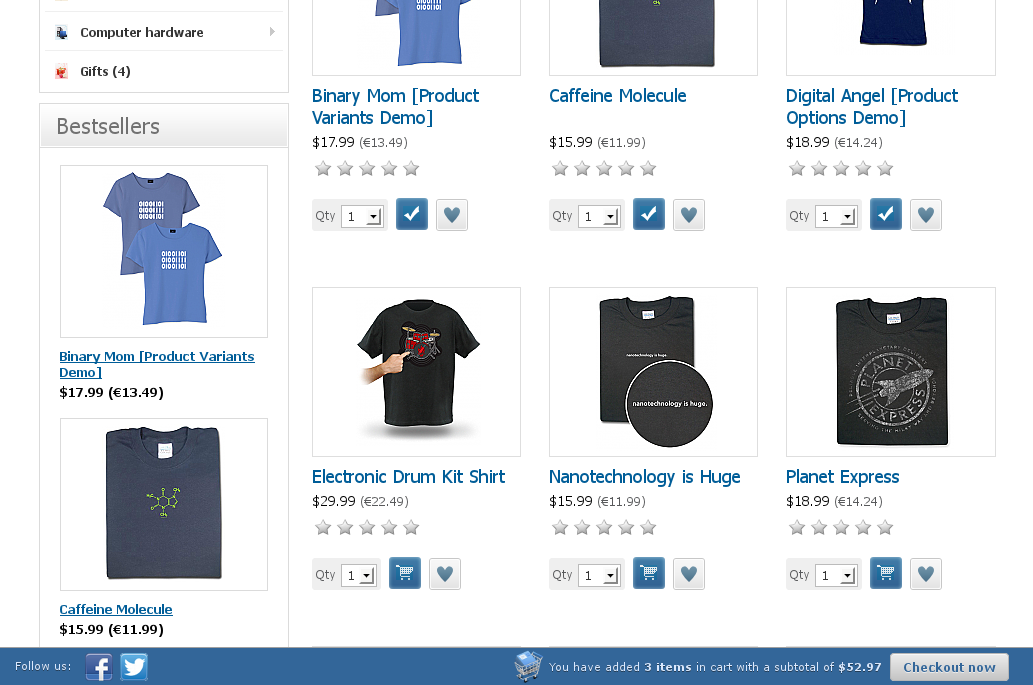
This pop-up will be shown if customer’s cart contains at least one product.
- Open 'Pop-ups management' page in your store's administration back end. This page can be accessed by clicking the Pop-ups management link in the Content menu.
- Click 'Add new'
- Configure title, availability and position of pop-up.
- Select 'Pop-up content is defined by type' in the 'Configure pop-up content' section.
- Select 'Bar with minicart info and checkout button' option.
- Define the following settings:
- Show social buttons in pop-up: If you have Socialize module enabled in your store then you can enable this setting
- Configure appearance and behaviour of the pop-up.
- Click 'Apply changes' to save pop-up settings.
Recommended settings for this type of pop-ups:
- Popup will be shown: Every time page is loaded
- Pop-up will not be shown on pages with URL containing: cart.php;
- Location: Bottom
- Width: 100%
- Delay: 0
- Show background: No
Configuring pop-up opened by click
- Open 'Pop-ups management' page in your store's administration back end. This page can be accessed by clicking the Pop-ups management link in the Content menu.
- Click 'Add new'
- Configure title, availability and position of pop-up.
- Configure pop-up content
- Select 'When customer clicks the link' in the ‘Pop-up will be shown’ selector in the 'Configure behaviour' section.
- Configure appearance of the pop-up.
- Click 'Apply changes' to save pop-up settings.
- To use the pop-up you need to insert specified code to certain template via 'Browse templates' section of your store's Admin area (Administration menu->Edit templates). (See the section X-Cart:Editing Skin Files).
Customizing the email notification messages sent by the module
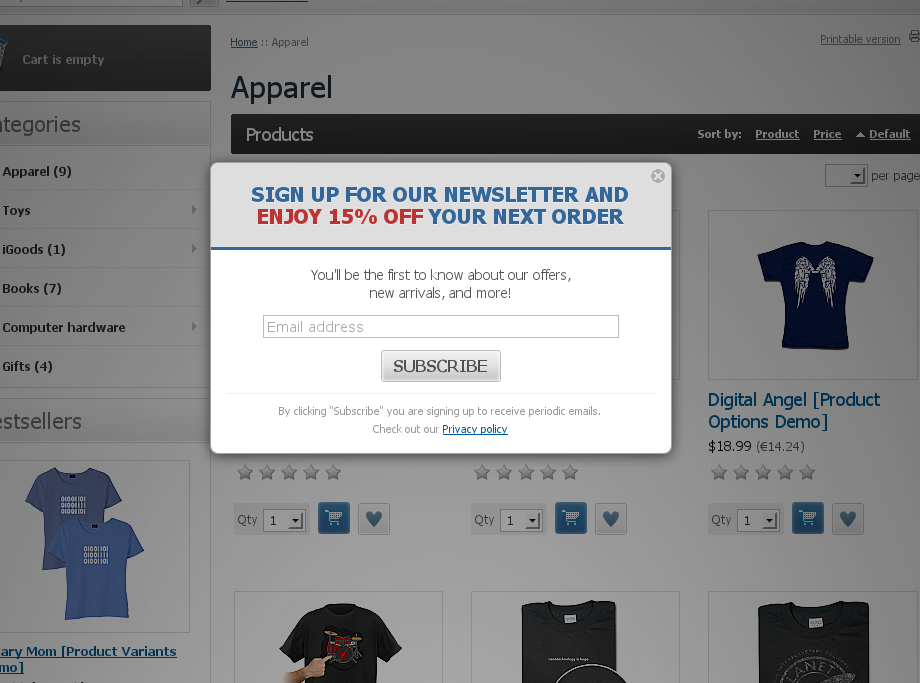
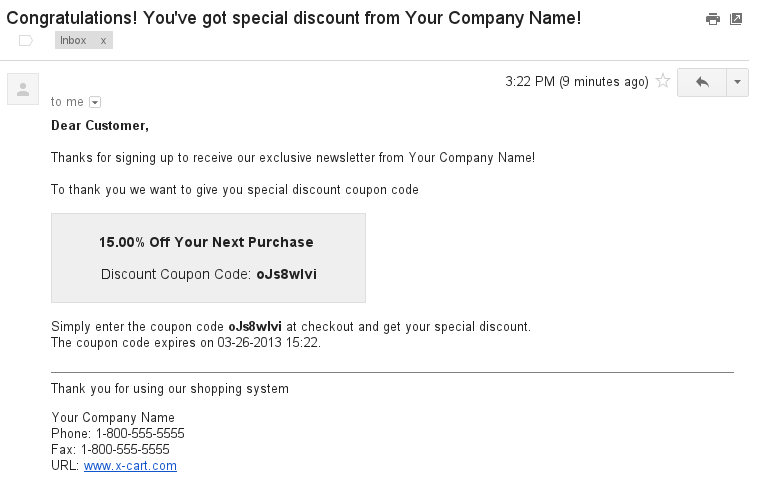
Pop-up with sign up to newsletter form allows you to generate coupon as soon as customer subscribes to newsletter via pop-up and send it to customer’s email.
By default the message sent to your customers looks as follows:
You can change the way these messages appear to your customers by adjusting the following Smarty templates:
- skin/common_files/mail/popup_coupon_to_customer.tpl (plain version of the notification)
- skin/common_files/mail/popup_coupon_to_customer_subj.tpl (header of the notification)
- skin/common_files/mail/html/popup_coupon_to_customer.tpl (HTML version of the notification)
In addition to that you may want to change the following language variables:
- txt_popup_coupon_to_customer_header
- txt_popup_coupon_instructions
- eml_popup_coupon_to_customer_subj
How to patch a 3rd party skin after the installation of the Pop-up Anywhere module
In this instructions we assume that you have already unpacked the Pop-up Anywhere module distribution package to your X-Cart and installed it. By default the Pop-up Anywhere module installer patches only the default X-Cart skins, whereas for any 3rd party skins the required changes are not added even after the installation process has been successfully completed. It means that 3rd party skins need to be patched manually. This process is described below.
Step 1. Locate the patches that you will need to apply to your 3rd party skin in the<xcart-dir>/popup_anywhere.patches/skin/common_files/ folder.
The complete list of patches that need to be applied is as follows:
./customer/content.tpl.patch
./customer/service_js.tpl.patch
./modules/Add_to_cart_popup/product_added.js.patch
./single/home.tpl.patch
./single/menu_box.tpl.patch
Step 2. Apply all these patches to your 3rd party skin as closely as possible.
Extended instruction
Most often if your store contains 3rd party skin pop-ups management functions correctly in administrator area, but no pop-ups in customer area. The following 2 templates in 3rd party skin must be patched manually to enable pop-ups in customer area:
<3rd_party_skin_dir>/common_files/customer/content.tpl
Add the following code to the end of file:
{if $active_modules.Popup_Anywhere}
{include file="modules/Popup_Anywhere/popups.tpl"}
{/if}
<3rd_party_skin_dir>/common_files/customer/service_js.tpl
Add the following code to the end of file:
{if $active_modules.Popup_Anywhere ne ''}
{include file="modules/Popup_Anywhere/popups_settings_js.tpl"}
{/if}
How to upgrade the module
The current version of the installed module is defined in the <xcart-dir>/VERSION.POPUP_ANYWHERE file.
How to upgrade the module from v1.0 to v1.1
If you've already have installed module and want to upgrade from v1.0 to v1.1, please follow the instructions (no re-installation is required):
- Unpack an updated distributive into a temp directory on your system
- Apply 'sql/popup_anywhere_patch_upgrade_v10_v110.sql' from unpacked module distributive via Admin -> Patch/Upgrade Center, 'Apply SQL-patch' section.
- Copy all module's files from temp directory (step 1) to your X-Cart directory to replace old files.
- Clear X-Cart cache in admin area via 'Tools -> Maintance -> Clear templates/X-Cart cache'
