LiteCommerce:AOM
Contents
- 1 Introduction
- 2 Features
- 3 Using the module
- 4 Customer Zone
- 5 Layout Templates
Introduction
LiteCommerce Advanced Order Management (AOM) add-on module provides your online store with a powerful and complete order management tool. The main benefits of employing this highly versatile module include the following:
- The module enables customizing your LiteCommerce system order processing procedures in order to meet your business needs.
- It introduces the means to make miscellaneous modifications to orders placed in your LiteCommerce system, resulting in ability to provide more responsive customer service.
- It provides the means for cloning and splitting existing orders and creating new ones.
- Functionality of the following LiteCommerce add-on components is expanded due to tight integration with AOM add-on module: Product Options, Wholesale Trading, Promotion Tools, Gift Certificates, Advanced Security add-on modules and Real-time Shipping Quotes Package.
Please be aware that the AOM module is just a means for order editing, it is not supposed to bring all the functionality of the customer zone to the admin zone. So, for example, if a special offer is applicable to an order, the store admin will not see it while editing this order using the functionality of the AOM module.
Features
LiteCommerce Advanced Order Management (AOM) add-on module brings an extensive set of improvements to your shopping system. The scope of features varies depending on the list of add-on modules activated on your LiteCommerce-based online store.
Redefining order life cycle
- Customize order statuses to make your store operations more flexible
- Create and handle your business-specific order statuses
Review detailed order histories and gain full control over order life cycle
Managing order details
- Change customer's personal and contact information
- Edit billing/shipping address of an order
- Change delivery method of an order
- Change payment method of an order
- Add new products to an order
- Remove products from an order
- Edit product prices within an order
- Update quantities and options of products ordered
- Apply gift certificates and promotional discounts to an order
- Cancel gift certificates and promotional discounts
- Clone an order
- Split an order
Using the module
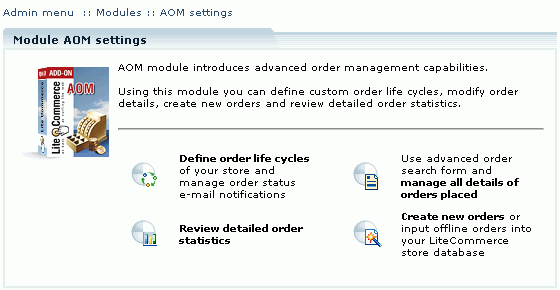
After you have successfully installed the AOM module, click on the 'AOM' module link to enter the advanced order management page (Figure 3).
The page contains links to the 'Order life cycles' configuration page (described in 'Managing Order Life Cycles' section of this manual) and the sections affected by the introduction of AOM module, namely 'Orders', 'Create order' and 'Order statistics'.
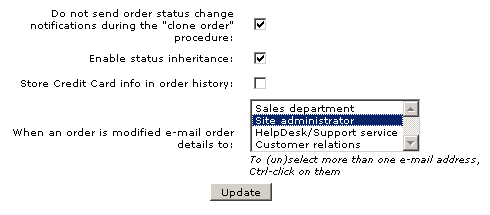
You can also configure the following general options according to your preferences.
Do not send order status change notifications during the "clone order" procedure: select this check box to reduce the number of unnecessary notifications.
Enable status inheritance: select this check box for the child order statuses to inherit all the properties from their parent order statuses. If the option is selected and an order receives one of the child order statuses, the same actions take place as if the order received the parent order status.
Store Credit Card info in order history: leave this check box empty in order not to copy credit card information into the order history.
When an order is modified e-mail order details to: select a department where you want a notification about order modification to be sent.
Understanding LiteCommerce order life cycles
Every customer's order placed through LiteCommerce shopping system goes through a life cycle comprised of several order statues.
When a visitor places an item into his shopping cart, a 'Temporary' order is created to accommodate the contents of his cart. Orders with the "Temporary" (or just 'T') status do not appear in the Administrator zone in the order list. Temporary orders are stored for the default period of 2 hours, and if their status does not change during that period, they expire from the database. Keeping shopping cart contents for a certain period of time allows store customers to return to the store after some time and complete their orders without having to repeat product selection process again.
After a customer selects shipment and payment methods and completes corresponding information, the order acquires an' Incomplete' (or 'I') status. Typically an order remains in this status until a customer presses the 'Submit order' button, at which time an order using an offline payment method is assigned the "Queued" status and the invoice is displayed to the customer. Orders with interactive payment methods selected remain in 'Incomplete' status while being processed by the payment gateway and then acquire an order status according to results received from the payment gateway (either "Processed" for successful transactions or "Failed" for unsuccessful ones).
If your shopping system has AntiFraud add-on module installed and configured to perform order checkups, upon successful payment gateway processing the 'Processed' orders are being analyzed by anti-fraud service. If fraud checkup finds the order to be suspicious, the order is marked for manual processing by changing its status to "Queued".
"Queued" orders are the orders that require attention from the store administrator. These can be the orders using offline shipping methods or the orders found to be suspicious by the fraud protection service. Once the order details are reviewed by the administrator, and the necessary actions are taken, the administrator would typically change the order status to either "Processed" or "Declined".
"Declined" orders are essentially the same as the orders with the "Failed" status. Similarly they do not affect stock amounts, do not take up gift certificates, bonus points or discount coupons and are kept in the order database for book-keeping purposes. While "Failed" status results from payment processors rejecting the payment, "Declined" status can be set by the store administrator for a number of reasons.
"Complete" orders are the orders that have been paid for and shipped out and thus do not require further attention. LiteCommerce system treats such orders just like the "Processed" orders, except for that they do not appear in the list of recent orders available in the 'Orders' section of the 'Management' menu.
"Failed" orders remain in the database for book-keeping records. They do not affect stock amounts (if you have the Inventory Tracking module enabled), neither do they take up gift certificates (introduced by the Gift Certificates module), bonus points or discount coupons (introduced by the Promotion Tools module).
Described above is a standard order life cycle of a LiteCommerce-based online store. You can adjust it according to your business needs by defining and utilizing additional order statuses, which are the subsidiary statuses of the predefined (primary) statuses discussed above.
Defining Order Lifecycles
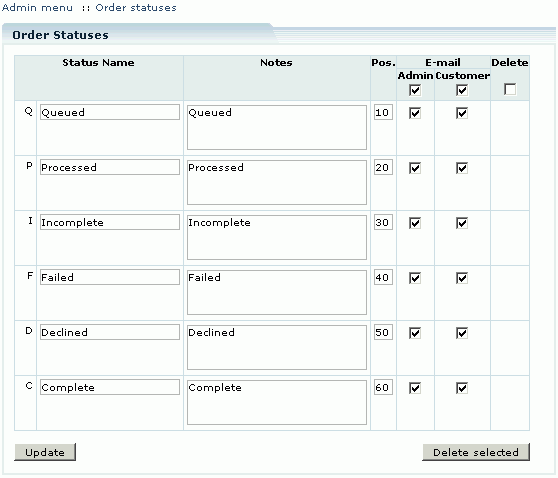
In order to review and customize the list of available order statuses, select 'Order life cycles' section in the 'Settings' menu. This section contains a list of existing order statuses (Figure 4) sorted according to their 'Pos.' values.
You can change a name, corresponding notes and a position value of any available status or sub-status. Make the necessary modifications and click on the 'Update' button to save them.
To add a new subsidiary status, scroll down to the end of the list of statuses and locate the form for new status addition (Figure 5). Type in the status name and corresponding notes, choose a status code from the list of unassigned codes and the parent status, and specify the 'Pos.' number of the status. 'Pos.' values define the order of sub-statuses of a given status - the lower the number, the closer to the top of the list the subsidiary status will appear. Review the details you have provided and click on the 'Add' button to create the sub-status. It will now appear in the list of statues and immediately become available throughout your shopping cart system.
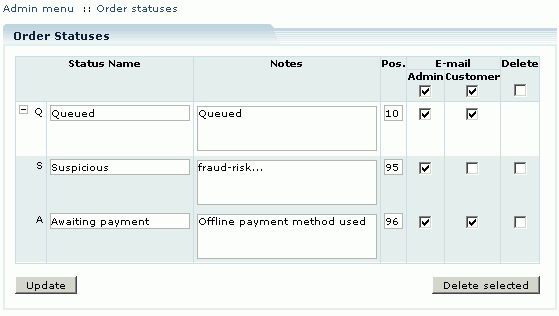
To delete a sub-status or several statuses at once, place checkmarks in the corresponding fields in the right-side column, click on the 'Delete selected' button and confirm the deletion in the confirmation window. Only unused subsidiary statuses can be deleted, primary statuses and sub-statuses in use (marked with a red asterisk) cannot be deleted (Figure 6). To delete all unused subsidiary statuses at once, place a checkmark in the box at the top of the right-side column and click on the 'Delete selected' button.
Configuring order status notifications
The AOM module provides a possibility to setup e-mail notifications of order status changes. You can choose to notify customers and/or the store administrator when order statuses change to a particular value ('Failed', 'Declined', 'Processed', 'Queued' or other, see the section 'Understanding LiteCommerce order life cycles' of this manual for more details).
In the 'Order life cycles' page of the 'Settings' menu locate the order status which requires e-mail notifications and place checkmarks in the corresponding 'E-mail Admin' and/or 'E-mail Customer' fields to enable administrator and customer notifications, respectively; then click on the 'Update' button to save your settings (Figure 6). To disable certain status change notifications, clear the corresponding checkboxes and click on the 'Update' button.
To enable all administrator status change notifications at once, place a checkmark in the box at the top of the 'E-mail Admin' column. For all customer status change notifications at once, use the box at the top of the 'E-mail Customer' column. To disable administrator or customer notifications, remove the checkmarks from the above-mentioned boxes. Click on the 'Update' button to save your settings.
Customizing order status notification messages
Using LiteCommerce template editor you can customize the text of order status notification e-mail messages. Choose the 'Template editor' section from the 'Look & Feel' menu and switch to the 'Advanced templates' tab. Template files pertinent to order status change e-mail notifications are located in the 'E-mail templates' section within the 'modules/AOM/status_changed/' and 'modules/AOM/status_changed_admin/' subfolders.
Please refer to LiteCommerce reference manual for details on how to use LiteCommerce template editor.
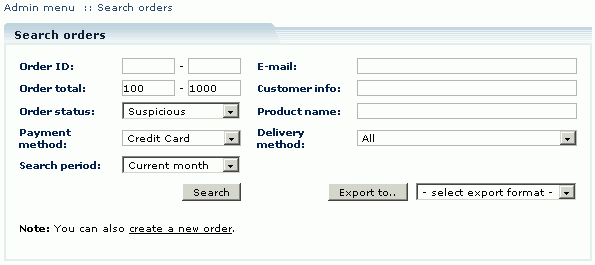
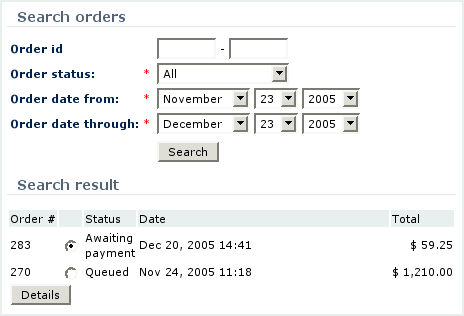
This section of the manual describes the changes to the 'Orders' section in the Administrator Zone introduced by the module. One change you will notice immediately is the modified 'Search orders' form (Figure 7) with an updated 'Search period' parameter and the following search option fields:
- Order ID, which allows you to search for the exact order by order number,
- Order total range, which allows you to narrow your search to orders with order totals within the specified range,
- Order status, which allows you to search for orders in a certain stage of the order life cycle,
- Payment method, which allows you to search through orders which use the specified payment method,
- Search period, which allows you to narrow your search to the desired period, say current month,
- E-mail, which allows you to search for all orders of specific customers, if you know their e-mail addresses,
- Customer info, which allows you to search orders by the customer's name and other details in his profile, including billing and shipping details,
- Product name, which allows you to search orders by the names and SKU's of products ordered, and
- Delivery method, which allows you to search through orders which use the specified delivery method.
This modified search form allows you to search through orders with regular and custom order statuses (custom statuses are defined in the 'Order life cycles' section of the 'Setting' menu, see Section 'Defining order life cycles' for details).
The form also contains a link that takes you to a new order creation page (see Section 'Creating a New Order' for further details on this feature). Once you click on the 'Search' button, the search displays the list of orders matching your search criteria. Click on the order number or the corresponding 'details >>' link to review order details.
Reviewing order details
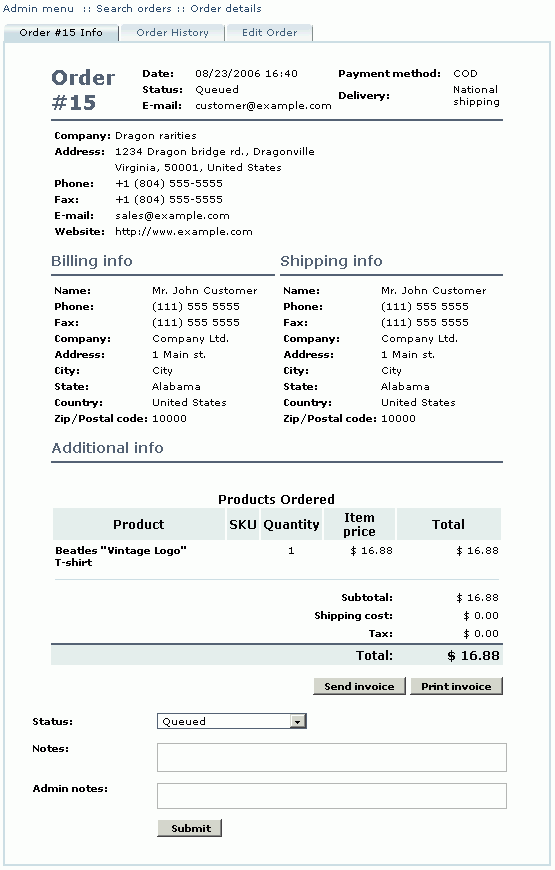
In the list of orders click on the order number or the corresponding 'details >>' link to review order details. With the AOM module installed and activated, 'Order details' page acquires extensive order management functionality. The page consists of three tabs, namely 'Order Info', 'Order History' and 'Edit Order' (with the fourth one, 'Review and Save Order', added if you make modifications to order details). The 'Order Info' tab contains full order details and allows you to change order status and send or print the invoice (Figure 8).
Note that the 'Admin notes' field has been introduced in the 'Order Info' tab for added convenience of order processing. The contents of this field is never revealed to customers.
Changing order details
The 'Edit order' tab enables you to modify every aspect of an order, including billing and shipping information, customer information and the list of products ordered. Order editing is performed in several elementary steps, each represented by a separate page. 'Ordered products', 'Customer information' and 'Order totals' are the basic pages, which allow you to edit the corresponding aspects of an order. Extra 'Gift Certificates' and 'Discount Coupon' pages are added by the Gift Certificates and Promotion Tools modules respectively. When you finish editing an order, you will review the modifications and submit your changes using the 'Review and Save Order' tab.
Editing the list of ordered products
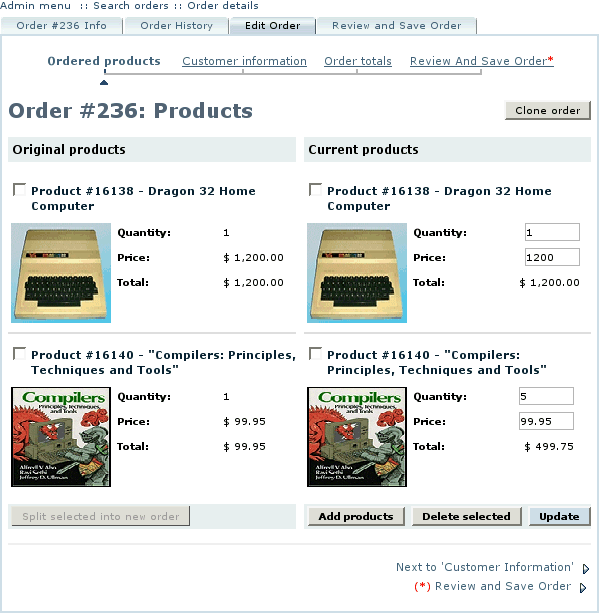
Switch to the 'Ordered products' page (Figure 10) to add or remove products from an order, update product quantities and prices.
To change the product price or the quantity of product items, modify the corresponding fields underneath the product name in the right column and click on the 'Update' button. Please be aware that the AOM module is just a means for order editing, it is not supposed to bring all the functionality of the customer zone to the admin zone. So, for example, if a special offer is applicable to an order, the store admin will not see it while editing this order using the functionality of the AOM module.
To remove a product from an order, place a checkmark next to the product name in the right column and click on the 'Delete selected' button. You can remove several products simultaneously.
To add a product or several products, click on the 'Add products' button. The 'Search product' form comes up in a new window. Find a product or products to add, place checkmarks in the corresponding fields and click on the 'Add' button. The selected products are added to the order in the background.
When you finish adding products, close the browser window with the 'Search product' form.
Splitting an order
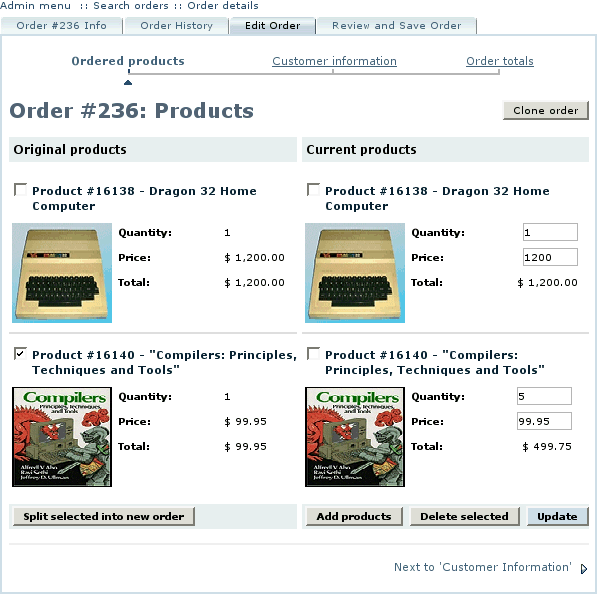
In certain cases it can be useful to split an order into two and process the two orders separately. To split an order, open the ' Ordered products' page, then in the left column place checkmarks against the products you want to split into a separate order and click on the 'Split selected into new order' button (Figure 11). This operation takes effect immediately and cannot be undone.
The newly created order has a unique number and an 'Incomplete' status. It inherits customer information and shipping and payment methods from the parent order. Review new order details and then proceed to the 'Order info' tab to change the order status and process the order.
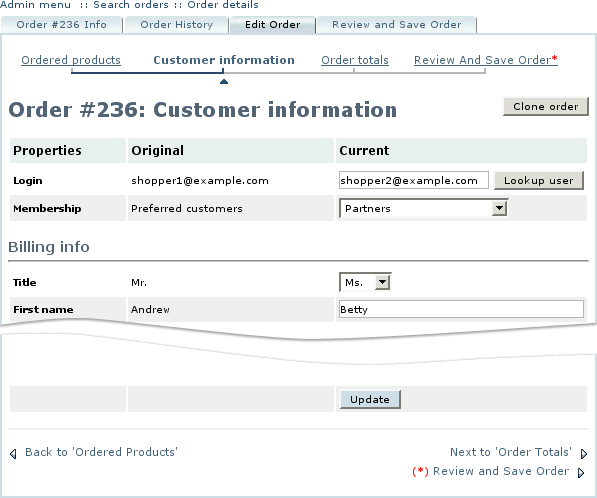
Changing customer information
Open the 'Customer information' page to change the customer's e-mail, membership, billing and/or shipping information (Figure 12). Make the necessary changes in the right-side column and click on the 'Update' button.
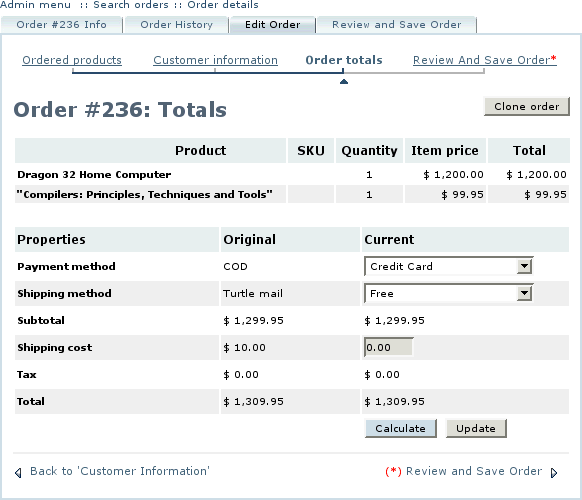
Changing order totals
Open the 'Order totals' page (Figure 13) to change order payment method, shipping method and costs and other relevant information (the list of editable fields depends on the set of add-on modules installed on your LiteCommerce shopping system).
Make the necessary changes in the right-hand column. You can choose a semi-automatic way of completing the information by clicking on the 'Calculate' button to let LiteCommerce system recalculate shipping rates, bonus points and other calculable data for you. Alternatively you can modify all the fields manually and click on the 'Update' button to save your current order settings.
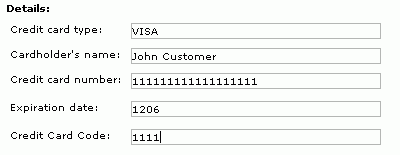
Manual credit card processing
If the customer has chosen offline credit card payment method for the order is is possible to manually edit the credit card details in the 'Order info' tab.
You can enter all the information including credit card type, number, expiration date, code and cardholder's name.
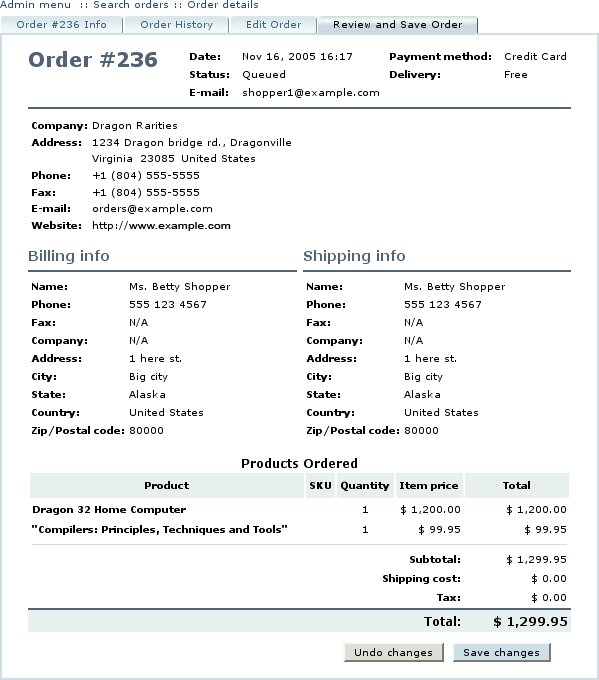
Completing order modifications
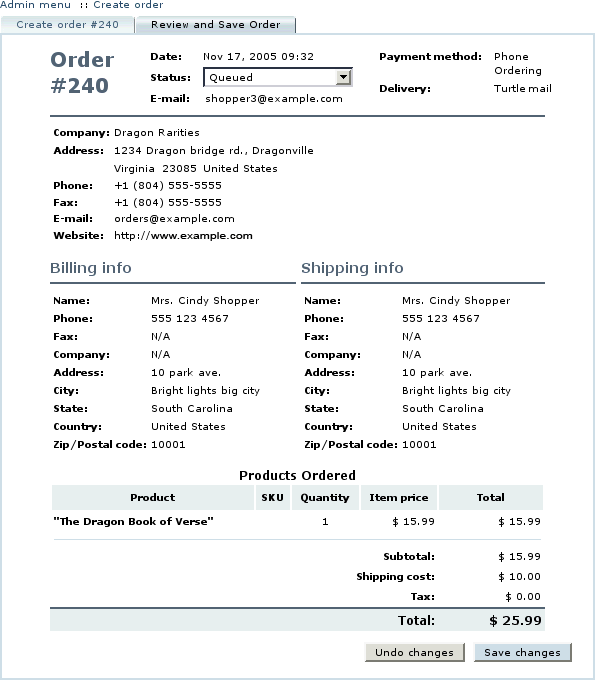
Once you make a modification to an order, 'Review and Save Order' tab appears automatically in the 'Order details' section. When you have finished editing an order, switch to the 'Review and Save Order' tab (Figure 14), review the modified order details and then click on the 'Save changes' button to completely replace the original order details with the modified order details or click on the 'Undo changes' button to discard order modifications.
After you have saved your modifications to the order, the details of those modifications become available in the 'Order history' tab.
Reviewing order history
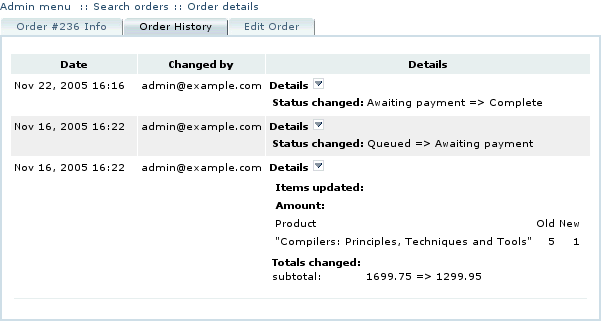
Choose 'Order history' tab to review the history of order modifications (Figure 9). Order history records reflect order status changes, notes updates and all other modifications displayed in reverse chronological order. You can see the date and time the corresponding change took place and the login of the administrator who made it.
Cloning an order
To clone an order, access the order details page, choose the 'Edit order' tab and click on the 'Clone order' button on the right-hand side of the page (Figure 10). A copy of an order is created with a new order number, and you are redirected to the details page of that order. You can then change order information and process the cloned order in a regular way.
Creating a new order
Using AOM add-on you can create new orders and input order details manually. This feature is especially useful if your store accepts telephone ordering or other forms of offline order placement along with online sales, and you would like to use the same powerful LiteCommerce mechanism to manage all kinds of orders at your store. To create an order, select the 'Create order' section from the 'Management' menu. Alternatively you can click on the 'create a new order' link in the 'Search orders' form.
The new order is assigned its own unique order number and you are redirected to the 'Ordered products' page of the order (Figure 15). Complete the required order information in the 'Ordered products', 'Customer information' and 'Order totals' pages.
Next switch to the 'Review and save order' tab where you will specify the initial status of an order and save order details by clicking on the 'Save changes' button (Figure 16).
You can then choose the 'Order info' tab to process the order in a regular way and use the 'Order history' tab (Figure 17) to view order history.
Customer Zone
The features introduced by AOM add-on module have been designed for the purpose of administering your LiteCommerce-based online store and do not affect the Customer Zone of your store.
However, if the store's order statuses have been customized, the 'Search orders' form in the 'Order history' page of the customer's account section allows to specify custom sub-statuses as a search criteria, and the actual order statuses are reflected in the search results (Figure 30).
Layout Templates
When the AOM add-on module is activated, some of the layout templates are patched or not used at all. Instead of the old ones, new templates from the modules/ directory are used. Please pay attention when you are customizing your store design and functionality.
| WERE USED | ARE NOW USED |
| Common templates for Admin and Customer Zones | |
| common/order_status.tpl
common/invoice.tpl common/print_invoice.tpl |
modules/AOM/common/order_status.tpl
modules/AOM/order_info.tpl modules/AOM/order_info.tpl |
| Templates used in Admin Zone only | |
| common/select_status.tpl
order/search_form.tpl order/order.tpl |
modules/AOM/common/select_status.tpl
modules/AOM/search_form.tpl modules/AOM/order.tpl |
