X-Cart:Google Analytics
Contents
What Google Analytics module does
X-Cart's Google Analytics module enables you to use Google Analytics system with your store.
Information on Google Analytics is available at https://www.google.com/analytics/home.
Roles in Google Analytics module management
If you are an X-Cart GOLD or GOLD PLUS administrator/provider or an X-Cart PLATINUM or PRO administrator:
- You can enable/disable the module Google Analytics and adjust its configuration settings (See Enabling and Configuring 'Google Analytics').
Enabling and Configuring 'Google Analytics'
Google Analytics is available as a built-in module in all X-Cart editions. It does not require installation and can be enabled in the Modules section of X-Cart Admin area.
Before you begin using Google Analytics with X-Cart:
1. Sign in to your Google account to access Google Analytics. If you haven't yet got a Google account, sign up for one at http://www.google.com/analytics/home/.
2. Sign in to Google Analytics and set up an account:
a) Provide general information: Website's URL (URL of the site you wish to track), Account name (a name as it should appear in your Google Analytics reports), Time zone country or territory and Time zone.
b) Provide your contact information: Last name, First name, Phone number, Country or territory.
c) Accept the User Agreement.
You will then be provided with a code segment. In this segment, you will find your account number (find a line:
var pageTracker = _gat._getTracker("UA-xxxxxx-x");
The value replaced by "UA-xxxxxxx-y" in the example is your account number). You will need to enter this number on the General settings/Modules options->Google Analytics options page of your store.
3. If you wish to use E-Commerce Analysis, let Google Analytics know that your site is an e-Commerce website. To do so, edit the profile settings of your store's website in your Google Analytics account as follows:
- a) In the 'Website profiles' section, click the 'Edit' link opposite your store website URL. The 'Profile Settings' page for the selected website opens.
- b) On the 'Profile Settings', click the 'Edit' link at the top of the 'Main Website Profile Information' box.
- c) Set the option 'E-Commerce Website' to Yes.
- d) Click the Save Changes button.
After you have completed the above steps, you can go to the Admin area of your store to enable and configure Google Analytics module:
1. Go to the 'Modules' section of your store (Administration menu->Modules) and enable Google Analytics module.
- When the module is enabled, a section titled Google Analytics options appears in General settings/Modules options.
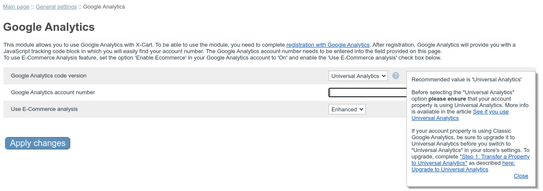
2. Adjust the module settings via General settings/Modules options->Google Analytics options.
- a) Google Analytics account number: Copy your account number from the code segment provided to you as a result of Google Analytics account signup and paste it into this field.
- b) Use E-Commerce Analysis: Select this check box to be able to generate e-commerce reports. For more information on this read on Ecommerce Tracking at Google Analytics website.
- c) Click the Save button to save the changes.
