X-Cart:Adding Products
X-Cart provides three methods of adding products:
Contents
Adding products manually
In X-Cart, products can be created only inside categories. To create products, you must have at least one category in your store.
To create a product:
1. Go to the 'Products Management->Add product' section of your store.
- If you are an X-Cart GOLD administrator/provider or an X-Cart PRO administrator: Go to the 'Products Management' section (Catalog menu->Products), then click on the link Add product in the 'Products Management' section menu.
- If you are an X-Cart PRO provider: Click on the link Add new product in the Products menu.
- In the 'Products Management->Add product' section, a dialog box titled 'Product details' is displayed.
2. In the ‘Product details’ dialog box, define the details of the new product (See the section #Defining Product Details).
3. Click the Save button at the bottom of the ‘Product details’ dialog box.
- When you click on Save, the product is created. A message is displayed confirming that the product has been created successfully.
- After a product has been created, you can define other product information for it (See the section #Defining Other Product Information).
Defining Product Details
When you create a new product or modify an existing product, the details of the product are defined in the ‘Product details’ dialog box. This dialog box provides four sections: 'Product thumbnail', 'Product owner', 'Classification' and 'Details'. The instructions below explain how to complete each of these sections. After you provide all the necessary product details in all the sections, be sure to click the Save button at the bottom of the ‘Product details’ dialog box to save the changes.
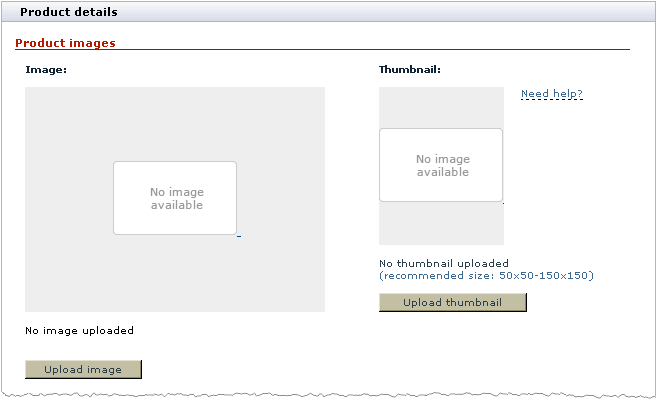
Product images
This section allows you to add the images that will represent the product on the storefront: a product image and a product thumbnail. A product thumbnail is an image displayed next to the product title and short description in the Products list. A product image is an image displayed next to the product title and detailed description on the Product details page.
To add a product image:
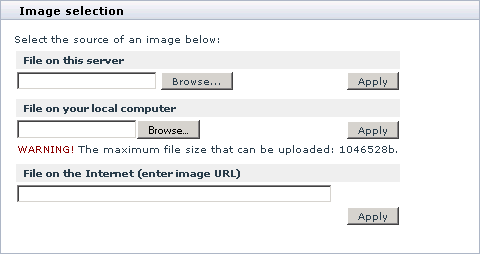
1. Click the Upload image button below the 'Image' area. A dialog box titled 'Image selection' appears.
2. Use the 'Image selection' dialog box to select the desired image:
- If the file is located on the server, click the Browse... button to select the image filename and click the Apply button.
- If the file is located on your local computer, click the Browse... button to select the image filename and click the Apply button.
- If the image is located on the Internet, enter the image URL and click the Apply button.
After you click on Apply, the selected image appears in the 'Image' area of the ‘Product details’ dialog box. The new image is marked 'modified' to show that it has not been saved yet. After you finish completing the fields of the 'Product details' dialog box and click the Save button, the image will be saved.
Before the uploaded image has been saved with the Save button, you can reset it to the image used previously with the Reset image button (This button appears below the 'Image' area after you upload an image to be used as the product's product image).
After you save the image, the resetting operation becomes unavailable, but you can upload a different product image instead of the currently saved one using the Change image button.
To remove a previously saved image, use the Delete image button.
A product thumbnail can be uploaded separately or generated from the product image.
To add a product thumbnail:
- Click the Upload thumbnail button below the 'Thumbnail' area. A dialog box titled 'Image selection' appears.
- Use the 'Image selection' dialog box to select the desired image:
- If the file is located on the server or on your local computer, use the appropriate Browse... button to select the image filename and click the Apply button.
- If the image is located on the Internet, enter the image URL and click the Apply button.
After you click on Apply, the selected image appears in the 'Thumbnail' area of the ‘Product details’ dialog box. The new image is marked 'modified' to show that it has not been saved yet. After you finish completing the fields of the 'Product details' dialog box and click the Save button, the image will be saved.
To generate a product thumbnail from a product image:
- Add a product image as described above.
- Click the Generate thumbnail button below the 'Thumbnail' area.
After you click on Generate thumbnail, the thumbnail image is generated automatically. The new image is marked 'modified' to show that it has not been saved yet. After you finish completing the fields of the 'Product details' dialog box and click the Save button, the image will be saved.
Before the uploaded thumbnail image has been saved with the Save button, you can reset it to the image used previously with the Reset thumbnail button (This button appears below the 'Thumbnail' area after you upload an image to be used as the product's thumbnail).
After you save the thumbnail image, the resetting operation becomes unavailable, but you can upload a different thumbnail image instead of the currently saved one using the Change thumbnail button.
To remove a previously saved thumbnail image, use the Delete thumbnail button.
You may choose not add a thumbnail image for the product; in this case, the default 'No image available' image will be displayed in the place of the product's thumbnail.
You may choose not to add a product image for the product and just add a product thumbnail; in this case, the product's thumbnail image will be displayed in the place of the product image.
Product owner
This section of the ‘Product details’ dialog box is supposed to contain information about the product owner (the provider who created the product, or the provider on whose behalf the store administrator created the product).
The contents of this section is defined automatically in X-Cart GOLD and in the Provider area of X-Cart PRO. An X-Cart PRO administrator is supposed to specify the product owner manually by selecting a provider's name from the 'Provider' drop-down box.
Classification
This section allows you to define a category (or several categories) in which the product must be located and to set the product's availability status.
Product's location
- Specify the product’s main category by selecting a category from the 'Main category' field.
- (Optional) If, in addition to the main category, you need the product to be displayed in some other category or categories, specify these categories by selecting them from the ‘Additional categories’ list (To select a single category, click on its name with your mouse; to select multiple categories, mouse-click on their names holding down the Ctrl key).
To set the product's availability status, select Available for sale, Hidden but available or Disabled from the ‘Availability’ box.
- Available for sale means that customers will be able to find the product by browsing the catalog or by using product search.
- Hidden, but available for sale means that the product will not be included into the product catalog. No person will be able to find it unless he or she knows an exact URL address of the product details page of this product.
This feature allows you to limit access of customers to certain products without having to set up membership levels. After you finish defining the details of a ‘hidden’ product and click the Save button, the URL address of the product's Product details page will appear below the 'Availability' box. You can use this URL to give your privileged customers direct access to the product.
- Disabled means that the product will not be displayed to customers (This status may be useful if, for some reason, you do not want to sell the product for a while).
Details
This section allows you to provide essential product details. As this section is pretty big, we'll divide it into several portions for convenience.
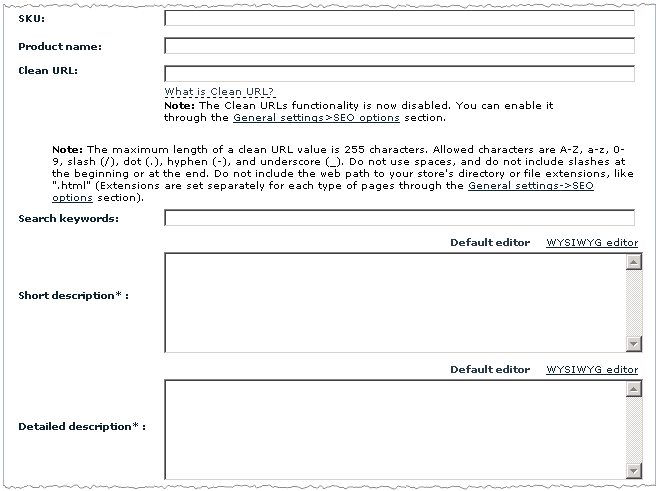
Portion 1:
- SKU: Stock Keeping Unit; the unique identification code for your product. For your convenience, X-Cart generates a unique SKU for each new product you add, so it is quite safe to leave the value of the ‘SKU’ field as is. However, if you wish to use your own system of product identification, simply remove the value generated by X-Cart and type in your own identification code for this product). SKU must not be longer than 32 characters.
- Product name: The title by which you and your customers will be able to identify the product.
- Clean URL: The clean URL value for this product. Instructions for adjusting this field are available in the section Defining Clean URL Values.
- Search keywords: The words or phrases by which you and your customers will be able to find the product.
- Short description: The short description of the product (will appear in the ‘Products list’).
- Detailed description: The detailed description of the product (will appear on the product's ‘Product details’ page).
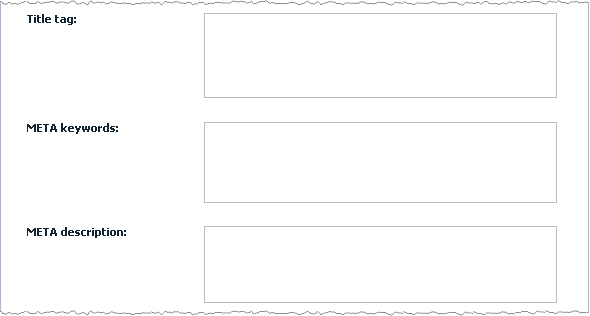
Portion 2:
- Title tag: The title to be used in the title bar of this product details page.
- META keywords: The keywords to be used in the keywords meta tag on the page of this product.
- META description: The description to be used in the description meta tag on the page of this product.
For more information on using the description and keywords meta tags, see the section Configuring Page Titles and Meta Tags.
Portion 3:
- Price: The price that will be used as the base price for this product. The price must be specified in the store's primary currency.
- List price: The price that will be used as the product's list price. List price is a promotion price which may be displayed on the storefront next to the actual price of the product. List price represents an average price of the product on the market, and the difference between the two prices is supposed to convince a prospective customer that ordering the product from your store is more economical.
If the price specified in the 'List price' field is higher than the base price of the product, a note: 'Market price: X' will be displayed next to the real price of the product on the storefront. There will also be a note showing how many percent less a customer will have to pay if he or she buys the product at your store, for example 'Our price: Y, save 10%'.
If you do not want to use list prices, simply leave the value of the ‘List price’ field set to 0.00.
Portion 4:
- Quantity in stock (items): Quantity of product pieces available for sale. As your customers order the product, X-Cart’s inventory tracking system will track the number of pieces of this product remaining in stock and automatically update the value in this field. This system will ensure that your customers will not be able to order more product pieces than you actually have.
- Low limit in stock: The number of product pieces remaining in stock that you wish to be regarded as insufficient. As soon as the product’s quantity in stock reaches this limit, X-Cart’s inventory tracking system will start sending email notifications to the store orders department signalling that your stock needs to be replentished. A notification will be sent every time someone orders the product.
- Minimum order quantity: The minimum number of items of the product that a customer will be allowed to order at a time. The value specified in this field will be entered as the smallest value in the quantity selectbox of the product on the storefront; a note 'you must order at least N items' will be added below the product description.
Portion 5:
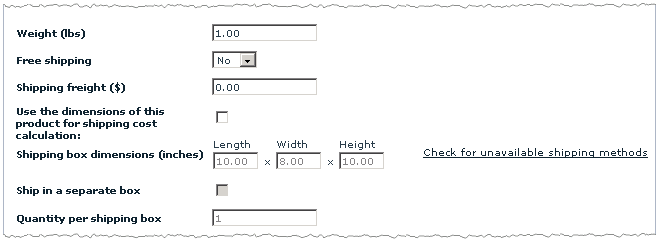
- Weight: The weight of one piece of this product (must be specified in the units of weight supported by your store).
- Free shipping: This option allows you to specify whether shipping for this product must be free. Select No if you want to charge purchasers of this product for shipping.
- Shipping freight: The fee that a purchaser of the product will be supposed to pay for any expenses incurred by the store in connection with having the product insured/packaged/delivered to a location where it will be picked up by a shipping service/loaded/etc. When defined, shipping freight is included in the product's shipping cost, so the customers do not see it as a separate fee.
- Use the dimensions of this product for shipping cost calculation: This option allows you to specify whether you wish the dimensions of this product to be used for shipping rates calculation. If this option is enabled, calculation of shipping rates for orders containing this product will be performed with the consideration of the product's dimensions (not just the product's weight). If this option is disabled, the product will be considered a small item (an item whose dimensions are so small that it can fit into any shipping package together with other items without affecting the overall cost of shipping for the package).
- Shipping box dimensions: The length, width and height of the product, or the length, width and height of the container in which this product will be placed into a shipping package. The dimensions specified here will be used by the packaging algorithm to fit the product into a shipping package. They will also be used by X-Cart to define the list of shipping methods available for the contents of a shopping cart if the cart contains this product (X-Cart will check whether the product's shipping box dimensions meet the package size limitations of each real-time shipping method used by the store, and if it finds that the product's shipping box dimensions exceed the limitations for a specific shipping method, it will make the respective shipping method unavailable for selection by the customer. After you specify the shipping box dimensions for the product and save the product's details by clicking the Save button at the bottom of the ‘Product details’ dialog box, you will be able to view the list of shipping methods that will be unavailable for orders containing this product using the link Check for unavailable shipping methods displayed next to the 'Shipping box dimensions' field).
- Ship in a separate box: This option allows you to specify whether you wish this product to be shipped separately from any other products ordered in the same order. The product for which this option is enabled, is shipped in a separate box even if other items in the order are considered small items and are supposed to be included into existing packages.
- Quantity per shipping box: The number of pieces of the product that fit into one shipping box (the box whose dimensions you specified above in the 'Shipping box dimensions' field). Typically, this value must be set to "1".
Portion 6:
- Membership: The membership levels to which you wish the product to be available. All means that the product will be available to all visitors, including non-members and users who are not logged in. Selecting a specific membership level makes the product available only to the members of this level; non-members and users of other membership levels will not be able to see this product. (To select a single membership level, simply click on its name with your mouse; to select multiple levels, click on their names holding down the Ctrl key).
Portion 7:
- Tax exempt: This option allows you to specify whether any taxes must be applied to this product. Select Yes if you want this product to be tax exempt.
- Apply taxes: The taxes that you wish to be applied to the product. To select multiple taxes, press and hold down the Ctrl key while clicking your mouse.
Portion 8:
- Apply global discounts: This option allows you to specify whether global discounts must be applied to this product. Select the check box to apply global discounts.
Defining Other Information
Besides product details, you can provide the following information about your products:
- international product descriptions (this feature is part of X-Cart's basic functionality);
- detailed images (this feature is enabled by X-Cart's Detailed Product Images module);
- product options/variants (this feature is enabled by X-Cart's Product Options module);
- wholesale prices (this feature is enabled by X-Cart's Wholesale Trading module);
- customer reviews (this feature is enabled by X-Cart's Customer Reviews module);
- upselling links (this feature is enabled by X-Cart's Upsellling Products module);
- subscriptions (this feature is enabled by X-Cart's Subscriptions module).
Defining international product descriptions
If your store supports more than one languages, you must provide names and descriptions for your products in all the languages supported by your store. A combination of the name, search keywords, short description and detailed description of a product in any language other than default is called the product's international description.
To add an international description for a product:
1. Find the product for which you wish to add an international description and open it for editing.
2. Click on the link 'International descriptions' in the section menu. This displays a dialog box titled 'International descriptions'.
3. In the 'International descriptions' dialog box, switch the language selector to the language in which you wish to add an international description. The language of the interface changes to the selected language.
4. Edit the details of the product translating them into the selected language.
5. Click the Apply button.
When you click on Apply, the international description is added. A message is displayed confirming that the international description has been updated successfully.
To edit an international product description:
1. Find the product whose international description you wish to edit and open it for editing.
2. To open the 'International descriptions' dialog box, use the link 'International descriptions' in the section menu.
3. In the 'International descriptions' dialog box, switch the language selector to the language of the international description that you wish to edit. The language of the interface changes to the selected language.
4. Edit the name and/or description of the product.
5. Click the Apply button.
When you click on Apply, the international description is updated. A message is displayed confirming that the international description has been updated successfully.
To delete an international product description:
1. Find the product whose international description you wish to delete and open it for editing.
2. To open the 'International descriptions' dialog box, use the link 'International descriptions' in the section menu.
3. In the 'International descriptions' dialog box, switch the language selector to the language of the international description that you wish to delete. The language of the interface changes to the selected language.
4. Click the Delete button.
When you click on Delete, the international description is deleted. A message is displayed confirming that the international description has been deleted successfully.
