Difference between revisions of "LiteCommerce:Changing Skin"
(Created page with 'LiteCommerce software distribution includes four stylish design and layout skins. When installing your LiteCommerce software you were requested to choose one skin for your store …') |
m |
||
| (One intermediate revision by one other user not shown) | |||
| Line 1: | Line 1: | ||
| − | LiteCommerce software distribution includes four stylish design and layout skins. When installing your LiteCommerce software you were requested to choose one skin for your store (see [ | + | {{LC2_disclaimer}}<br /><br /> |
| + | LiteCommerce software distribution includes four stylish design and layout skins. When installing your LiteCommerce software you were requested to choose one skin for your store (see [[LiteCommerce:Running Web Installation wizard]] page and Figure 1-18). Should you decide to apply a different skin, you can always do so in the Administrator Zone or by using the 'install.php' script. | ||
{{Note1|Note: all the modifications that you have made to your store design will be lost after you change the skin. }} | {{Note1|Note: all the modifications that you have made to your store design will be lost after you change the skin. }} | ||
| Line 8: | Line 9: | ||
2. Select a different layout skin from the drop-down list of predefined skins (Figure 3-72). Four predefined layouts are available: two 2-column layouts and two 3-column layouts. | 2. Select a different layout skin from the drop-down list of predefined skins (Figure 3-72). Four predefined layouts are available: two 2-column layouts and two 3-column layouts. | ||
| − | |||
<div align="center">[[Image:lc22-3-72.gif|600px|Figure 3-72: Changing design skin of your store]] | <div align="center">[[Image:lc22-3-72.gif|600px|Figure 3-72: Changing design skin of your store]] | ||
| Line 18: | Line 18: | ||
4. The skin installation progress screen will appear (Figure 3-73). Once the installation is complete, click on the ''''Return to admin zone'''' link. | 4. The skin installation progress screen will appear (Figure 3-73). Once the installation is complete, click on the ''''Return to admin zone'''' link. | ||
| − | |||
<div align="center">[[Image:lc22-3-73.gif|600px|Figure 3-73: Design and layout customization progress screen]] | <div align="center">[[Image:lc22-3-73.gif|600px|Figure 3-73: Design and layout customization progress screen]] | ||
| Line 37: | Line 36: | ||
* place a checkmark in a box next to ''''I accept the license agreement'''' to acknowledge acceptance of its terms and conditions, and then | * place a checkmark in a box next to ''''I accept the license agreement'''' to acknowledge acceptance of its terms and conditions, and then | ||
* click on the ''''Next >'''' button to proceed to the next screen. | * click on the ''''Next >'''' button to proceed to the next screen. | ||
| − | |||
<div align="center">[[Image:lc22-3-74.gif|604px|Figure 3-74: Software License Agreement screen]] | <div align="center">[[Image:lc22-3-74.gif|604px|Figure 3-74: Software License Agreement screen]] | ||
| Line 45: | Line 43: | ||
4. At the next step you are requested to choose the design layout for your store (Figure 3-75). Click on the ''''Next >'''' button to proceed with the installation. | 4. At the next step you are requested to choose the design layout for your store (Figure 3-75). Click on the ''''Next >'''' button to proceed with the installation. | ||
| − | |||
<div align="center">[[Image:lc22-1-18.gif|604px|Figure 3-75: Specifying the store layout]] | <div align="center">[[Image:lc22-1-18.gif|604px|Figure 3-75: Specifying the store layout]] | ||
| Line 60: | Line 57: | ||
6. Once the installation of the skin is complete, the Installation Wizard displays the ''''Installation complete'''' screen (Figure 3-77). For security purposes, the 'install.php' script is then renamed into a PHP file which has a filename comprised of 32 hexadecimal figures (1-9 and a-f) followed by '.php'. | 6. Once the installation of the skin is complete, the Installation Wizard displays the ''''Installation complete'''' screen (Figure 3-77). For security purposes, the 'install.php' script is then renamed into a PHP file which has a filename comprised of 32 hexadecimal figures (1-9 and a-f) followed by '.php'. | ||
| − | |||
<div align="center">[[Image:lc22-1-22.gif|604px|Figure 3-77:]] | <div align="center">[[Image:lc22-1-22.gif|604px|Figure 3-77:]] | ||
Latest revision as of 12:26, 31 May 2012
|
LiteCommerce software distribution includes four stylish design and layout skins. When installing your LiteCommerce software you were requested to choose one skin for your store (see LiteCommerce:Running Web Installation wizard page and Figure 1-18). Should you decide to apply a different skin, you can always do so in the Administrator Zone or by using the 'install.php' script.
To change the skin in the Administrator Zone:
1. Proceed to the 'Change current skin' section of the 'Look&Feel' menu.
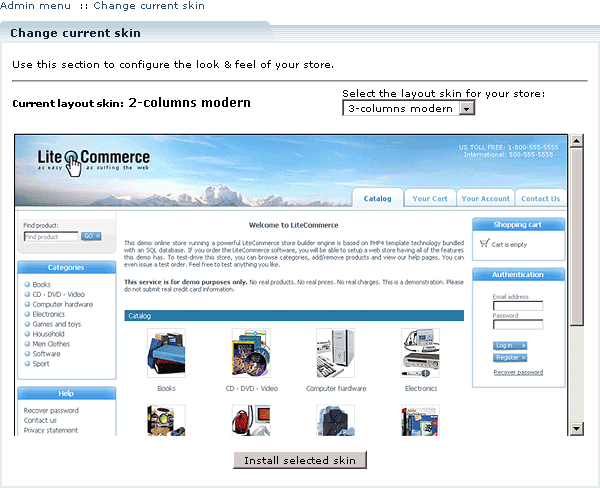
2. Select a different layout skin from the drop-down list of predefined skins (Figure 3-72). Four predefined layouts are available: two 2-column layouts and two 3-column layouts.
3. Click on the 'Install selected skin' button to apply your changes.
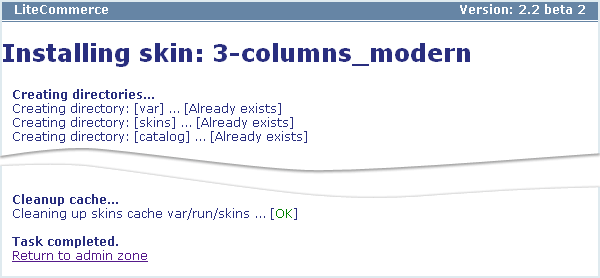
4. The skin installation progress screen will appear (Figure 3-73). Once the installation is complete, click on the 'Return to admin zone' link.
To change the skin using the 'install.php' script:
1. In your LiteCommerce installation directory locate a PHP file, which has a filename comprised of 32 hexadecimal figures (1-9 and a-f) followed by '.php', and rename it into 'install.php'.
2. Launch your web browser and type the URL of LiteCommerce Installation Wizard in the 'Location' field of the browser: http://www.example.com/litecommerce_directory/install.php
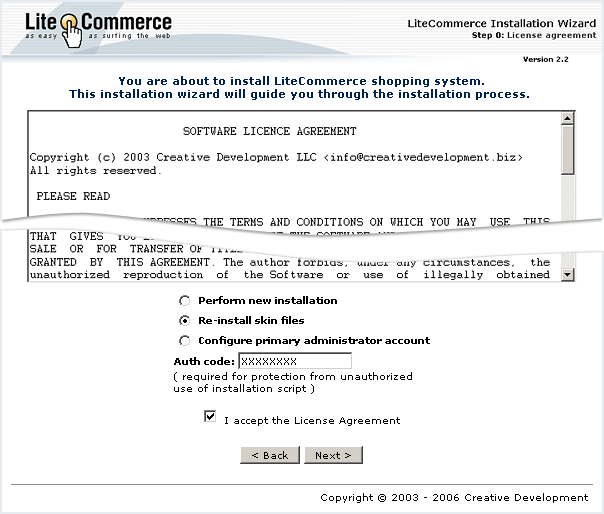
3. In the software license agreement screen (Figure 3-74):
- select the 'Re-install skin files' option,
- specify the authentication code in the corresponding field,
- place a checkmark in a box next to 'I accept the license agreement' to acknowledge acceptance of its terms and conditions, and then
- click on the 'Next >' button to proceed to the next screen.
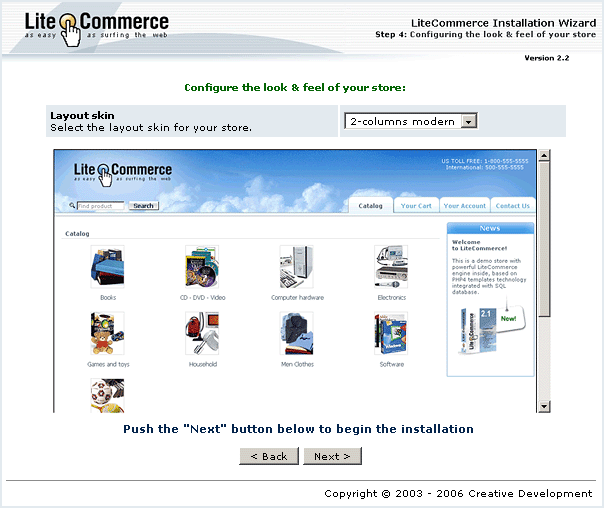
4. At the next step you are requested to choose the design layout for your store (Figure 3-75). Click on the 'Next >' button to proceed with the installation.
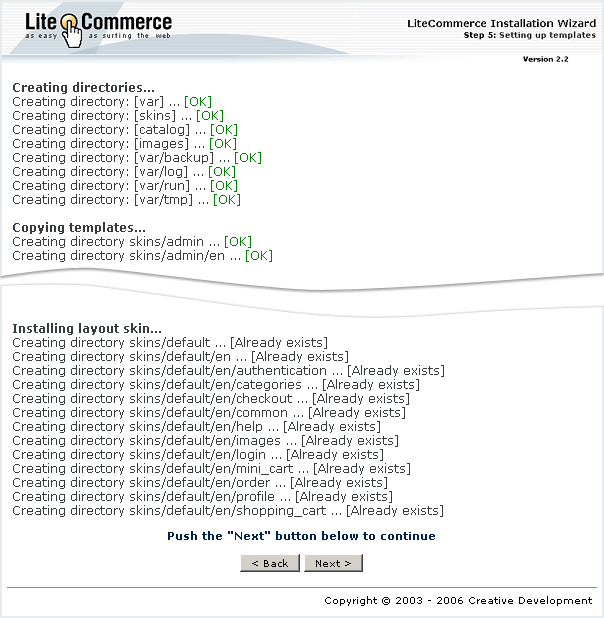
5. After you have specified the desired layout, the corresponding template files are copied to the destination location. Review the details (Figure 3-76) and click on the 'Next >' button.
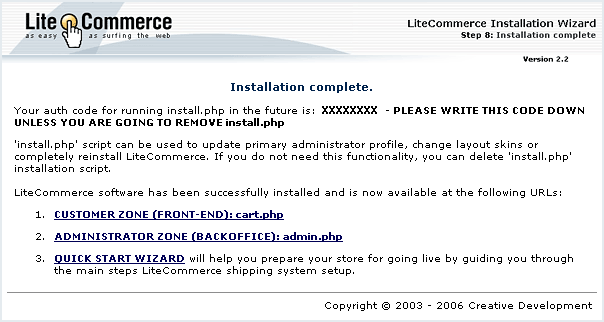
6. Once the installation of the skin is complete, the Installation Wizard displays the 'Installation complete' screen (Figure 3-77). For security purposes, the 'install.php' script is then renamed into a PHP file which has a filename comprised of 32 hexadecimal figures (1-9 and a-f) followed by '.php'.
